
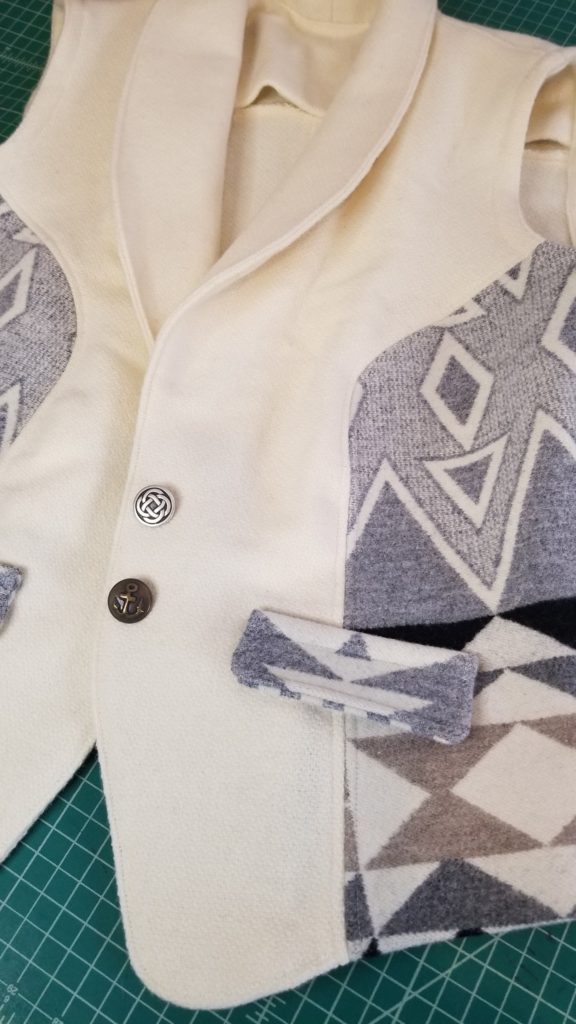
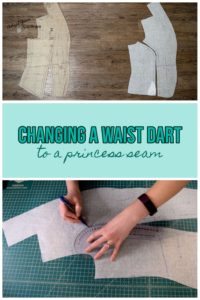
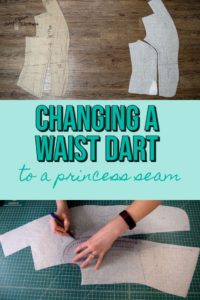
I recently started making a vest for my mom – who is a HUGE fan of vests… and we picked out a pattern, but the pattern had a large waist dart that we wanted to convert to a princess seam. This is because we wanted to be able to use a different fabric on the outside edges of the front! I had some beautiful Pendleton wool, but didn’t have enough for the whole vest, so we wanted to use it as an accent with a princess seam.
So in this tutorial, I show you how I changed the waist dart in the bodice into a princess seam! In the video, I even take you along through a couple test runs of the pattern and show you how I update my pattern after the first fitting.
Alright, so the video version of the tutorial is below, but if you want the written version just scroll on past the video!
But first, here’s what you’ll need!
What you need
*This list contains affiliate links for your DIYing convenience, so I receive a small commission if you buy something through my links. This really helps to support my site so I can keep creating DIY tutorials to help you create your dream wardrobe.
- bodice pattern you want to alter
- pattern paper
- pen or marker
- ruler
- french curve ruler
- scissors or rotary cutter
Video Tutorial
Written Tutorial
Alright for those of you who prefer to read the tutorial – on to the written version!
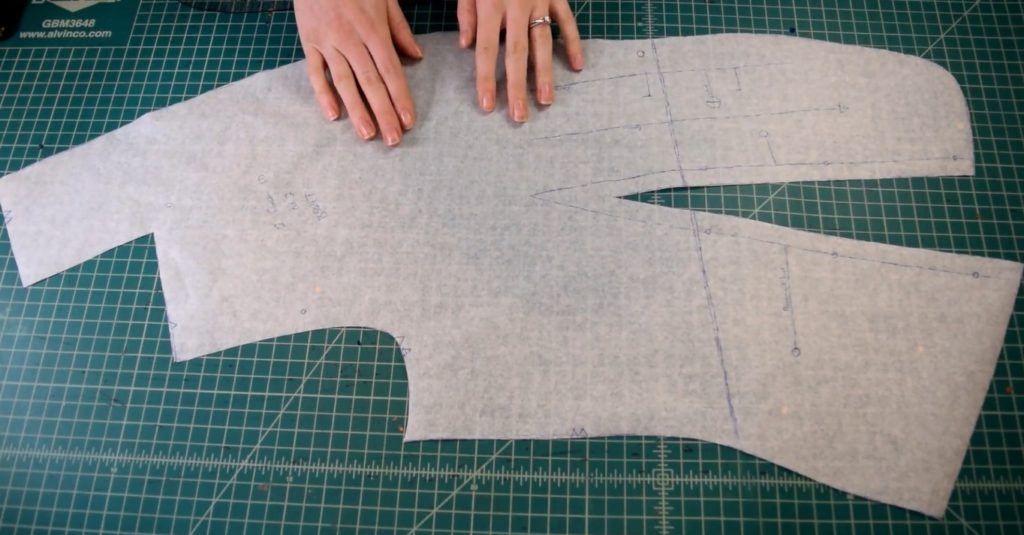
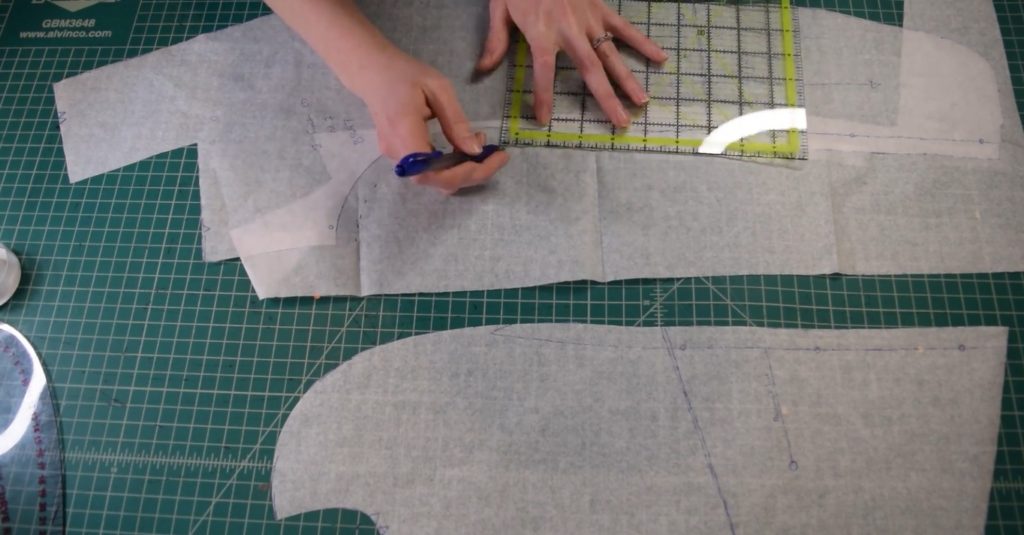
So first I traced off the vest front pattern piece that I want to alter. I didn’t want to cut up the original pattern piece in case I messed up, so tracing it off gave me another copy to work with and make my changes. I also want to mention – this piece may look a bit odd in shape – that’s because the collar is built into the piece, which is what that piece that sticks up above the shoulder seam is. But we don’t need to worry about that for this process.
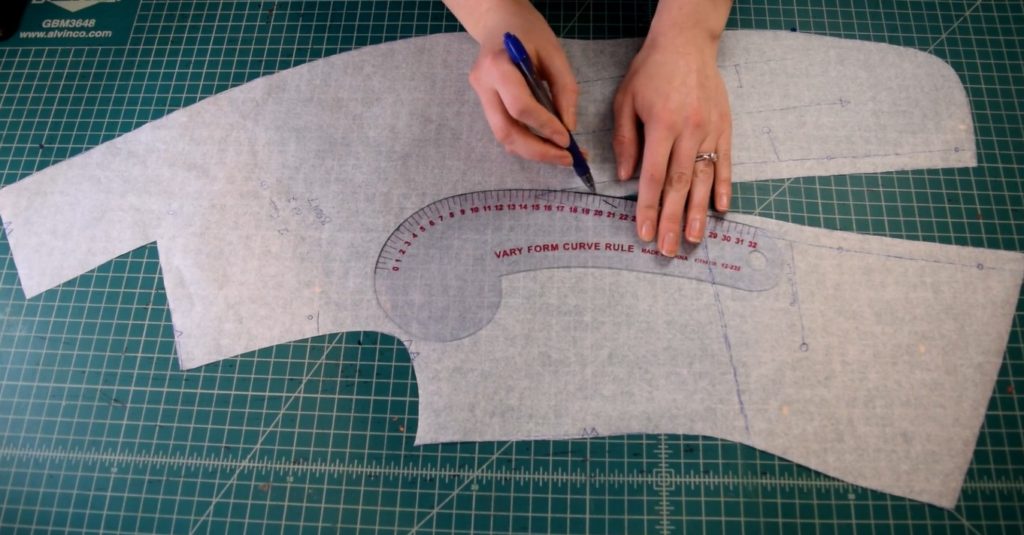
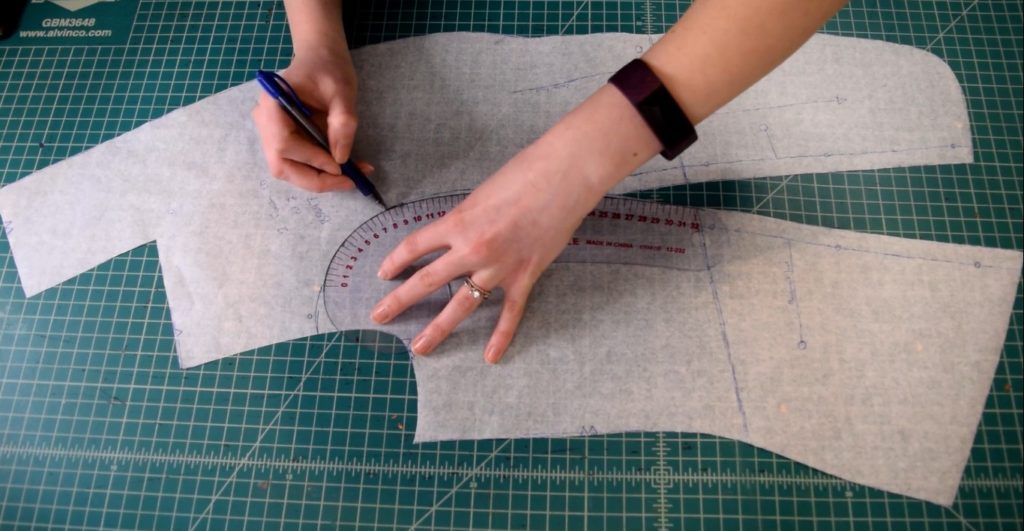
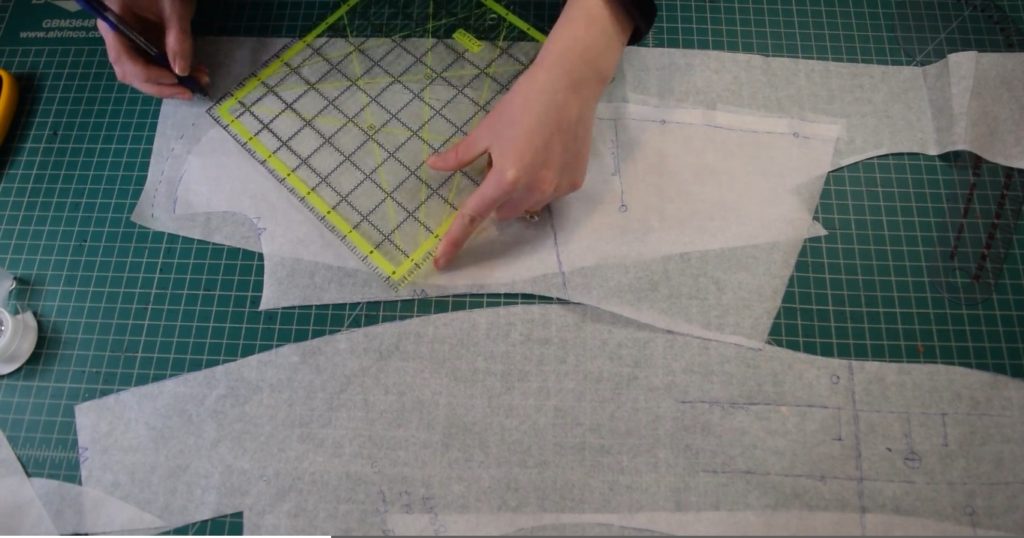
Next, we need to draw in our new princess seam. So I used my french curve ruler to draw in a nice curve connecting the side of the dart closest to the side seam with the armhole. It’s up to you how you want your curve to look – I would suggest looking at photos to decide how angled you want your curve to be.
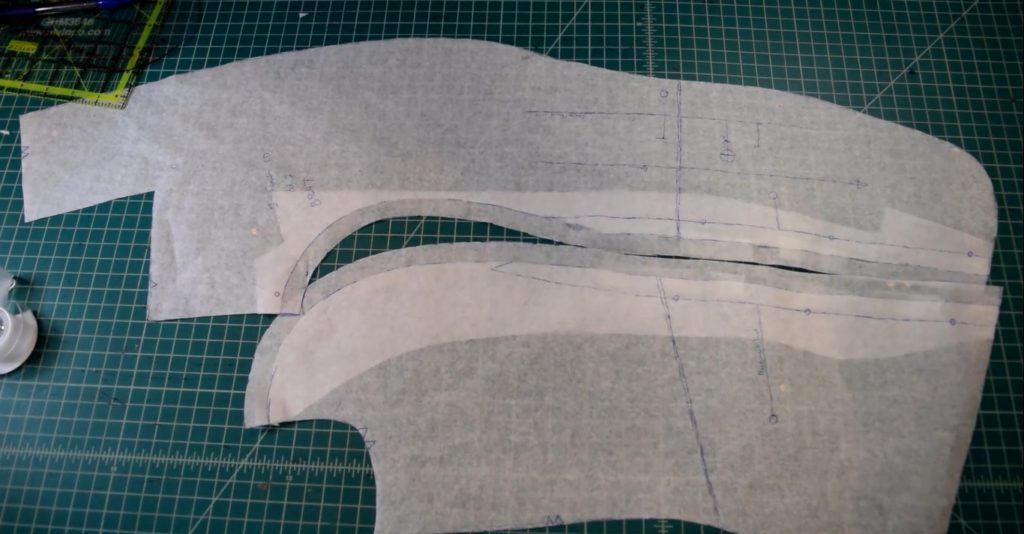
Then cut the pattern piece apart along the curve you just drew. This will be your new seam line!
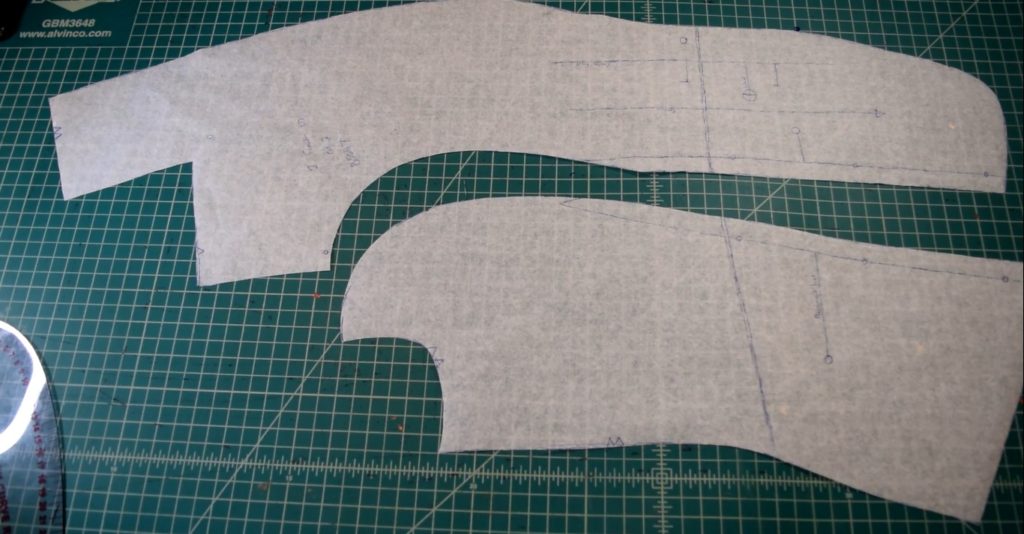
Next, we need to add in our seam allowance to the part we just cut. You only need to add seam allowance to the top curved part, then blend it into the seam allowance where the dart used to be. I accidentally added seam allowance to the entire area, and it worked out OK, but it would be best to only add it to the top part where we drew in the new seam. You’ll need to add seam allowance to both the front and the side front pieces.

And that’s all there is to it! I would definitely recommend testing your new pattern with muslin or another inexpensive fabric before cutting into any nice fabrics. That way you can make sure the fit is good and make any adjustments to your pattern!
Also – below is a photo of the vest I made for my mom with this pattern (before I put the buttons on) – this picture was the one I sent her to get her input on button choice! 🙂
I hope you enjoyed this tutorial and feel like you can take on turning your darted bodice pattern into a princess seam bodice! If you want more sewing and DIY tutorials I would love to have you sign up for my email newsletter! You can sign up below. 🙂


It is indeed my belief that mesothelioma is definitely the most deadly cancer. It has unusual properties. The more I actually look at it a lot more I am certain it does not act like a real solid cells cancer. In case mesothelioma is usually a rogue viral infection, then there is the chance of developing a vaccine plus offering vaccination to asbestos open people who are open to high risk associated with developing long run asbestos related malignancies. Thanks for discussing your ideas on this important ailment.
Stuning storfy there. What occurred after?
Take care!
Your house is valueble for me. Thanks!?
Incredible! This blog looks just like my old one! It’s on a totally different subject but it has pretty much the same layout and design. Outstanding choice of colors!
You actually make it appear so easy along with your presentation however I find this matter to be really one thing that I believe I might never understand. It sort of feels too complex and very large for me. I am having a look forward for your subsequent put up, I?ll attempt to get the cling of it!
What?s Happening i am new to this, I stumbled upon this I have found It positively useful and it has aided me out loads. I am hoping to contribute & assist other customers like its aided me. Good job.
Heya just wanted to give you a quick heads up and let you know a few of the images aren’t loading correctly. I’m not sure why but I think its a linking issue. I’ve tried it in two different browsers and both show the same outcome.
Thanks for the write-up. My partner and i have often noticed that most people are eager to lose weight simply because they wish to appear slim plus attractive. Nonetheless, they do not constantly realize that there are many benefits so that you can losing weight in addition. Doctors claim that over weight people suffer from a variety of diseases that can be perfectely attributed to the excess weight. Thankfully that people who’re overweight and also suffering from various diseases can help to eliminate the severity of their own illnesses simply by losing weight. You possibly can see a progressive but noticeable improvement in health if even a bit of a amount of fat reduction is reached.
Thanks for your write-up. One other thing is that individual states have their unique laws that will affect people, which makes it quite difficult for the our lawmakers to come up with a fresh set of recommendations concerning foreclosure on people. The problem is that every state has own laws and regulations which may have impact in a damaging manner in terms of foreclosure policies.
Its like you read my mind! You appear to know a lot about this, like you wrote the book in it or something. I think that you can do with some pics to drive the message home a bit, but other than that, this is great blog. An excellent read. I’ll definitely be back.
Thanks for revealing your ideas with this blog. As well, a misconception regarding the banking companies intentions whenever talking about home foreclosure is that the lender will not getreceive my repayments. There is a specific amount of time which the bank can take payments from time to time. If you are very deep in the hole, they may commonly desire that you pay the payment 100 . However, that doesn’t mean that they will not take any sort of installments at all. If you and the bank can find a way to work some thing out, this foreclosure procedure may stop. However, in case you continue to skip payments within the new approach, the property foreclosures process can just pick up from where it left off.
Thanks for the suggestions shared using your blog. Yet another thing I would like to convey is that weight-loss is not supposed to be about going on a celebrity diet and trying to reduce as much weight as you can in a few months. The most effective way to lose weight is by consuming it slowly and gradually and obeying some basic tips which can make it easier to make the most from a attempt to drop some weight. You may recognize and already be following these tips, but reinforcing knowledge never does any damage.
A further issue is that video gaming has become one of the all-time main forms of recreation for people of all ages. Kids engage in video games, plus adults do, too. The particular XBox 360 is among the favorite games systems for folks who love to have a huge variety of video games available to them, plus who like to play live with other people all over the world. Thank you for sharing your opinions.
There are actually lots of particulars like that to take into consideration. That may be a great level to convey up. I supply the thoughts above as basic inspiration however clearly there are questions like the one you carry up the place an important thing might be working in honest good faith. I don?t know if finest practices have emerged around things like that, however I am certain that your job is clearly recognized as a fair game. Each boys and girls really feel the influence of just a second?s pleasure, for the remainder of their lives.
Hello this is kind of of off topic but I was wanting to know if blogs use WYSIWYG editors or if you have to manually code with HTML. I’m starting a blog soon but have no coding know-how so I wanted to get guidance from someone with experience. Any help would be enormously appreciated!
Almanya’nın en iyi medyumu haluk hoca sayesinde sizlerde güven içerisinde çalışmalar yaptırabilirsiniz, 40 yıllık uzmanlık ve tecrübesi ile sizlere en iyi medyumluk hizmeti sunuyoruz.
Almanya’nın en iyi medyumu haluk hoca sayesinde sizlerde güven içerisinde çalışmalar yaptırabilirsiniz, 40 yıllık uzmanlık ve tecrübesi ile sizlere en iyi medyumluk hizmeti sunuyoruz.
I believe one of your advertisements triggered my internet browser to resize, you might want to put that on your blacklist.
The very heart of your writing while appearing agreeable at first, did not really sit properly with me personally after some time. Somewhere within the paragraphs you managed to make me a believer but only for a very short while. I nevertheless have got a problem with your leaps in assumptions and you might do nicely to help fill in those gaps. When you actually can accomplish that, I would surely be amazed.
Thanks, I have been hunting for info about this subject matter for ages and yours is the best I’ve located so far.
A few things i have seen in terms of laptop or computer memory is that often there are technical specs such as SDRAM, DDR or anything else, that must match up the features of the motherboard. If the personal computer’s motherboard is rather current while there are no main system issues, replacing the memory space literally takes under 1 hour. It’s one of several easiest laptop or computer upgrade processes one can visualize. Thanks for giving your ideas.
The crux of your writing whilst sounding agreeable in the beginning, did not work properly with me after some time. Somewhere within the paragraphs you were able to make me a believer unfortunately only for a while. I nevertheless have a problem with your jumps in logic and one would do well to fill in those gaps. When you can accomplish that, I will certainly end up being impressed.
Good day! This is my first visit to your blog! We are a collection of volunteers and starting a new project in a community in the same niche. Your blog provided us useful information to work on. You have done a outstanding job!
I want to express my gratitude for your kind and encouraging words in your reply on the blog. Thank you.
Hey! Do you know if they make any plugins to assist with Search Engine Optimization? I’m trying to get my blog to rank for some targeted keywords but I’m not seeing very good success. If you know of any please share. Cheers!
bookdecorfactory.com is a Global Trusted Online Fake Books Decor Store. We sell high quality budget price fake books decoration, Faux Books Decor. We offer FREE shipping across US, UK, AUS, NZ, Russia, Europe, Asia and deliver 100+ countries. Our delivery takes around 12 to 20 Days. We started our online business journey in Sydney, Australia and have been selling all sorts of home decor and art styles since 2008.
Can I simply say what a relief to seek out someone who truly knows what theyre speaking about on the internet. You undoubtedly know the right way to carry a problem to gentle and make it important. More people need to read this and perceive this side of the story. I cant imagine youre no more widespread because you positively have the gift.
I loved as much as you’ll receive carried out right here. The sketch is attractive, your authored material stylish. nonetheless, you command get bought an edginess over that you wish be delivering the following. unwell unquestionably come more formerly again as exactly the same nearly very often inside case you shield this hike.
I am extremely impressed with your writing skills as well as with the layout on your blog. Is this a paid theme or did you customize it yourself? Either way keep up the excellent quality writing, it?s rare to see a great blog like this one nowadays..
Wow! This can be one particular of the most helpful blogs We have ever arrive across on this subject. Basically Great. I’m also an expert in this topic therefore I can understand your hard work.
Thanks for expressing your ideas. One thing is that pupils have a selection between fed student loan and also a private student loan where it really is easier to select student loan online debt consolidation than with the federal education loan.
Hi there this is kind of of off topic but I was wondering if blogs use WYSIWYG editors or if you have to manually code with HTML. I’m starting a blog soon but have no coding experience so I wanted to get advice from someone with experience. Any help would be enormously appreciated!
I am very happy to read this. This is the type of manual that needs to be given and not the random misinformation that is at the other blogs. Appreciate your sharing this greatest doc.
Today, I went to the beachfront with my kids. I found a sea shell and gave it to my 4 year old daughter and said “You can hear the ocean if you put this to your ear.” She placed the shell to her ear and screamed. There was a hermit crab inside and it pinched her ear. She never wants to go back! LoL I know this is totally off topic but I had to tell someone!
I am no longer certain the place you’re getting your information, but good topic. I must spend some time learning much more or understanding more. Thank you for excellent information I used to be looking for this information for my mission.
Today, I went to the beach with my children. I found a sea shell and gave it to my 4 year old daughter and said “You can hear the ocean if you put this to your ear.” She put the shell to her ear and screamed. There was a hermit crab inside and it pinched her ear. She never wants to go back! LoL I know this is entirely off topic but I had to tell someone!
Thanks for discussing your ideas on this blog. Also, a misconception regarding the lenders intentions if talking about foreclosure is that the standard bank will not have my payments. There is a specific amount of time which the bank is going to take payments every now and then. If you are way too deep in the hole, they’re going to commonly demand that you pay the actual payment in full. However, i am not saying that they will not take any sort of installments at all. In case you and the loan company can be capable to work a little something out, the actual foreclosure method may stop. However, in case you continue to pass up payments beneath new plan, the foreclosures process can pick up from where it was left off.
Just about all of whatever you mention is supprisingly accurate and that makes me wonder why I had not looked at this with this light before. Your piece truly did switch the light on for me personally as far as this subject matter goes. Nevertheless there is actually 1 issue I am not too comfortable with so whilst I try to reconcile that with the actual main idea of your point, permit me see just what all the rest of your subscribers have to point out.Well done.
I appreciate, cause I found just what I was looking for. You have ended my four day long hunt! God Bless you man. Have a great day. Bye
Excellent read, I just passed this onto a friend who was doing a little research on that. And he just bought me lunch since I found it for him smile Thus let me rephrase that: Thank you for lunch!
Thanks for the strategies presented. One thing I should also believe is that often credit cards presenting a 0 interest rate often lure consumers together with zero rate of interest, instant approval and easy online balance transfers, but beware of the number one factor that can void that 0 easy road annual percentage rate and throw one out into the bad house quick.
What?s Happening i am new to this, I stumbled upon this I’ve found It positively useful and it has aided me out loads. I hope to contribute & assist other users like its aided me. Good job.
In this grand pattern of things you get a B- just for effort. Exactly where you actually lost me was first in your specifics. As as the maxim goes, details make or break the argument.. And it could not be more accurate at this point. Having said that, permit me tell you just what exactly did give good results. Your text is certainly incredibly persuasive and that is possibly why I am making an effort to opine. I do not make it a regular habit of doing that. Next, whilst I can easily notice the jumps in reason you make, I am not sure of how you seem to connect the points which in turn make the conclusion. For right now I will, no doubt yield to your position but trust in the near future you actually link your dots much better.
I really like your wp theme, where do you down load it through?
Thanks for your submission. I also believe that laptop computers are getting to be more and more popular today, and now in many cases are the only form of computer used in a household. This is because at the same time actually becoming more and more very affordable, their working power keeps growing to the point where they may be as potent as desktop from just a few years back.
I am very happy to read this. This is the kind of manual that needs to be given and not the random misinformation that is at the other blogs. Appreciate your sharing this greatest doc.
I appreciate, cause I found exactly what I was looking for. You have ended my four day long hunt! God Bless you man. Have a nice day. Bye
Hi! Do you know if they make any plugins to assist with Search Engine Optimization? I’m trying to get my blog to rank for some targeted keywords but I’m not seeing very good gains. If you know of any please share. Many thanks!
I have seen a lot of useful items on your web page about desktops. However, I’ve the viewpoint that lap tops are still not quite powerful adequately to be a sensible choice if you frequently do things that require loads of power, for instance video touch-ups. But for net surfing, word processing, and majority of other typical computer functions they are just fine, provided you may not mind the small screen size. Thank you for sharing your notions.
I am extremely impressed with your writing skills and also with the layout on your blog. Is this a paid theme or did you customize it yourself? Either way keep up the nice quality writing, it?s rare to see a nice blog like this one today..
Wow, thiis paragraph iis fastidious, myy younger
siszter is analyzing ssuch things, thereore I aam going tto convvey her.
Lovely just what I was searching for.Thanks to the author for taking his time on this one.
I do not even know how I stopped up right here, but I believed this submit was once good. I do not recognise who you might be however definitely you’re going to a famous blogger if you happen to aren’t already 😉 Cheers!
I loved as much as you’ll receive carried out right here. The sketch is tasteful, your authored subject matter stylish. nonetheless, you command get got an shakiness over that you wish be delivering the following. unwell unquestionably come further formerly again as exactly the same nearly very often inside case you shield this hike.
I am extremely impressed along with your writing abilities as neatly as with
the structure in your blog. Is this a paid subject or did you modify it your self?
Anyway stay up the nice high quality writing, it’s rare to peer a great blog like this one nowadays..
Right here is the right blog for everyone who would like to find out about this topic. You know a whole lot its almost tough to argue with you (not that I really will need to…HaHa). You definitely put a new spin on a topic which has been discussed for decades. Excellent stuff, just wonderful.
This is a topic that’s near to my heart… Thank you! Where are your contact details though?
The very next time I read a blog, I hope that it does not disappoint me as much as this particular one. I mean, I know it was my choice to read through, however I truly believed you would probably have something interesting to say. All I hear is a bunch of complaining about something you could possibly fix if you weren’t too busy seeking attention.
This page really has all of the information and facts I needed concerning this subject and didn’t know who to ask.
The next time I read a blog, Hopefully it does not fail me just as much as this particular one. I mean, I know it was my choice to read through, but I truly believed you would have something useful to say. All I hear is a bunch of whining about something you could possibly fix if you weren’t too busy seeking attention.
This is a topic that is close to my heart… Cheers! Where are your contact details though?
Howdy! Do you know if they make any plugins to safeguard against hackers? I’m kinda paranoid about losing everything I’ve worked hard on. Any recommendations?
There is definately a great deal to find out about this issue. I really like all the points you made.
Can I simply say what a relief to search out somebody who actually is aware of what theyre speaking about on the internet. You positively know the way to bring an issue to gentle and make it important. Extra individuals have to learn this and perceive this facet of the story. I cant believe youre no more common because you definitely have the gift.
Next time I read a blog, Hopefully it won’t fail me as much as this one. I mean, Yes, it was my choice to read, however I genuinely believed you would probably have something helpful to say. All I hear is a bunch of complaining about something that you could fix if you were not too busy seeking attention.
There’s certainly a great deal to find out about this subject. I love all the points you have made.
This is a topic that’s near to my heart… Cheers! Where can I find the contact details for questions?
Hi, I do believe this is an excellent blog. I stumbledupon it 😉 I’m going to revisit yet again since i have book marked it. Money and freedom is the greatest way to change, may you be rich and continue to help other people.
Thanks for another informative blog. Where else could I get that type of info written in such an ideal way? I’ve a project that I’m just now working on, and I have been on the look out for such info.
Can I just say what a comfort to discover a person that actually understands what they are discussing on the internet. You definitely understand how to bring an issue to light and make it important. More people ought to check this out and understand this side of the story. I was surprised you’re not more popular because you most certainly have the gift.
This blog was… how do I say it? Relevant!! Finally I’ve found something which helped me. Kudos!
I’m impressed, I must say. Rarely do I come across a blog that’s both equally educative and amusing, and without a doubt, you’ve hit the nail on the head. The problem is something that not enough folks are speaking intelligently about. I am very happy I came across this during my hunt for something regarding this.
Wow! This could be one particular of the most beneficial blogs We’ve ever arrive across on this subject. Actually Magnificent. I’m also an expert in this topic so I can understand your hard work.
There’s certainly a great deal to find out about this topic. I love all of the points you’ve made.
It’s difficult to find educated people about this subject, however, you seem like you know what you’re talking about! Thanks
I’m amazed, I must say. Rarely do I encounter a blog that’s both educative and amusing, and let me tell you, you have hit the nail on the head. The problem is something that not enough men and women are speaking intelligently about. I am very happy I found this in my search for something relating to this.
An additional issue is that video gaming became one of the all-time main forms of entertainment for people of nearly every age. Kids have fun with video games, and adults do, too. The actual XBox 360 is one of the favorite games systems for many who love to have a lot of games available to them, plus who like to play live with other folks all over the world. Many thanks for sharing your notions.
I appreciate, cause I found exactly what I was looking for. You’ve ended my 4 day long hunt! God Bless you man. Have a nice day. Bye
That is the proper blog for anybody who needs to search out out about this topic. You notice so much its almost hard to argue with you (not that I really would want?HaHa). You positively put a brand new spin on a topic thats been written about for years. Nice stuff, simply great!
It’s nearly impossible to find experienced people in this particular topic, but you sound like you know what you’re talking about! Thanks
May I simply just say what a relief to find an individual who truly understands what they are discussing online. You definitely know how to bring an issue to light and make it important. More and more people have to read this and understand this side of your story. I can’t believe you’re not more popular since you most certainly have the gift.
I’m impressed, I must say. Rarely do I encounter a blog that’s both educative and amusing, and without a doubt, you have hit the nail on the head. The issue is something too few men and women are speaking intelligently about. Now i’m very happy I found this during my hunt for something regarding this.
The very next time I read a blog, I hope that it does not fail me as much as this particular one. I mean, I know it was my choice to read through, nonetheless I truly thought you would probably have something helpful to talk about. All I hear is a bunch of crying about something that you could fix if you weren’t too busy looking for attention.
I do not even understand how I ended up here, but I assumed this publish used to be great
Hi, I do think this is a great blog. I stumbledupon it 😉 I am going to come back yet again since i have book marked it. Money and freedom is the greatest way to change, may you be rich and continue to guide others.
Great information. Lucky me I recently found your blog by accident (stumbleupon). I have saved as a favorite for later.
This is a topic that’s close to my heart… Many thanks! Where are your contact details though?
My spouse and I stumbled over here different web address and thought I might check things out. I like what I see so i am just following you. Look forward to checking out your web page again.
spotify monthly listeners
Sumatra Slim Belly Tonic takes pride in its manufacturing process, ensuring that every batch is produced in FDA-approved and GMP-certified facilities. This means that each and every bottle of Sumatra Slim Belly Tonic meets the highest standards of quality and safety. You can trust that you are getting a product that has undergone strict quality control measures and is backed by scientific research.
Thanks for your write-up. I also think laptop computers are becoming more and more popular nowadays, and now are often the only kind of computer found in a household. It is because at the same time that they are becoming more and more very affordable, their processing power keeps growing to the point where these are as robust as desktop computers through just a few in years past.
I’m impressed, I have to admit. Seldom do I come across a blog that’s both equally educative and entertaining, and without a doubt, you have hit the nail on the head. The problem is an issue that too few people are speaking intelligently about. I am very happy that I came across this during my search for something regarding this.
Glucotrust is an innovative supplement that offers a range of benefits for those seeking to improve their health and wellbeing. One of the key advantages of this supplement is its ability to help promote healthy blood sugar levels. This is particularly important for those who suffer from diabetes or other blood sugar-related conditions, as it can help to regulate insulin levels and prevent spikes in blood sugar.
Today, I went to the beachfront with my kids.
I found a sea shell and gave it to my 4 year old daughter
and said “You can hear the ocean if you put this to your ear.” She placed
the shell to her ear and screamed. There was a
hermit crab inside and it pinched her ear. She never wants to
go back! LoL I know this is completely off topic but I had
to tell someone!
Sugar Defender introduces a meticulously curated ensemble of eight key ingredients, each strategically selected to champion healthy blood sugar levels and facilitate weight loss. These ingredients collaborate to enhance the supplement’s effectiveness through diverse mechanisms, including energy elevation, fat burning, and metabolism stimulation, all while providing direct support for maintaining healthy blood glucose levels. Here is an insightful overview of each ingredient along with its purported functionality according to the manufacturer:
Right here is the right webpage for everyone who would like to find out about this topic. You realize so much its almost tough to argue with you (not that I actually will need to…HaHa). You certainly put a fresh spin on a topic that has been discussed for years. Wonderful stuff, just wonderful.
The ability of Alpilean to target both subcutaneous and visceral fat distinguishes it from other weight loss products. Subcutaneous fat is visible beneath the skin, whereas visceral fat is harmful fat that accumulates around the organs, increasing the risk of heart disease and other health problems. Alpilean ensures that you not only look better, but also feel better by attacking both types of fat.
What?s Going down i am new to this, I stumbled upon this I have discovered It positively helpful and it has helped me out loads. I am hoping to give a contribution & assist other users like its helped me. Good job.
This design is steller! You certainly know how to keep a reader entertained. Between your wit and your videos, I was almost moved to start my own blog (well, almost…HaHa!) Wonderful job. I really loved what you had to say, and more than that, how you presented it. Too cool!
May I just say what a relief to discover someone that really knows what they are discussing on the net. You actually know how to bring a problem to light and make it important. A lot more people ought to look at this and understand this side of the story. I can’t believe you’re not more popular because you most certainly possess the gift.
I don?t even know the way I stopped up here, but I assumed this publish was once good. I don’t realize who you are however definitely you’re going to a famous blogger in the event you are not already 😉 Cheers!
It’s hard to come by educated people for this topic, but you seem like you know what you’re talking about! Thanks
Hi there, i read your blog from time to time and i own a similar one and i was just wondering if you get a lot of spam remarks? If so how do you prevent it, any plugin or anything you can advise? I get so much lately it’s driving me mad so any support is very much appreciated.
Metanail Serum Pro is a cutting-edge nail care serum designed to revitalize and strengthen your nails. This advanced formula combines a potent blend of ingredients that work synergistically to provide comprehensive nail care and address common nail concerns.
Thanks for discussing your ideas on this blog. Also, a fable regarding the finance institutions intentions while talking about foreclosure is that the loan company will not getreceive my installments. There is a specific amount of time that this bank can take payments here and there. If you are very deep in the hole, they’re going to commonly require that you pay the particular payment fully. However, i am not saying that they will have any sort of repayments at all. When you and the loan company can find a way to work a little something out, this foreclosure course of action may cease. However, when you continue to pass up payments underneath the new plan, the property foreclosures process can just pick up exactly where it was left off.
Wonderful blog! I found it while searching on Yahoo News. Do you have any tips on how to get listed in Yahoo News? I’ve been trying for a while but I never seem to get there! Appreciate it
excellent issues altogether, you just gained a new reader. What might you recommend about your submit that you simply made some days ago? Any positive?
Whats up this is kinda of off topic but I was wanting to know if blogs use WYSIWYG editors or if you have to manually code with HTML. I’m starting a blog soon but have no coding experience so I wanted to get advice from someone with experience. Any help would be greatly appreciated!
I do not even know how I stopped up here, however I believed this submit used to be good. I don’t recognise who you are but certainly you’re going to a well-known blogger if you happen to aren’t already 😉 Cheers!
Throughout this awesome pattern of things you get a B+ with regard to effort and hard work. Exactly where you confused me personally ended up being on the specifics. You know, people say, details make or break the argument.. And that could not be more true right here. Having said that, permit me reveal to you precisely what did work. Your authoring is rather persuasive and this is most likely the reason why I am making the effort in order to opine. I do not make it a regular habit of doing that. Second, despite the fact that I can easily notice the jumps in reasoning you make, I am not certain of how you appear to unite the points that help to make the final result. For the moment I will yield to your position however trust in the future you actually link your dots much better.
Thanks for your submission. Another thing is that being a photographer involves not only trouble in catching award-winning photographs but additionally hardships in establishing the best dslr camera suited to your requirements and most especially hardships in maintaining the standard of your camera. It is very real and obvious for those professional photographers that are into capturing the nature’s exciting scenes — the mountains, the actual forests, the actual wild or even the seas. Visiting these exciting places surely requires a camera that can live up to the wild’s harsh settings.
Hey would you mind letting me know which web host you’re utilizing? I’ve loaded your blog in 3 completely different browsers and I must say this blog loads a lot quicker then most. Can you recommend a good internet hosting provider at a honest price? Many thanks, I appreciate it!
Heya i?m for the first time here. I came across this board and I find It truly useful & it helped me out much. I hope to give something back and help others like you helped me.
Can I simply just say what a comfort to discover someone that genuinely understands what they’re discussing on the net. You certainly realize how to bring a problem to light and make it important. A lot more people need to look at this and understand this side of your story. I can’t believe you are not more popular because you most certainly possess the gift.
I’m extremely inspired together with your writing skills and also with the layout on your blog. Is that this a paid theme or did you customize it yourself? Anyway stay up the nice high quality writing, it?s rare to see a nice blog like this one today..
It’s hard to come by experienced people about this subject, but you sound like you know what you’re talking about! Thanks
I have recommended your blog to all of my friends and family Your words have the power to change lives and I want others to experience that as well
Whats Happening i am new to this, I stumbled upon this I have discovered It absolutely helpful and it has aided me out loads. I hope to give a contribution & help different customers like its helped me. Good job.
Thank you for sharing indeed great looking !
ckIiMHAodJbmtL
Sweet blog! I found it while searching on Yahoo News. Do you have any suggestions on how to get listed in Yahoo News? I’ve been trying for a while but I never seem to get there! Cheers
Keep up the fantastic work!
Keep up the amazing work!
Keep up the fantastic work!
Keep up the fantastic work!
I’m amazed, I have to admit. Seldom do I come across a blog that’s both educative and engaging, and let me tell you, you have hit the nail on the head. The issue is something that not enough men and women are speaking intelligently about. Now i’m very happy that I stumbled across this in my search for something relating to this.
This web page can be a walk-by way of for all of the info you needed about this and didn?t know who to ask. Glimpse right here, and you?ll definitely discover it.
I do enjoy the manner in which you have presented this specific matter plus it does indeed offer us a lot of fodder for consideration. Nevertheless, through everything that I have observed, I simply hope when the remarks pack on that folks continue to be on point and don’t get started upon a tirade regarding some other news of the day. Still, thank you for this outstanding point and although I can not agree with it in totality, I regard your viewpoint.
Thanks for giving your ideas on this blog. Also, a misconception regarding the banks intentions any time talking about property foreclosure is that the lender will not getreceive my repayments. There is a specific amount of time that the bank can take payments occasionally. If you are also deep within the hole, they are going to commonly call that you pay the actual payment entirely. However, i am not saying that they will have any sort of repayments at all. In case you and the standard bank can manage to work something out, the foreclosure procedure may stop. However, should you continue to miss payments in the new system, the foreclosed process can just pick up exactly where it left off.
bouncing ball88
Güvenilir bir danışman için medyum nasip hocayı seçin en iyi medyum hocalardan bir tanesidir.
The information shared is of top quality which has to get appreciated at all levels. Well done…
There’s certainly a lot to know about this subject. I really like all of the points you have made.
There is definately a lot to find out about this issue. I really like all of the points you’ve made.
Yet another issue is that video gaming became one of the all-time main forms of entertainment for people of nearly every age. Kids participate in video games, plus adults do, too. The XBox 360 is one of the favorite games systems for many who love to have a lot of games available to them, as well as who like to play live with other people all over the world. Thanks for sharing your thinking.
What?s Happening i am new to this, I stumbled upon this I’ve found It positively useful and it has helped me out loads. I hope to contribute & assist other users like its helped me. Good job.
Güvenilir bir danışman için medyum nasip hocayı seçin en iyi medyum hocalardan bir tanesidir.
It’s nearly impossible to find experienced people about this subject, however, you seem like you know what you’re talking about! Thanks
There is certainly a lot to find out about this subject. I love all the points you made.
Keep up the fantastic work!
Güvenilir bir danışman için medyum haluk hocayı seçin en iyi medyum hocalardan bir tanesidir.
Nearly all of what you point out happens to be astonishingly appropriate and that makes me ponder why I had not looked at this with this light before. This piece really did switch the light on for me personally as far as this issue goes. However there is 1 issue I am not too comfortable with and while I try to reconcile that with the actual main idea of the issue, permit me see what the rest of the readers have to point out.Very well done.
Güvenilir bir danışman için medyum haluk hocayı seçin en iyi medyum hocalardan bir tanesidir.
This blog was… how do I say it? Relevant!! Finally I have found something which helped me. Many thanks.
Keep up the fantastic work!
The very next time I read a blog, I hope that it won’t fail me just as much as this particular one. After all, I know it was my choice to read through, nonetheless I actually believed you would have something useful to say. All I hear is a bunch of crying about something you can fix if you weren’t too busy looking for attention.
Next time I read a blog, I hope that it doesn’t fail me as much as this particular one. I mean, Yes, it was my choice to read, but I actually thought you would probably have something useful to talk about. All I hear is a bunch of moaning about something you could possibly fix if you were not too busy seeking attention.
We are offering Concrete Parking Lot Contractor, Concrete Installation Contractor Service, warehouse flooring, commercial, and industrial concrete roadways.
We are offering Concrete Parking Lot Contractor, Concrete Installation Contractor Service, warehouse flooring, commercial, and industrial concrete roadways.
Its such as you read my thoughts! You appear to grasp a lot approximately this, such as you wrote the guide in it or something. I believe that you simply could do with a few p.c. to force the message home a bit, but other than that, that is magnificent blog. An excellent read. I will definitely be back.
Thanks for these tips. One thing I additionally believe is the fact credit cards providing a 0 apr often bait consumers together with zero rate, instant approval and easy on the web balance transfers, but beware of the real factor that will void that 0 easy street annual percentage rate plus throw one out into the bad house quickly.
We are offering Concrete Parking Lot Contractor, Concrete Installation Contractor Service, warehouse flooring, commercial, and industrial concrete roadways.
584708 845293Seriously extremely very good contribution, I really depend on up-dates of your stuff. 406786
It is indeed my belief that mesothelioma is usually the most fatal cancer. It has unusual features. The more I look at it the greater I am assured it does not work like a true solid human cancer. In the event that mesothelioma is actually a rogue virus-like infection, hence there is the possibility of developing a vaccine as well as offering vaccination for asbestos subjected people who are at high risk involving developing foreseeable future asbestos associated malignancies. Thanks for revealing your ideas on this important health issue.
There is certainly a lot to know about this issue. I love all the points you have made.
This is a topic that’s near to my heart… Take care!
Where are your contact details though?
Great blog you’ve got here.. It’s hard to find good quality writing like yours these days. I seriously appreciate people like you! Take care!!
Next time I read a blog, Hopefully it won’t disappoint me as much as this one. After all, Yes, it was my choice to read through, nonetheless I really thought you’d have something useful to say. All I hear is a bunch of whining about something you could fix if you were not too busy searching for attention.
Hey this is kinda of off topic but I was wondering if blogs use WYSIWYG editors or if you have to manually code with HTML. I’m starting a blog soon but have no coding expertise so I wanted to get advice from someone with experience. Any help would be enormously appreciated!
Its like you read my mind! You appear to know so much about this, like you wrote the book in it or something. I think that you can do with a few pics to drive the message home a bit, but other than that, this is fantastic blog. An excellent read. I’ll definitely be back.
I’m amazed, I have to admit. Seldom do I encounter a blog that’s both educative and engaging, and let me tell you, you’ve hit the nail on the head. The problem is something which too few men and women are speaking intelligently about. I’m very happy that I stumbled across this during my search for something concerning this.
I’m really impressed with your writing skills and also with the layout on your blog. Is this a paid theme or did you customize it yourself? Anyway keep up the nice quality writing, it?s rare to see a great blog like this one nowadays..
You need to take part in a contest for one of the best blogs online. I’m going to recommend this blog!
There is certainly a lot to find out about this topic. I love all the points you made.
I?m now not positive the place you are getting your info, however great topic. I must spend a while studying much more or figuring out more. Thank you for great info I was looking for this info for my mission.
There is definately a great deal to know about this subject. I love all the points you have made.
I have realized that online education is getting well-known because accomplishing your degree online has changed into a popular choice for many people. Numerous people have not necessarily had a chance to attend a regular college or university although seek the elevated earning potential and a better job that a Bachelors Degree gives. Still some others might have a degree in one course but would want to pursue one thing they now possess an interest in.
The information shared is of top quality which has to get appreciated at all levels. Well done…
Its like you read my mind! You appear to know so much about this, like you wrote the book in it or something. I think that you could do with some pics to drive the message home a bit, but instead of that, this is magnificent blog. A fantastic read. I’ll certainly be back.
I’m impressed, I have to admit. Rarely do I come across a blog that’s both educative and amusing, and let me tell you, you have hit the nail on the head. The issue is something too few men and women are speaking intelligently about. I am very happy that I came across this during my hunt for something concerning this.
Thank you for sharing indeed great looking !
Hey just wanted to give you a brief heads up and let you know a few of the images aren’t loading correctly. I’m not sure why but I think its a linking issue. I’ve tried it in two different internet browsers and both show the same results.
Keep up the fantastic work and continue to inspire us all!
The very next time I read a blog, I hope that it won’t fail me just as much as this particular one. After all, Yes, it was my choice to read through, but I really believed you would have something interesting to say. All I hear is a bunch of whining about something that you can fix if you weren’t too busy looking for attention.
Keep up the incredible work! I can’t wait to see what you write next.
Hi there, i read your blog occasionally and i own a similar one and i was just wondering if you get a lot of spam remarks? If so how do you prevent it, any plugin or anything you can recommend? I get so much lately it’s driving me insane so any support is very much appreciated.
It?s really a great and useful piece of information. I?m glad that you shared this helpful info with us. Please keep us up to date like this. Thanks for sharing.
There is definately a great deal to find out about this topic. I really like all the points you made.
It?s really a nice and useful piece of info. I?m glad that you shared this helpful information with us. Please keep us informed like this. Thank you for sharing.
There’s certainly a lot to find out about this issue. I like all of the points you have made.
600491 611033Wohh just what I was looking for, appreciate it for putting up. 692007
Today, considering the fast chosen lifestyle that everyone leads, credit cards have a huge demand in the economy. Persons coming from every arena are using the credit card and people who aren’t using the credit cards have arranged to apply for 1. Thanks for giving your ideas about credit cards.
Thank you for sharing indeed great looking !
May I simply say what a relief to uncover a person that actually knows what they are talking about on the net. You actually know how to bring a problem to light and make it important. More and more people need to look at this and understand this side of the story. I was surprised that you aren’t more popular since you surely possess the gift.
I have taken notice that in digital camera models, unique sensors help to {focus|concentrate|maintain focus|target|a**** automatically. Those kind of sensors regarding some cams change in in the area of contrast, while others employ a beam involving infra-red (IR) light, especially in low lumination. Higher specification cameras oftentimes use a combination of both models and probably have Face Priority AF where the digital camera can ‘See’ a face as you concentrate only upon that. Thank you for sharing your notions on this blog.
Heya i?m for the primary time here. I came across this board and I in finding It really helpful & it helped me out a lot. I’m hoping to offer something back and help others such as you aided me.
This is a topic that’s close to my heart… Take care! Where are your contact details though?
Hi would you mind letting me know which web host you’re utilizing? I’ve loaded your blog in 3 completely different web browsers and I must say this blog loads a lot quicker then most. Can you suggest a good web hosting provider at a honest price? Many thanks, I appreciate it!
I like what you guys are usually up too. This kind of clever work and coverage! Keep up the terrific works guys I’ve included you guys to blogroll.
I’m impressed, I have to admit. Rarely do I encounter a blog that’s both equally educative and interesting, and let me tell you, you have hit the nail on the head. The problem is something which not enough men and women are speaking intelligently about. I’m very happy I found this during my search for something concerning this.
May I simply say what a relief to uncover someone who genuinely knows what they are talking about on the net. You definitely know how to bring a problem to light and make it important. A lot more people should look at this and understand this side of the story. I was surprised you’re not more popular since you certainly possess the gift.
An impressive share! I’ve just forwarded this onto a co-worker who had been doing a little homework on this. And he actually ordered me lunch due to the fact that I stumbled upon it for him… lol. So allow me to reword this…. Thanks for the meal!! But yeah, thanks for spending time to discuss this matter here on your blog.
It’s hard to come by knowledgeable people about this subject, however, you sound like you know what you’re talking about! Thanks
This was such a helpful read. I’ll definitely be referring back to it in the future
You can definitely see your skills within the paintings you write. The world hopes for more passionate writers like you who aren’t afraid to mention how they believe. Always follow your heart.