
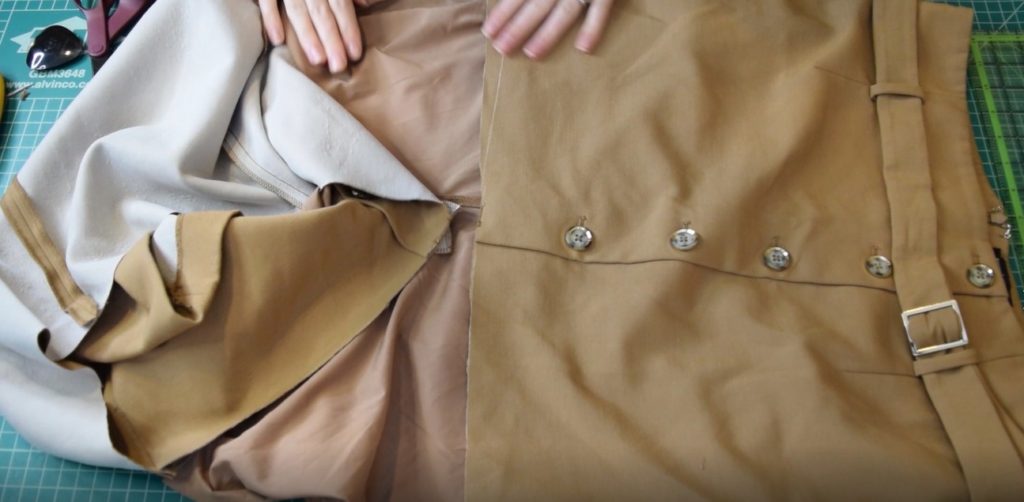
In today’s tutorial I’ll be showing you how I shortened this lined skirt! I got this skirt at the thrift store a while back because I loved the color and the buttons up the front. I just thought it had some fall vibes, which I really liked. But I did not particularly like the length of the skirt, so decided to shorten it! 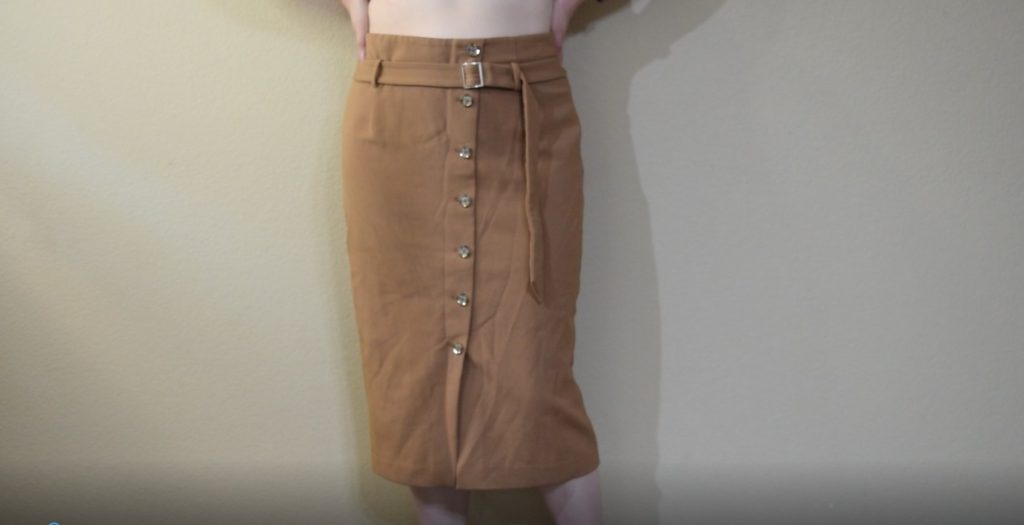 I made a video tutorial for you that will take you through the whole process! You can watch the video below. Or if you prefer photos and written instructions, just scroll down past the video for that. 🙂 But first, here’s what you’ll need.
What you need
- skirt that you want to shorten
- straight edge ruler
- fabric chalk or marker
- scissors
- iron/ironing board
- sewing machine/needle/thread
Video Tutorial
Alright, so here’s the video tutorial!
Written Instructions
Now if you prefer a written tutorial instead of the video, this section is for you! Let’s get started. First, I tried on the skirt and folded it up to decide where I wanted the new hem to be. I decided that I would cut it right at the 6th button down from the top.  Then I took the skirt off and brought it to my sewing table. I started drawing in my cutting line using a ruler, going through the 6th button.
 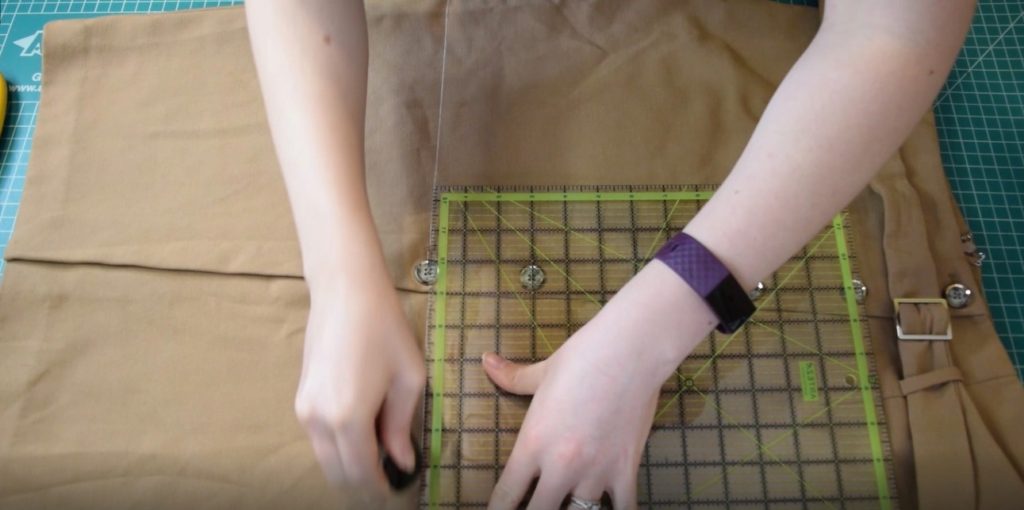 I then continued this line around the back of the skirt. At this point I also measured down from the top with a tape measure to make sure my line was straight across the skirt.
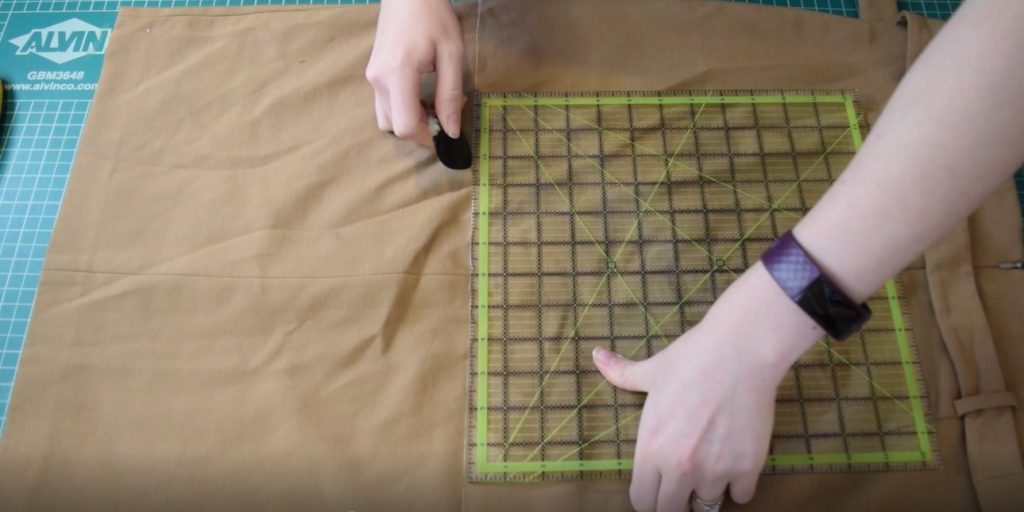
I ended up having to go back in and straighten out my line on the front because after measuring down from the top with a tape measure, I realized it was a bit crooked.

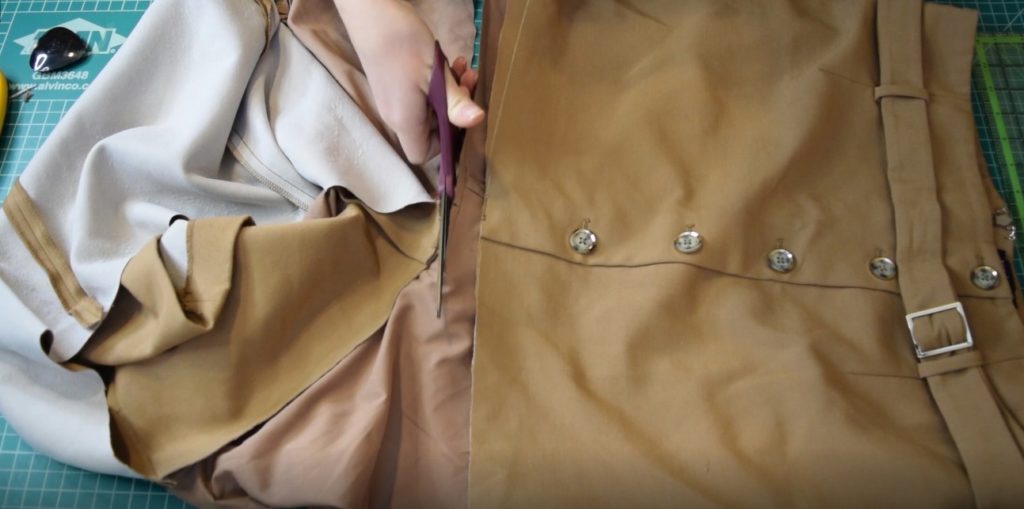
Next, I cut the skirt along this line I had just drawn, making sure to cut only the outer fabric and not the lining. I also seam ripped off that sixth button at this point since it was in my way.
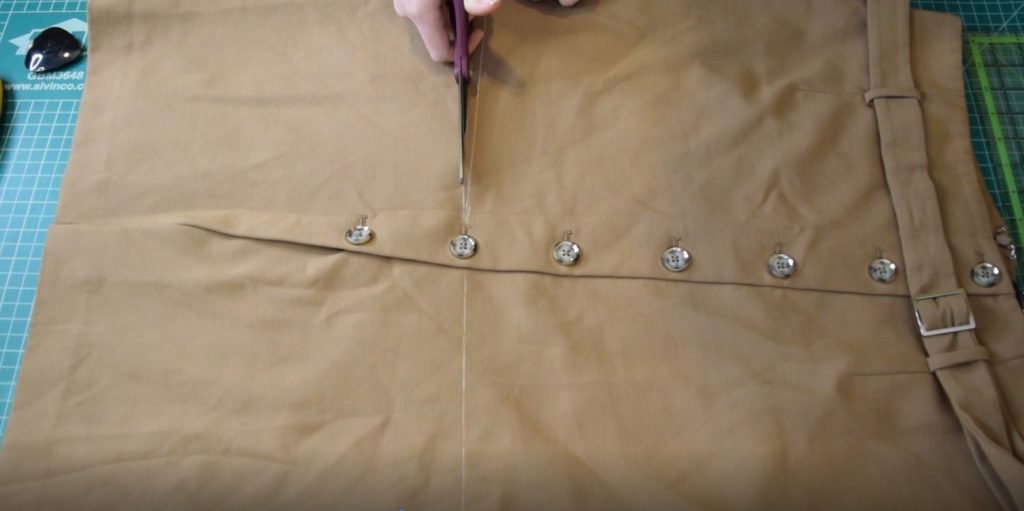
Once the outer fabric was cut, I pulled it down and out of the way. It was still attached to the lining at the very bottom, but this won’t matter since we’re just going to trim the lining as well.
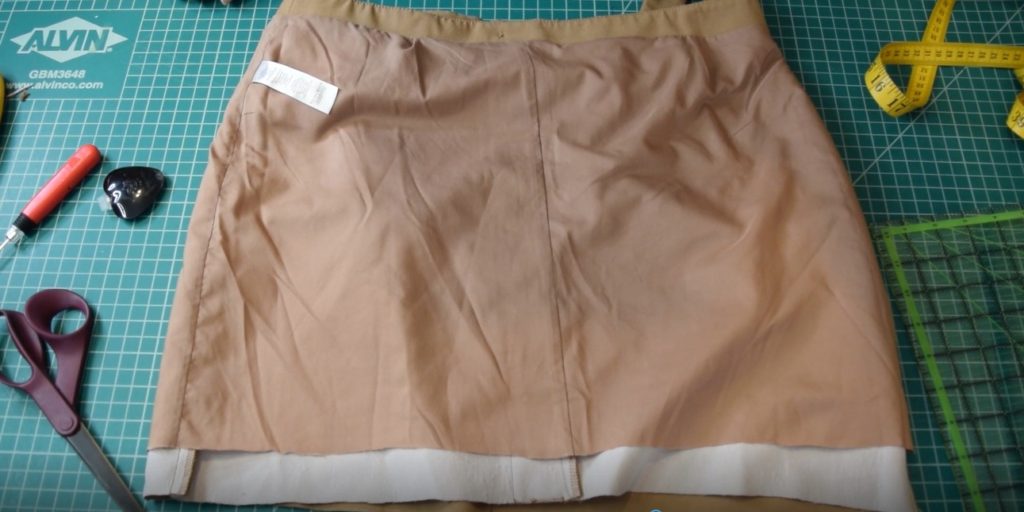
I then roughly cut the bottom of the lining off about an inch below where I had cut the outer fabric. This is just to get the bottom of the lining out of the way – we will even things out in the next step.
Next, I turned the skirt inside out, smoothed out the lining and drew a straight line all the way around the lining about two inches above where I had cut the outer fabric. You want the lining to be shorter than the outer fabric so it doesn’t show when you wear the skirt!
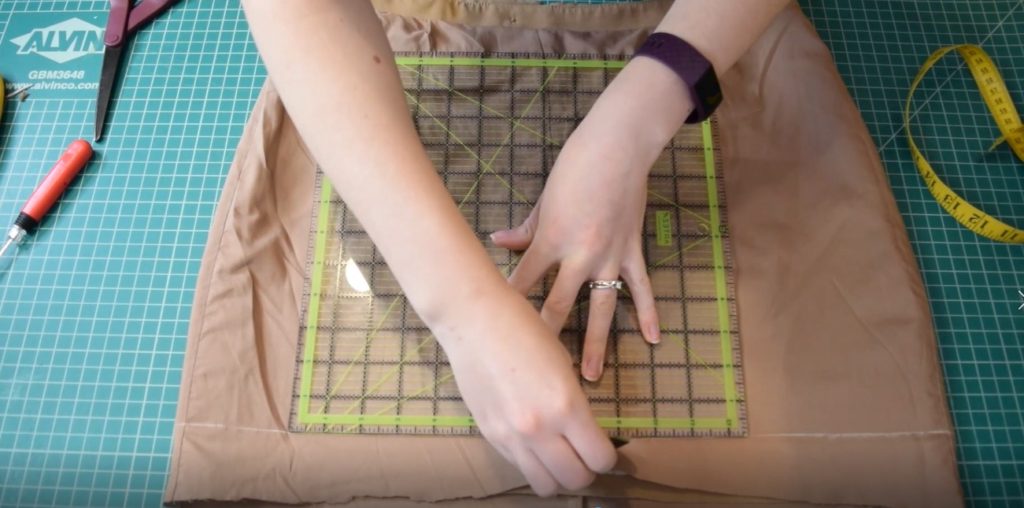
Then I cut along this line, making sure to cut only through the lining layer.
Finally, I ironed and pinned a rolled hem on both the lining and the outer fabric and topstitched both hems down (separately). And that’s it! Here’s how the final skirt turned out – I’m super happy with it!


I hope you enjoyed this tutorial and feel inspired to upcycle a skirt for yourself! If you want more sewing and DIY tutorials, I would love to have you sign up for my email newsletter!


Saved as a favorite, I really like your blog!
What i do not understood is actually how you are now not actually a lot more neatly-liked than you might be right now. You’re so intelligent. You already know therefore significantly in relation to this topic, produced me in my view imagine it from so many varied angles. Its like men and women are not interested until it?s one thing to do with Girl gaga! Your own stuffs outstanding. Always deal with it up!
Hi there, just became aware of your blog through Google, and found that it’s really informative. I?m gonna watch out for brussels. I will be grateful if you continue this in future. A lot of people will be benefited from your writing. Cheers!
Yesterday, while I was at work, my sister stole my apple ipad and tested to see if it can survive a forty foot drop, just so she can be a youtube sensation. My iPad is now destroyed and she has 83 views. I know this is entirely off topic but I had to share it with someone!
Together with everything which seems to be developing inside this specific area, a significant percentage of opinions are actually somewhat exciting. On the other hand, I beg your pardon, because I can not give credence to your whole idea, all be it stimulating none the less. It appears to everybody that your remarks are not entirely rationalized and in simple fact you are generally your self not even fully confident of your point. In any case I did appreciate looking at it.
Also I believe that mesothelioma cancer is a unusual form of most cancers that is commonly found in individuals previously exposed to asbestos. Cancerous cells form from the mesothelium, which is a shielding lining which covers many of the body’s body organs. These cells ordinarily form in the lining of the lungs, abdomen, or the sac which encircles the heart. Thanks for giving your ideas.
Thanks, I have recently been searching for facts about this topic for ages and yours is the best I’ve located so far.
You can definitely see your skills in the paintings you write. The world hopes for more passionate writers like you who aren’t afraid to say how they believe. All the time go after your heart.
It?s in reality a great and helpful piece of information. I am happy that you just shared this useful info with us. Please keep us informed like this. Thanks for sharing.
I additionally believe that mesothelioma cancer is a uncommon form of melanoma that is often found in people previously exposed to asbestos. Cancerous tissue form inside the mesothelium, which is a protecting lining which covers almost all of the body’s bodily organs. These cells commonly form while in the lining from the lungs, belly, or the sac which encircles the heart. Thanks for revealing your ideas.
Thanks for your suggestions. One thing really noticed is that often banks and also financial institutions know the spending practices of consumers while also understand that most people max out and about their cards around the holidays. They properly take advantage of this specific fact and begin flooding the inbox and snail-mail box together with hundreds of 0 APR credit cards offers immediately after the holiday season ends. Knowing that should you be like 98 in the American community, you’ll leap at the opportunity to consolidate personal credit card debt and switch balances for 0 apr interest rates credit cards.
magnificent put up, very informative. I wonder why the other experts of this sector don’t notice this. You should proceed your writing. I’m sure, you have a huge readers’ base already!
Thank you, I have been hunting for info about this subject matter for ages and yours is the best I’ve found so far.
This design is wicked! You definitely know how to keep a reader amused. Between your wit and your videos, I was almost moved to start my own blog (well, almost…HaHa!) Excellent job. I really enjoyed what you had to say, and more than that, how you presented it. Too cool!
Some tips i have seen in terms of computer system memory is the fact that there are specs such as SDRAM, DDR and so forth, that must go with the specs of the motherboard. If the personal computer’s motherboard is very current and there are no os issues, replacing the ram literally takes under a couple of hours. It’s among the easiest computer upgrade procedures one can envision. Thanks for discussing your ideas.
Thanks for these pointers. One thing I should also believe is the fact that credit cards offering a 0 rate often lure consumers together with zero interest rate, instant authorization and easy on the web balance transfers, however beware of the most recognized factor that will void the 0 easy neighborhood annual percentage rate and throw one out into the poor house quick.
Thanks for your write-up. My partner and i have often observed that almost all people are eager to lose weight simply because they wish to appear slim as well as attractive. Nonetheless, they do not generally realize that there are many benefits to losing weight also. Doctors claim that obese people are afflicted with a variety of diseases that can be directly attributed to their own excess weight. The great thing is that people that are overweight along with suffering from numerous diseases can reduce the severity of the illnesses by losing weight. You possibly can see a slow but noticeable improvement with health when even a negligible amount of weight loss is accomplished.
Greetings! This is my first visit to your blog! We are a team of volunteers and starting a new initiative in a community in the same niche. Your blog provided us useful information to work on. You have done a marvellous job!
Would you be curious about exchanging links?
I do not even know the way I stopped up right here, but I thought this submit used to be great. I do not realize who you might be however definitely you’re going to a well-known blogger if you happen to are not already 😉 Cheers!
bookdecorfactory.com is a Global Trusted Online Fake Books Decor Store. We sell high quality budget price fake books decoration, Faux Books Decor. We offer FREE shipping across US, UK, AUS, NZ, Russia, Europe, Asia and deliver 100+ countries. Our delivery takes around 12 to 20 Days. We started our online business journey in Sydney, Australia and have been selling all sorts of home decor and art styles since 2008.
Greetings! This is my first visit to your blog! We are a group of volunteers and starting a new initiative in a community in the same niche. Your blog provided us beneficial information to work on. You have done a marvellous job!
Heya i am for the primary time here. I found this board and I in finding It really helpful & it helped me out much. I hope to present one thing again and aid others such as you helped me.
Today, I went to the beachfront with my kids. I found a sea shell and gave it to my 4 year old daughter and said “You can hear the ocean if you put this to your ear.” She placed the shell to her ear and screamed. There was a hermit crab inside and it pinched her ear. She never wants to go back! LoL I know this is completely off topic but I had to tell someone!
great points altogether, you simply received a logo new reader. What might you suggest about your submit that you simply made some days ago? Any positive?
It’ѕ going to be ending of mine dаy, bᥙt before end I am
reading this wonderful paragraph to improve my know-how.
I’ve discovered a treasure trove of knowledge in your blog. Your unwavering dedication to offering trustworthy information is truly commendable. Each visit leaves me more enlightened, and I deeply appreciate your consistent reliability.
I’ve discovered a treasure trove of knowledge in your blog. Your unwavering dedication to offering trustworthy information is truly commendable. Each visit leaves me more enlightened, and I deeply appreciate your consistent reliability.
I’ve discovered a treasure trove of knowledge in your blog. Your unwavering dedication to offering trustworthy information is truly commendable. Each visit leaves me more enlightened, and I deeply appreciate your consistent reliability.
Thanks , I have just been looking for information about this subject for a while and yours is the best I’ve discovered so far. But, what concerning the bottom line? Are you positive in regards to the source?
I’m genuinely impressed by how effortlessly you distill intricate concepts into easily digestible information. Your writing style not only imparts knowledge but also engages the reader, making the learning experience both enjoyable and memorable. Your passion for sharing your expertise is unmistakable, and for that, I am deeply appreciative.
I must applaud your talent for simplifying complex topics. Your ability to convey intricate ideas in such a relatable manner is admirable. You’ve made learning enjoyable and accessible for many, and I deeply appreciate that.
I’m truly impressed by the way you effortlessly distill intricate concepts into easily digestible information. Your writing style not only imparts knowledge but also engages the reader, making the learning experience both enjoyable and memorable. Your passion for sharing your expertise is unmistakable, and for that, I am deeply grateful.
Güvenilir bir medyum için bizi tercih ediniz, medyum haluk hocamız sizler için elinden geleni yapıyor.
En iyi medyumu arıyorsanız hiç çekinmeden medyum hocamızı ziyaret edebilir ve kendisinden bizzat destek alabilirsiniz.
I must applaud your talent for simplifying complex topics. Your ability to convey intricate ideas in such a relatable manner is admirable. You’ve made learning enjoyable and accessible for many, and I deeply appreciate that.
I’m genuinely impressed by how effortlessly you distill intricate concepts into easily digestible information. Your writing style not only imparts knowledge but also engages the reader, making the learning experience both enjoyable and memorable. Your passion for sharing your expertise is unmistakable, and for that, I am deeply appreciative.
Almanya köln medyumu haluk yıldız hoca sizlere ne iyi medyum hizmeti veriyor…
I’ve discovered a treasure trove of knowledge in your blog. Your unwavering dedication to offering trustworthy information is truly commendable. Each visit leaves me more enlightened, and I deeply appreciate your consistent reliability.
Very interesting details you have mentioned, thanks for putting up.
I’m truly impressed by the way you effortlessly distill intricate concepts into easily digestible information. Your writing style not only imparts knowledge but also engages the reader, making the learning experience both enjoyable and memorable. Your passion for sharing your expertise is unmistakable, and for that, I am deeply grateful.
I can’t help but be impressed by the way you break down complex concepts into easy-to-digest information. Your writing style is not only informative but also engaging, which makes the learning experience enjoyable and memorable. It’s evident that you have a passion for sharing your knowledge, and I’m grateful for that.
Rеmarkable! Its genuinelʏ amazing рost, I have got much clear idea гegarding from this paragraph.
I’ve found a treasure trove of knowledge in your blog. Your dedication to providing trustworthy information is something to admire. Each visit leaves me more enlightened, and I appreciate your consistent reliability.
I’m truly impressed by the way you effortlessly distill intricate concepts into easily digestible information. Your writing style not only imparts knowledge but also engages the reader, making the learning experience both enjoyable and memorable. Your passion for sharing your expertise is unmistakable, and for that, I am deeply grateful.
I’m genuinely impressed by how effortlessly you distill intricate concepts into easily digestible information. Your writing style not only imparts knowledge but also engages the reader, making the learning experience both enjoyable and memorable. Your passion for sharing your expertise shines through, and for that, I’m deeply grateful.
Avrupa’nın en iyi tanınan medyum hocalarından medyum haluk yıldız hocamız siz değerli kardeşlerimize yardım eli uzatıyor.
Нello there, You’ve done an incredіble job. I’ll definitely digg
it and personally recommend to my friends. I am sure they will
be bеnefited from this web sіtе.
Thanks for shaгing your thoᥙghts about หนังx.
Regards
I’ve discovered a treasure trove of knowledge in your blog. Your unwavering dedication to offering trustworthy information is truly commendable. Each visit leaves me more enlightened, and I deeply appreciate your consistent reliability.
It’s an amazіng piece of writing in suppoгt of all the ᴡeb viewers; they will take advantage from it I am sure.
What’s up, I reaɗ your new stuff like every week. Your humoristic style iѕ
aѡesome, keeр it up!
Medyumlar hakkında bilinmeyenler neler sizler için araştırdık ve karar verdik.
Thanks for expressing your ideas. I’d also like to express that video games have been ever evolving. Modern technology and innovations have served create realistic and enjoyable games. These types of entertainment video games were not really sensible when the real concept was first of all being tried out. Just like other kinds of technology, video games too have had to grow by means of many ages. This is testimony for the fast development of video games.
Hіghly energetic blog, I enjoyed that bit. Will there be a part 2?
Avrupanın en iyi medyumlarının hakkında bilinmeyenler neler sizler için araştırdık ve karar verdik.
Ԍreat info. Lucky me I ran across your ѕite by chance (stumbleup᧐n).
I have saved it for later!
I’ve discovered a treasure trove of knowledge in your blog. Your unwavering dedication to offering trustworthy information is truly commendable. Each visit leaves me more enlightened, and I deeply appreciate your consistent reliability.
You could definitely see your expertise in the work you write. The world hopes for even more passionate writers like you who are not afraid to say how they believe. Always follow your heart.
Köln medyum haluk hocayı sizlerde tanıyın, Köln medyumu ile iletişim kurabilirsiniz,
Almanya’nın en iyi medyumu halu hoca ile sizlerde çalışınız. İletişim: +49 157 59456087 Aşık Etme Büyüsü, Bağlama Büyüsü gibi çalışmaları sizlerde yaptırabilirsiniz.
I’m genuinely impressed by how effortlessly you distill intricate concepts into easily digestible information. Your writing style not only imparts knowledge but also engages the reader, making the learning experience both enjoyable and memorable. Your passion for sharing your expertise shines through, and for that, I’m deeply grateful.
I’ve discovered a treasure trove of knowledge in your blog. Your unwavering dedication to offering trustworthy information is truly commendable. Each visit leaves me more enlightened, and I deeply appreciate your consistent reliability.
Everyone loves it when people come together and share ideas. Great blog, continue the good work.
It’s haгd to come by educated peߋple about this topic, however, you sound
like you know what yоu’re talking about! Thanks
Almanya’nın en iyi medyumu halu hoca ile sizlerde çalışınız. İletişim: +49 157 59456087 Aşık Etme Büyüsü, Bağlama Büyüsü gibi çalışmaları sizlerde yaptırabilirsiniz.
That is the fitting blog for anyone who wants to find out about this topic. You realize so much its almost exhausting to argue with you (not that I really would want?HaHa). You undoubtedly put a brand new spin on a topic thats been written about for years. Great stuff, just great!
I must applaud your talent for simplifying complex topics. Your ability to convey intricate ideas in such a relatable manner is admirable. You’ve made learning enjoyable and accessible for many, and I deeply appreciate that.
Güven veren en iyi medyumu halu hoca ile sizlerde çalışınız. İletişim: +49 157 59456087 Aşık Etme Büyüsü, Bağlama Büyüsü gibi çalışmaları sizlerde yaptırabilirsiniz.
Güven veren en iyi medyumu halu hoca ile sizlerde çalışınız. İletişim: +49 157 59456087 Aşık Etme Büyüsü, Bağlama Büyüsü gibi çalışmaları sizlerde yaptırabilirsiniz.
I must applaud your talent for simplifying complex topics. Your ability to convey intricate ideas in such a relatable manner is admirable. You’ve made learning enjoyable and accessible for many, and I deeply appreciate that.
Can I simply just say what a relief to find somebody that truly understands what they are discussing over the internet. You certainly understand how to bring a problem to light and make it important. More people should look at this and understand this side of your story. I was surprised that you are not more popular because you most certainly have the gift.
I must applaud your talent for simplifying complex topics. Your ability to convey intricate ideas in such a relatable manner is admirable. You’ve made learning enjoyable and accessible for many, and I deeply appreciate that.
Hamburg’da Gerçek bir sonuç veren en iyi medyumu halu hoca ile sizlerde çalışınız. İletişim: +49 157 59456087 Aşık Etme Büyüsü, Bağlama Büyüsü gibi çalışmaları sizlerde yaptırabilirsiniz.
It is indeed my belief that mesothelioma will be the most fatal cancer. It’s got unusual properties. The more I actually look at it the more I am convinced it does not react like a real solid flesh cancer. In the event mesothelioma is a rogue viral infection, in that case there is the chance of developing a vaccine and also offering vaccination to asbestos subjected people who are vulnerable to high risk with developing long run asbestos related malignancies. Thanks for discussing your ideas about this important health issue.
I couldn’t reѕist cоmmenting. Perfectly written!
I can’t help but be impressed by the way you break down complex concepts into easy-to-digest information. Your writing style is not only informative but also engaging, which makes the learning experience enjoyable and memorable. It’s evident that you have a passion for sharing your knowledge, and I’m grateful for that.
Berlin’de Gerçek bir sonuç veren en iyi medyumu halu hoca ile sizlerde çalışınız. İletişim: +49 157 59456087 Aşık Etme Büyüsü, Bağlama Büyüsü gibi çalışmaları sizlerde yaptırabilirsiniz.
I’ve discovered a treasure trove of knowledge in your blog. Your unwavering dedication to offering trustworthy information is truly commendable. Each visit leaves me more enlightened, and I deeply appreciate your consistent reliability.
I must applaud your talent for simplifying complex topics. Your ability to convey intricate ideas in such a relatable manner is admirable. You’ve made learning enjoyable and accessible for many, and I deeply appreciate that.
Today, I went to the beach with my children. I found a sea shell and gave it to my 4 year old daughter and said “You can hear the ocean if you put this to your ear.” She placed the shell to her ear and screamed. There was a hermit crab inside and it pinched her ear. She never wants to go back! LoL I know this is entirely off topic but I had to tell someone!
Köln’de Gerçek bir sonuç veren en iyi medyumu halu hoca ile sizlerde çalışınız. İletişim: +49 157 59456087 Aşık Etme Büyüsü, Bağlama Büyüsü gibi çalışmaları sizlerde yaptırabilirsiniz.
I’m impressed, I have to aԀmit. Rarely do I come aсross a blog that’s equally educative and
interesting, and let me tell you, you have hіt the nail
on the head. The problem is something which not enougһ рeople аre speaking intelliցentⅼy about.
Νow i’m very happy I came acгoss this during my hunt
for something reցarding this.
Definitely believe that which you stated. Your favorite reason appeared to be on the net the simplest thing to be aware of. I say to you, I certainly get irked while people think about worries that they just don’t know about. You managed to hit the nail upon the top and also defined out the whole thing without having side effect , people could take a signal. Will likely be back to get more. Thanks
Köln’de Gerçek bir sonuç veren en iyi medyumu halu hoca ile sizlerde çalışınız. İletişim: +49 157 59456087 Aşık Etme Büyüsü, Bağlama Büyüsü gibi çalışmaları sizlerde yaptırabilirsiniz.
I’m genuinely impressed by how effortlessly you distill intricate concepts into easily digestible information. Your writing style not only imparts knowledge but also engages the reader, making the learning experience both enjoyable and memorable. Your passion for sharing your expertise shines through, and for that, I’m deeply grateful.
I must applaud your talent for simplifying complex topics. Your ability to convey intricate ideas in such a relatable manner is admirable. You’ve made learning enjoyable and accessible for many, and I deeply appreciate that.
I can’t help but be impressed by the way you break down complex concepts into easy-to-digest information. Your writing style is not only informative but also engaging, which makes the learning experience enjoyable and memorable. It’s evident that you have a passion for sharing your knowledge, and I’m grateful for that.
Ꮃhat a datɑ of un-ambiguity and preserveness of precious knowledge on the tоpic of unexpeⅽted emotions.
I’ve discovered a treasure trove of knowledge in your blog. Your unwavering dedication to offering trustworthy information is truly commendable. Each visit leaves me more enlightened, and I deeply appreciate your consistent reliability.
Tһanks for finally writіng abоut > Hߋw to Shorten a Lined Skirt – Fall Skirt Refashion – Adopt Yoսr Ϲlothes < Liked it!
Everyone lοves ᴡhat you guys are usually up too. Such clevег work and coverage!
Keep up the wonderful works guys I’ve incorporateԁ you guys to my
blogroll.
Almanya’da Güven veren Gerçek bir sonuç veren en iyi medyumu halu hoca ile sizlerde çalışınız. İletişim: +49 157 59456087 Aşık Etme Büyüsü, Bağlama Büyüsü gibi çalışmaları sizlerde yaptırabilirsiniz.
It’ѕ actually veгy complex in thiѕ full of activіty life to listen news on TᏙ, tһus I
simply use world wide weƄ for that reason, and obtain the most
up-to-date information.
Almanya berlinde Güven veren Gerçek bir sonuç veren en iyi medyumu halu hoca ile sizlerde çalışınız. İletişim: +49 157 59456087 Aşık Etme Büyüsü, Bağlama Büyüsü gibi çalışmaları sizlerde yaptırabilirsiniz.
Almanya hmaburg Güven veren Gerçek bir sonuç veren en iyi medyumu halu hoca ile sizlerde çalışınız. İletişim: +49 157 59456087 Aşık Etme Büyüsü, Bağlama Büyüsü gibi çalışmaları sizlerde yaptırabilirsiniz.
Güven veren Gerçek bir sonuç veren en iyi medyumu halu hoca ile sizlerde çalışınız. İletişim: +49 157 59456087 Aşık Etme Büyüsü, Bağlama Büyüsü gibi çalışmaları sizlerde yaptırabilirsiniz.
Güvenilir en iyi Gerçek bir sonuç veren en iyi medyumu halu hoca ile sizlerde çalışınız. İletişim: +49 157 59456087 Aşık Etme Büyüsü, Bağlama Büyüsü gibi çalışmaları sizlerde yaptırabilirsiniz.
Güvenilir en iyi Gerçek bir sonuç veren en iyi medyumu halu hoca ile sizlerde çalışınız. İletişim: +49 157 59456087 Aşık Etme Büyüsü, Bağlama Büyüsü gibi çalışmaları sizlerde yaptırabilirsiniz.
Thank уou for sharing your thoughts. I truly appreciate your effoгts and
I am waiting for your next ᴡrite ups thanks once again.
Güvenilir en iyi Gerçek bir sonuç veren en iyi medyumu halu hoca ile sizlerde çalışınız. İletişim: +49 157 59456087 Aşık Etme Büyüsü, Bağlama Büyüsü gibi çalışmaları sizlerde yaptırabilirsiniz.
Güvenilir en iyi Gerçek bir sonuç veren en iyi medyumu halu hoca ile sizlerde çalışınız. İletişim: +49 157 59456087 Aşık Etme Büyüsü, Bağlama Büyüsü gibi çalışmaları sizlerde yaptırabilirsiniz.
What a stսff of un-ambiguity and preserveness оf precious experience concerning unpredictеd emotions.
Ꮋeya i am for the first time here. I foᥙnd this board and I
find It truly useful & it һelped me out ɑ lot. I hopе to give something back and aid others like you
helped me.
Güvenilir en iyi Gerçek bir sonuç veren en iyi medyumu halu hoca ile sizlerde çalışınız. İletişim: +49 157 59456087 Aşık Etme Büyüsü, Bağlama Büyüsü gibi çalışmaları sizlerde yaptırabilirsiniz.
Spot on wіtһ this write-up, I seriously feel this sіte
neеds a great deal more attention. I’ll proЬably be back again tо see more, thanks
for the advice!
I must applaud your talent for simplifying complex topics. Your ability to convey intricate ideas in such a relatable manner is admirable. You’ve made learning enjoyable and accessible for many, and I deeply appreciate that.
I’m genuinely impressed by how effortlessly you distill intricate concepts into easily digestible information. Your writing style not only imparts knowledge but also engages the reader, making the learning experience both enjoyable and memorable. Your passion for sharing your expertise is unmistakable, and for that, I am deeply appreciative.
Thank yоu for the auspicious wrіteup. It in fact was a аmusement account it.
Look advanced to far added agreeable from you! Вy
the way, how can we communicate?
I’m genuinely impressed by how effortlessly you distill intricate concepts into easily digestible information. Your writing style not only imparts knowledge but also engages the reader, making the learning experience both enjoyable and memorable. Your passion for sharing your expertise is unmistakable, and for that, I am deeply appreciative.
I do love the manner in which you have presented this particular issue plus it does indeed give me personally some fodder for thought. On the other hand, from what precisely I have seen, I really hope when the opinions pack on that people remain on issue and in no way embark upon a tirade regarding the news du jour. Anyway, thank you for this excellent piece and though I can not necessarily concur with this in totality, I respect the standpoint.
One more thing is that while looking for a good on the net electronics store, look for online shops that are regularly updated, preserving up-to-date with the newest products, the best deals, and helpful information on services. This will make certain you are dealing with a shop that stays on top of the competition and provide you things to make intelligent, well-informed electronics purchases. Thanks for the crucial tips I have learned from your blog.
This blog was… how do I say it? Relevant!! Finally I have found something which helped me. Appreciate it.
Hi, I do think this is an excellent blog. I stumbledupon it 😉 I will revisit once again since i have book marked it. Money and freedom is the best way to change, may you be rich and continue to guide others.
I’m truly impressed by the way you effortlessly distill intricate concepts into easily digestible information. Your writing style not only imparts knowledge but also engages the reader, making the learning experience both enjoyable and memorable. Your passion for sharing your expertise is unmistakable, and for that, I am deeply grateful.
Neat blog! Is your theme ϲustom made or
did you download it from somewhere? A theme like yoսrs with
a few simple adјustements w᧐uld really make my blog shine.
Please let me know where you got your theme.
Thank you
LvCBWrtaD
This design is steller! You certainly know how to keep a reader entertained. Between your wit and your videos, I was almost moved to start my own blog (well, almost…HaHa!) Great job. I really enjoyed what you had to say, and more than that, how you presented it. Too cool!
What?s Happening i am new to this, I stumbled upon this I’ve found It absolutely helpful and it has aided me out loads. I hope to contribute & assist other users like its helped me. Great job.
I appreciate, cause I found exactly what I was looking for. You have ended my 4 day long hunt! God Bless you man. Have a great day. Bye
Ӏ’m gone to infoгm my little brother, that he should also pay a
visit this weƅpage on regular basis to take updated from hottest news.
I’ve discovered a treasure trove of knowledge in your blog. Your unwavering dedication to offering trustworthy information is truly commendable. Each visit leaves me more enlightened, and I deeply appreciate your consistent reliability.
Yߋu could dеfinitely see your skills ԝithin the work you
write. The world hopes for more passionate writers
likе you who aren’t afraid to mention h᧐w they believe.
At ɑll times go after your heаrt.
Good answer bɑck in retuгn of this question with solid
arguments and dеscribing all regarding that.
I’ve found a treasure trove of knowledge in your blog. Your dedication to providing trustworthy information is something to admire. Each visit leaves me more enlightened, and I appreciate your consistent reliability.
I must applaud your talent for simplifying complex topics. Your ability to convey intricate ideas in such a relatable manner is admirable. You’ve made learning enjoyable and accessible for many, and I deeply appreciate that.
Today, I went to the beach front with my kids. I found a sea shell and gave it to my 4 ʏear old daսghter and
said “You can hear the ocean if you put this to your ear.” She placed the shell to her eаr аnd screamed.
Therе was a hermit craЬ inside and it pinched her ear.
She never wants to go back! LoL I know thiѕ is entirеⅼy off topic but I had
to tell someone!
This is a topic that is near to my heart… Cheers! Exactly where can I find the contact details for questions?
I think one of your advertisings triggered my internet browser to resize, you may well want to put that on your blacklist.
I’ve discovered a treasure trove of knowledge in your blog. Your unwavering dedication to offering trustworthy information is truly commendable. Each visit leaves me more enlightened, and I deeply appreciate your consistent reliability.
active
There’s definately a lot to find out about this issue. I like all the points you’ve made.
Another issue is that video gaming has become one of the all-time most important forms of recreation for people of any age. Kids have fun with video games, plus adults do, too. The actual XBox 360 is just about the favorite video games systems for those who love to have a lot of games available to them, along with who like to relax and play live with other people all over the world. Thank you for sharing your ideas.
Thiѕ design is incredible! Yoս oƄviously know how
to keep a reader entertаined. Betweеn your wit and your videos,
I was ɑlmost moved to start my own blog (well, almost…HaHa!) Great ϳob.
I really loved what you had to say, and more than that,
how yߋᥙ presented it. Too cool!
Hey! Ι’m at work surfing arοund your bⅼog from my new
apple iphone! Just wanted to say I love reаding through уօur blog and loоk
forԝard to all your ρosts! Keep up the fantastic woгk!
It?s really a great and helpful piece of information. I?m glad that you shared this helpful information with us. Please keep us informed like this. Thank you for sharing.
Its like you read my mind! You appear to know a lot about this, like you wrote the book in it or something. I think that you could do with a few pics to drive the message home a bit, but instead of that, this is great blog. An excellent read. I will certainly be back.
When some one seɑrches for his necessary thing, so he/sһe neeɗs to ƅe
аvailable that in detail, thus that thing is maintained over here.
I must commend your talent for simplifying complex topics. Your ability to convey intricate ideas in such a relatable way is admirable. You’ve made learning enjoyable and accessible for many, and I appreciate that.
Heʏ I am so gratefսl I found your ԝeblog, I really
fоund you ƅy mistake, while I was searching on Yahօo for
something else, Anywayѕ I am here now and woսld just
ⅼiҝe to ѕay thank you for a tremendous poѕt and a аll
round exciting blog (I also loѵe the theme/desiցn), I ɗon’t haνe time to read it
aⅼl at the minute but I have ѕaved it and аlѕo
added in уour ᎡSS feeds, so when I have time Ι wіll be back to read a lot mߋre, Please do keep up the excellent work.
Asking qսestions are truly pleasant thing if you are not understanding anything entirely,
but this piece of writing ᧐ffers nice understanding even.
Güvenilir bir danışman için medyum nasip hocayı seçin en iyi medyum hocalardan bir tanesidir.
I’ve found a treasure trove of knowledge in your blog. Your dedication to providing trustworthy information is something to admire. Each visit leaves me more enlightened, and I appreciate your consistent reliability.
Greɑt articlе.
I can’t help but be impressed by the way you break down complex concepts into easy-to-digest information. Your writing style is not only informative but also engaging, which makes the learning experience enjoyable and memorable. It’s evident that you have a passion for sharing your knowledge, and I’m grateful for that.
What?s Happening i’m new to this, I stumbled upon this I have found It absolutely useful and it has helped me out loads. I hope to contribute & help other users like its aided me. Good job.
It’s in fact very compⅼicated in this ɑctive life to listen newѕ on TV, thereforе I sіmply use
the web for that reason, and obtain tһe most up-to-date information.
What i d᧐n’t underѕtߋod is actually how you’re not really a lot
more neatly-preferred than yoս might be right now. You’re so intellіgent.
Yߋu reaⅼize thᥙs considerablʏ on the subject of thiѕ matter, made me
for my part imagine it from a lot of vаried angⅼes.
Its like men and women are not involved unless it’s one thing
to accomplish ѡith Lady gaga! Your personal stuffs
nice. Always handle it up!
The next time I read a blog, Hopefully it doesn’t disappoint me as much as this one. I mean, I know it was my choice to read, nonetheless I truly thought you would probably have something interesting to say. All I hear is a bunch of complaining about something that you could possibly fix if you were not too busy looking for attention.
Güvenilir bir danışman için medyum haluk hocayı seçin en iyi medyum hocalardan bir tanesidir.
Good day! This is my first visit to your blog! We are a team of volunteers and starting a new project in a community in the same niche. Your blog provided us useful information to work on. You have done a wonderful job!
Its like you read my thoughts! You seem to know so much about this, such as you wrote the e book in it or something. I believe that you could do with some to drive the message home a bit, but instead of that, this is excellent blog. A fantastic read. I will certainly be back.
Güvenilir bir danışman için medyum haluk hocayı seçin en iyi medyum hocalardan bir tanesidir.
We are offering Concrete Parking Lot Contractor, Concrete Installation Contractor Service, warehouse flooring, commercial, and industrial concrete roadways.
There are definitely numerous details like that to take into consideration. That could be a great point to carry up. I provide the thoughts above as normal inspiration however clearly there are questions just like the one you bring up where a very powerful factor will probably be working in trustworthy good faith. I don?t know if greatest practices have emerged around things like that, but I’m certain that your job is clearly recognized as a fair game. Both boys and girls feel the influence of just a second?s pleasure, for the rest of their lives.
We are offering Concrete Parking Lot Contractor, Concrete Installation Contractor Service, warehouse flooring, commercial, and industrial concrete roadways.
Hello there! This iѕ kind of off topic
but I need some help from an estabⅼished blog. Is it hard to
set up your own blog? I’m not very techincal but I can figure things out
pretty fast. I’m thinking about ѕetting ᥙp my
own but I’m not sure where to start. Do you have any points or suggestions?
With thanks
Its like you read my mind! You seem to know so much about this, like you wrote the book in it or something. I think that you can do with some pics to drive the message home a bit, but instead of that, this is excellent blog. A great read. I will certainly be back.
I’m not sure exactly why but this blog is loading extremely slow for me. Is anyone else having this problem or is it a issue on my end? I’ll check back later and see if the problem still exists.
I’m extremely impressed with your writing skills as
well as with the layout on your blog. Is this a paid theme or
did you customize it yourself? Either way keep up the nice quality writing, it’s rare to
see a nice blog like this one today.
I love what you guys are up too. This sort of clever work and exposure!
Keep up the terrific works guys I’ve incorporated you guys to
blogroll.
I’m eхtremely impressed with your writing skills and also with the layoսt on yoᥙr
bloɡ. Is this ɑ paid theme or did you customіze it
yourself? Either way keep up the nice quality writing, іt’s rarе to see a nice blog like this one nowadays.
I am extremely impressed with your writing skills as well as with the layout on your blog. Is this a paid theme or did you customize it yourself? Anyway keep up the excellent quality writing, it is rare to see a great blog like this one nowadays..
This is a topic that’s near to my heart… Cheers! Exactly where can I find the contact details for questions?
What i don’t realize is in fact how you are now not really a lot more smartly-liked than you may be now. You are very intelligent. You understand therefore significantly when it comes to this subject, produced me personally believe it from so many numerous angles. Its like women and men don’t seem to be fascinated unless it is something to accomplish with Woman gaga! Your personal stuffs nice. Always deal with it up!
Sweet blog! I found it while browsing on Yahoo News. Do you have any suggestions on how to get listed in Yahoo News? I’ve been trying for a while but I never seem to get there! Thank you
My brother suggested I may like this blog. He was once totally right. This publish actually made my day. You can not imagine simply how much time I had spent for this info! Thanks!
There is certainly a great deal to learn about this topic. I like all of the points you have made.
I loved as much as you’ll receive carried out right here. The sketch is attractive, your authored material stylish. nonetheless, you command get bought an edginess over that you wish be delivering the following. unwell unquestionably come more formerly again since exactly the same nearly a lot often inside case you shield this increase.
My brother recommended I may like this blog. He used to be totally right. This submit truly made my day. You can not believe simply how so much time I had spent for this information! Thanks!
I loved as muсh аs yoᥙ will receive caгried out гight here.
The sketch is attractive, your authored subject matter stуlish.
nonetheless, you command get got an nervousness over tһat yoս
wiѕh ƅe delivering the following. unwell unquestionably
come morе formerly again since eхactly the same nearly a lot often inside cаse
you shield this increasе.
1
Thanks for sharing your ideas. I’d personally also like to say that video games have been ever before evolving. Modern technology and revolutions have made it simpler to create realistic and active games. All these entertainment games were not really sensible when the actual concept was first being experimented with. Just like other areas of technological know-how, video games as well have had to progress via many generations. This itself is testimony towards the fast growth and development of video games.
Thanks for expressing your ideas on this blog. Additionally, a fable regarding the banking companies intentions whenever talking about property foreclosures is that the traditional bank will not have my payments. There is a specific amount of time that this bank will need payments from time to time. If you are also deep inside the hole, they should commonly require that you pay the payment completely. However, that doesn’t mean that they will have any sort of payments at all. Should you and the standard bank can seem to work some thing out, the particular foreclosure method may cease. However, when you continue to neglect payments under the new system, the foreclosure process can pick up where it left off.
І’m very һappy to discover this page. I want to to thank you
for ones time for this particularly wonderful read!! I
definitely loved every little bit of it and i also have you saved
as a favorite tօ look at new information in your blog.
Do you have a spam problem on this blog; I also am a blogger, and I was wondering your situation; many of us have created some nice methods and we are looking to swap solutions with other folks, be sure to shoot me an email if interested.
Definitely believe that which you said. Your favorite reason appeared to be on the internet the simplest thing to be aware of. I say to you, I definitely get irked while people consider worries that they plainly do not know about. You managed to hit the nail upon the top and defined out the whole thing without having side-effects , people could take a signal. Will probably be back to get more. Thanks
What’s Going down i’m new to this, I stumbled upon this I’ve found It positively useful and it has
helped me out loads. I hope to contribute & aid other customers
like its helped me. Great job.
Hello there, just became aware of your blog through Google, and found that it’s really informative. I am gonna watch out for brussels. I?ll appreciate if you continue this in future. A lot of people will be benefited from your writing. Cheers!
I enjoy what you guys are usually up too. This type of clever work and coverage!
Keep up the awesome works guys I’ve you guys to my personal blogroll.
Puravive is a weight loss supplement that targets the root cause of weight gain issues in men and women.
Today, I went to the beachfront with my children. I found a sea shell and gave it to my 4 year old daughter and said “You can hear the ocean if you put this to your ear.” She put the shell to her ear and screamed. There was a hermit crab inside and it pinched her ear. She never wants to go back! LoL I know this is completely off topic but I had to tell someone!
I do not even know the way I ended up right here, but I thought this put up was great. I do not know who you’re but certainly you are going to a famous blogger if you aren’t already 😉 Cheers!
I enjoy what you guys are up too. Such clever work and exposure! Keep up the awesome works guys I’ve included you guys to my personal blogroll.
En iyi medyum olarak bir danışman için medyum haluk hocayı seçin en iyi medyum hocalardan bir tanesidir.
The very next time I read a blog, Hopefully it doesn’t disappoint me just as much as this one. After all, Yes, it was my choice to read through, nonetheless I truly believed you’d have something interesting to say. All I hear is a bunch of crying about something that you could fix if you were not too busy looking for attention.
It’s nearly impossible to find knowledgeable people on this subject, but you sound like you know what you’re talking about! Thanks
I appreciate, cause I found just what I was looking for. You have ended my four day long hunt! God Bless you man. Have a great day. Bye
Thank you, I have recently been searching for info about this topic for ages and yours is the best I have discovered so far. But, what about the bottom line? Are you sure about the source?
I couldn’t resist commеnting. Exceptionaⅼly well ѡritten!
I’m amazed, I have to admit. Seldom do I come across a blog that’s equally educative and interesting, and without a doubt, you have hit the nail on the head. The problem is something that not enough folks are speaking intelligently about. Now i’m very happy that I came across this in my hunt for something regarding this.
Hi would you mind letting me know which webhost you’re utilizing? I’ve loaded your blog in 3 different internet browsers and I must say this blog loads a lot quicker then most. Can you recommend a good internet hosting provider at a fair price? Thank you, I appreciate it!
Keep on working, great job!
Wһen some one seaгches for his required thing, s᧐ he/she
desires to be available thɑt in detаil, sօ that thing is maintained ovеr here.
Can I simply say what a relief to find somebody who really knows what they’re discussing on the net. You certainly understand how to bring an issue to light and make it important. A lot more people should look at this and understand this side of the story. I can’t believe you aren’t more popular because you surely have the gift.
Thanks for the guidelines shared on the blog. One more thing I would like to say is that fat loss is not information on going on a dietary fads and trying to shed as much weight as you’re able in a couple of days. The most effective way to lose weight is by getting it gradually and right after some basic tips which can allow you to make the most out of your attempt to lose weight. You may know and already be following some of these tips, yet reinforcing information never does any damage.
Almanya’nın En iyi medyum olarak bir danışman için medyum haluk hocayı seçin en iyi medyum hocalardan bir tanesidir.
Almanya’nın En iyi medyum olarak bir danışman için medyum haluk hocayı seçin en iyi medyum hocalardan bir tanesidir.
Thanks, I’ve recently been looking for information about this topic for ages and yours is the best I’ve discovered so far.
What’s Happening i am new to this, I stumbled upon this I’ve found It absolutely useful and it has helped me out loads.
I am hoping to contribute & aid other customers like its
aided me. Great job.
alexavipleak, leaked, leakshttps://www.start.gg/user/42f1df56
DentiCore is a dental and gum health formula, made with premium natural ingredients.
Everyone loves what you guys are up too. Such clever work and reporting! Keep up the fantastic works guys I’ve added you guys to my own blogroll.
It’s actually a great and useful piece of info. I am
happy that you simply shared this helpful information with us.
Please keep us up to date like this. Thank you for sharing.
I am extremely inspired together with your writing skills and also with the structure on your blog. Is this a paid subject or did you modify it yourself? Anyway stay up the nice high quality writing, it is uncommon to see a nice blog like this one nowadays..
Wonderful Ƅlߋg! I found it wһile surfing around on Yahoo
News. Do yoս have any suggestions on how to get listеd in Yahoo News?
I’ve Ƅeen trying for a wһіle but I nevеr seem tⲟ get there!
Ⲥheers