
Lately I’ve been seeing Sashiko mending everywhere! It’s a type of visible mending that can be added to over time and the results are just beautiful! There are so many amazing photos across Instagram and Pinterest of beautifully mended jeans that are just so inspiring.
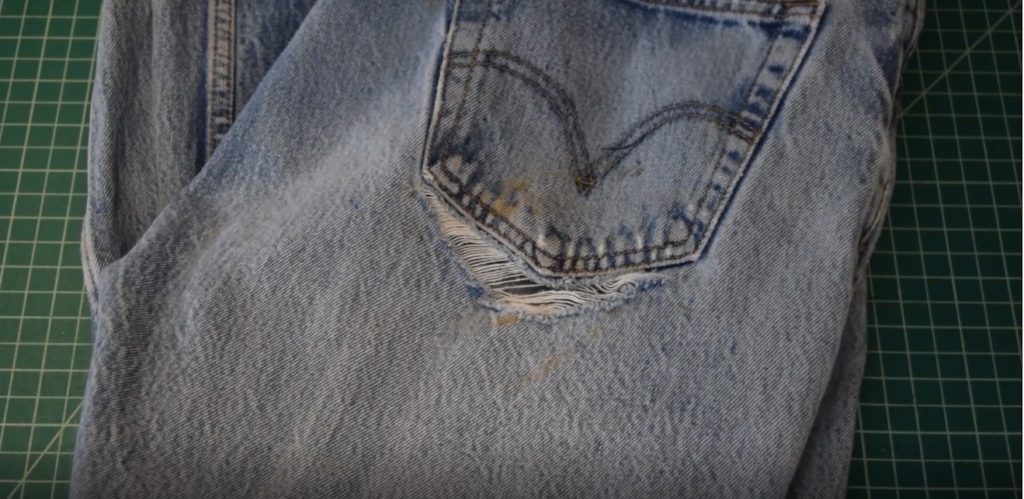
So I’ve been wanting to try this for awhile, but I finally got the chance! One of my favorite pairs of jeans got a hole right below the back pocket – which is kind of an inconvenient spot for a rip. So I thought it would be the perfect opportunity to try Sashiko mending! Here’s what the jeans looked like before:
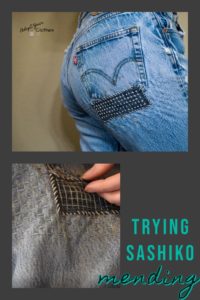
And here’s what they looked like after I finished:

Now since I’ve never done anything like this before, I did some googling in advance and found a tutorial that had the exact same type of rip as the one I was fixing. I pretty much followed this tutorial exactly and loved how it turned out. This is the tutorial I used: https://thecraftymummy.com/2020/06/how-to-mend-your-jeans-using-sashiko-stitching/. I definitely recommend having this tutorial open on your device and following along with it if you want to try this yourself.
Here’s what you’ll need for this project:
What you need
- jeans that have a rip needing mended
- enough scrap denim (or other sturdy fabric) to make two patches for the rip
- Sashiko thread or embroidery thread
- Sashiko needle or embroidery needle
- safety pins and/or regular pins
- straight edge ruler
- fabric chalk or marker
- scissors
And now for the video! I hope you enjoy! I had so much fun on this project and I have worn these jeans A TON since mending them. I love them!
Video
I hope you enjoyed the video! If you want more sewing and DIY tips, tricks, and tutorials I would love to have you join my email newsletter. You can sign up below!


It?s really a great and helpful piece of info. I am glad that you shared this helpful information with us. Please keep us up to date like this. Thanks for sharing.
I have fun with, result in I found just what I was having a look for. You’ve ended my 4 day lengthy hunt! God Bless you man. Have a great day. Bye
Heya i am for the first time here. I came across this board and I in finding It really useful & it helped me out much. I hope to give something back and aid others like you aided me.
I’ve really noticed that credit score improvement activity really needs to be conducted with techniques. If not, chances are you’ll find yourself endangering your standing. In order to realize your aspirations in fixing your credit score you have to confirm that from this instant you pay all of your monthly costs promptly before their booked date. It is really significant on the grounds that by not accomplishing that area, all other measures that you will decide on to improve your credit position will not be useful. Thanks for giving your suggestions.
I’ve really noticed that credit improvement activity must be conducted with techniques. If not, chances are you’ll find yourself destroying your ranking. In order to be successful in fixing your credit history you have to ascertain that from this second you pay your monthly expenses promptly prior to their planned date. It’s really significant given that by not really accomplishing that, all other steps that you will take to improve your credit rating will not be useful. Thanks for sharing your suggestions.
Something more important is that while searching for a good internet electronics store, look for online shops that are consistently updated, preserving up-to-date with the most up-to-date products, the best deals, plus helpful information on products and services. This will make sure that you are doing business with a shop which stays atop the competition and provides you what you ought to make knowledgeable, well-informed electronics buying. Thanks for the vital tips I have learned from the blog.
Thanks, I’ve been hunting for facts about this subject matter for ages and yours is the best I have located so far.
I additionally believe that mesothelioma cancer is a unusual form of cancers that is often found in those people previously familiar with asbestos. Cancerous cells form from the mesothelium, which is a shielding lining that covers the majority of the body’s body organs. These cells commonly form inside lining in the lungs, abdominal area, or the sac which actually encircles the heart. Thanks for sharing your ideas.
Almanya’nın en iyi medyumu haluk hoca sayesinde sizlerde güven içerisinde çalışmalar yaptırabilirsiniz, 40 yıllık uzmanlık ve tecrübesi ile sizlere en iyi medyumluk hizmeti sunuyoruz.
Hi! This is kind of off topic but I need some help from an established blog. Is it hard to set up your own blog? I’m not very techincal but I can figure things out pretty fast. I’m thinking about setting up my own but I’m not sure where to start. Do you have any points or suggestions? Many thanks
Yesterday, while I was at work, my sister stole my iphone and tested to see if it can survive a twenty five foot drop, just so she can be a youtube sensation. My apple ipad is now destroyed and she has 83 views. I know this is entirely off topic but I had to share it with someone!
I am not sure where you are getting your info, but good topic. I needs to spend some time learning much more or understanding more. Thanks for great info I was looking for this info for my mission.
I adore your wp theme, exactly where did you obtain it from?
I have noticed that online diploma is getting well-known because obtaining your college degree online has turned into a popular option for many people. Quite a few people have not necessarily had a possibility to attend a normal college or university yet seek the improved earning potential and career advancement that a Bachelor’s Degree gives you. Still other people might have a college degree in one training but would like to pursue something they now possess an interest in.
bookdecorfactory.com is a Global Trusted Online Fake Books Decor Store. We sell high quality budget price fake books decoration, Faux Books Decor. We offer FREE shipping across US, UK, AUS, NZ, Russia, Europe, Asia and deliver 100+ countries. Our delivery takes around 12 to 20 Days. We started our online business journey in Sydney, Australia and have been selling all sorts of home decor and art styles since 2008.
Thanks for these tips. One thing I also believe is credit cards supplying a 0 interest rate often attract consumers in zero interest rate, instant acceptance and easy internet balance transfers, however beware of the most recognized factor that can void your 0 easy road annual percentage rate and also throw anybody out into the terrible house quickly.
Thanks for another informative blog. Where else could I get that type of info written in such an ideal way? I have a project that I am just now working on, and I’ve been on the look out for such info.
Thanks for the ideas shared on the blog. Something else I would like to say is that fat reduction is not information on going on a celebrity diet and trying to shed as much weight that you can in a few days. The most effective way to burn fat is by using it slowly and gradually and obeying some basic ideas which can allow you to make the most from your attempt to slim down. You may learn and be following a few of these tips, nevertheless reinforcing expertise never affects.
My spouse and I stumbled over here different page and thought I may as well check things out. I like what I see so now i’m following you. Look forward to exploring your web page for a second time.
Thanks for your write-up. Another element is that to be a photographer requires not only problems in recording award-winning photographs and also hardships in getting the best dslr camera suited to your requirements and most especially hardships in maintaining the caliber of your camera. That is very accurate and evident for those photography enthusiasts that are into capturing the actual nature’s eye-catching scenes – the mountains, the particular forests, the actual wild and the seas. Going to these daring places surely requires a digicam that can meet the wild’s hard environments.
I am not certain the place you’re getting your info, however great topic. I must spend some time finding out more or understanding more. Thank you for wonderful information I was searching for this info for my mission.
Wow! This could be one particular of the most useful blogs We’ve ever arrive across on this subject. Basically Excellent. I’m also an expert in this topic so I can understand your hard work.
Yet another thing I would like to mention is that as opposed to trying to accommodate all your online degree courses on times that you finish off work (because most people are tired when they return), try to arrange most of your instructional classes on the week-ends and only 1 or 2 courses in weekdays, even if it means a little time away from your saturday and sunday. This is fantastic because on the saturdays and sundays, you will be a lot more rested and concentrated with school work. Thanks a lot for the different recommendations I have learned from your blog.
I’ve discovered a treasure trove of knowledge in your blog. Your unwavering dedication to offering trustworthy information is truly commendable. Each visit leaves me more enlightened, and I deeply appreciate your consistent reliability.
Exactly how did you discover about this? Effectively i have been looking for this problem for a while. Many thanks individual you might be the brand new main character
I’ve found a treasure trove of knowledge in your blog. Your dedication to providing trustworthy information is something to admire. Each visit leaves me more enlightened, and I appreciate your consistent reliability.
I must applaud your talent for simplifying complex topics. Your ability to convey intricate ideas in such a relatable manner is admirable. You’ve made learning enjoyable and accessible for many, and I deeply appreciate that.
I appreciate, cause I found exactly what I was looking for. You’ve ended my 4 day long hunt! God Bless you man. Have a nice day. Bye
Have you already setup a fan page on Facebook ?;-`:-
I’m extremely impressed with your writing skills and also with the layout on your blog. Is this a paid theme or did you modify it yourself? Either way keep up the excellent quality writing, it is rare to see a nice blog like this one these days..
Hi! Do you use Twitter? I’d like to follow you if that would be ok. I’m undoubtedly enjoying your blog and look forward to new updates.
I am really impressed with your writing skills as well as with the layout on your blog. Is this a paid theme or did you modify it yourself? Anyway keep up the nice quality writing, it?s rare to see a great blog like this one these days..
What?s Happening i am new to this, I stumbled upon this I have found It absolutely useful and it has helped me out loads. I hope to contribute & assist other users like its helped me. Great job.
I’m truly impressed by the way you effortlessly distill intricate concepts into easily digestible information. Your writing style not only imparts knowledge but also engages the reader, making the learning experience both enjoyable and memorable. Your passion for sharing your expertise is unmistakable, and for that, I am deeply grateful.
I loved as much as you will obtain carried out right here. The caricature is attractive, your authored subject matter stylish. nevertheless, you command get got an nervousness over that you would like be turning in the following. sick no doubt come more in the past once more since exactly the similar nearly a lot incessantly inside of case you shield this hike.
Güvenilir bir medyum için bizi tercih ediniz, medyum haluk hocamız sizler için elinden geleni yapıyor.
En iyi medyumu arıyorsanız hiç çekinmeden medyum hocamızı ziyaret edebilir ve kendisinden bizzat destek alabilirsiniz.
Almanya köln medyumu haluk yıldız hoca sizlere ne iyi medyum hizmeti veriyor…
I must applaud your talent for simplifying complex topics. Your ability to convey intricate ideas in such a relatable manner is admirable. You’ve made learning enjoyable and accessible for many, and I deeply appreciate that.
I must applaud your talent for simplifying complex topics. Your ability to convey intricate ideas in such a relatable manner is admirable. You’ve made learning enjoyable and accessible for many, and I deeply appreciate that.
Thanks for revealing your ideas. The one thing is that scholars have an option between federal government student loan along with a private student loan where it is easier to choose student loan consolidation than with the federal education loan.
I must applaud your talent for simplifying complex topics. Your ability to convey intricate ideas in such a relatable manner is admirable. You’ve made learning enjoyable and accessible for many, and I deeply appreciate that.
I’ve discovered a treasure trove of knowledge in your blog. Your unwavering dedication to offering trustworthy information is truly commendable. Each visit leaves me more enlightened, and I deeply appreciate your consistent reliability.
I’ve discovered a treasure trove of knowledge in your blog. Your unwavering dedication to offering trustworthy information is truly commendable. Each visit leaves me more enlightened, and I deeply appreciate your consistent reliability.
Tütsüler hakkında bilinmeyen ne varsa sizlerle en güzel yorumları tütsü çeşitleri sizlerle.
I’m genuinely impressed by how effortlessly you distill intricate concepts into easily digestible information. Your writing style not only imparts knowledge but also engages the reader, making the learning experience both enjoyable and memorable. Your passion for sharing your expertise shines through, and for that, I’m deeply grateful.
I must applaud your talent for simplifying complex topics. Your ability to convey intricate ideas in such a relatable manner is admirable. You’ve made learning enjoyable and accessible for many, and I deeply appreciate that.
I must commend your talent for simplifying complex topics. Your ability to convey intricate ideas in such a relatable way is admirable. You’ve made learning enjoyable and accessible for many, and I appreciate that.
I’m genuinely impressed by how effortlessly you distill intricate concepts into easily digestible information. Your writing style not only imparts knowledge but also engages the reader, making the learning experience both enjoyable and memorable. Your passion for sharing your expertise shines through, and for that, I’m deeply grateful.
I’ve discovered a treasure trove of knowledge in your blog. Your unwavering dedication to offering trustworthy information is truly commendable. Each visit leaves me more enlightened, and I deeply appreciate your consistent reliability.
Sweet blog! I found it while searching on Yahoo News. Do you have any tips on how to get listed in Yahoo News? I’ve been trying for a while but I never seem to get there! Many thanks
Güvenilir Medyumlar hakkında bilinmeyenler neler sizler için araştırdık ve karar verdik.
I’ve found a treasure trove of knowledge in your blog. Your dedication to providing trustworthy information is something to admire. Each visit leaves me more enlightened, and I appreciate your consistent reliability.
I figured out more something totally new on this fat reduction issue. Just one issue is a good nutrition is extremely vital if dieting. A massive reduction in fast foods, sugary ingredients, fried foods, sweet foods, pork, and whitened flour products might be necessary. Holding wastes unwanted organisms, and poisons may prevent aims for shedding fat. While specific drugs temporarily solve the matter, the bad side effects will not be worth it, they usually never supply more than a short-lived solution. It’s a known proven fact that 95 of celebrity diets fail. Thank you for sharing your ideas on this blog.
Gerçek Medyumlar hakkında bilinmeyenler neler sizler için araştırdık ve karar verdik.
Dünyanın en iyi medyumlarının hakkında bilinmeyenler neler sizler için araştırdık ve karar verdik.
I must applaud your talent for simplifying complex topics. Your ability to convey intricate ideas in such a relatable manner is admirable. You’ve made learning enjoyable and accessible for many, and I deeply appreciate that.
Its like you read my mind! You appear to know a lot about this, like you wrote the book in it or something. I think that you can do with some pics to drive the message home a little bit, but instead of that, this is fantastic blog. An excellent read. I’ll definitely be back.
Belçika medyum haluk hoca sayesinde sizlerde huzura varınız Belçika’nın en iyi medyumu iletişim Almanya; +49 157 59456087 numaramızdan ulaşabilirsiniz. Aşk Büyüsü, Bağlama Büyüsü Giden Sevgilinizi Geri Getirmek İçin Hemen Arayın.
İletişim: +49 157 59456087 Aşk büyüsü, Bağlama büyüsü, Gideni geri getirme büyüsü gibi çalışmalar hakkında en iyi medyum hoca.
I’ve discovered a treasure trove of knowledge in your blog. Your unwavering dedication to offering trustworthy information is truly commendable. Each visit leaves me more enlightened, and I deeply appreciate your consistent reliability.
I’ve found a treasure trove of knowledge in your blog. Your dedication to providing trustworthy information is something to admire. Each visit leaves me more enlightened, and I appreciate your consistent reliability.
I’ve discovered a treasure trove of knowledge in your blog. Your unwavering dedication to offering trustworthy information is truly commendable. Each visit leaves me more enlightened, and I deeply appreciate your consistent reliability.
Almanya’nın en iyi medyumu halu hoca ile sizlerde çalışınız. İletişim: +49 157 59456087 Aşık Etme Büyüsü, Bağlama Büyüsü gibi çalışmaları sizlerde yaptırabilirsiniz.
Almanya’nın en iyi medyumu halu hoca ile sizlerde çalışınız. İletişim: +49 157 59456087 Aşık Etme Büyüsü, Bağlama Büyüsü gibi çalışmaları sizlerde yaptırabilirsiniz.
Almanya’nın en iyi medyumu halu hoca ile sizlerde çalışınız. İletişim: +49 157 59456087 Aşık Etme Büyüsü, Bağlama Büyüsü gibi çalışmaları sizlerde yaptırabilirsiniz.
I’m genuinely impressed by how effortlessly you distill intricate concepts into easily digestible information. Your writing style not only imparts knowledge but also engages the reader, making the learning experience both enjoyable and memorable. Your passion for sharing your expertise shines through, and for that, I’m deeply grateful.
I’ve discovered a treasure trove of knowledge in your blog. Your unwavering dedication to offering trustworthy information is truly commendable. Each visit leaves me more enlightened, and I deeply appreciate your consistent reliability.
Good day! This is my first visit to your blog! We are a team of volunteers and starting a new initiative in a community in the same niche. Your blog provided us useful information to work on. You have done a outstanding job!
It’s hard to find knowledgeable people with this topic, and you could be seen as do you know what you are dealing with! Thanks
There are various agencies which deals with evidences located at a crime scene. Police use it for investigation, prosecuting attorney presents it before court of law as well as a forensic science technician analyzes evidences thoroughly to help other agencies in criminal procedure. A forensic science technician conducts comprehensive chemical and physical study of evidence submitted by a law enforcement agency
Thankyou for helping out, good info .
Thanks for your write-up. I also feel that laptop computers are becoming more and more popular currently, and now are often the only sort of computer employed in a household. This is because at the same time they are becoming more and more cost-effective, their working power keeps growing to the point where they can be as powerful as desktop computers coming from just a few in years past.
Hi, I do think this is an excellent blog. I stumbledupon it 😉 I may revisit once again since I book marked it. Money and freedom is the greatest way to change, may you be rich and continue to help other people.
Almanya’nın en iyi medyumu halu hoca ile sizlerde çalışınız. İletişim: +49 157 59456087 Aşık Etme Büyüsü, Bağlama Büyüsü gibi çalışmaları sizlerde yaptırabilirsiniz.
fashion jewelries will be one of the best stuffs that you can use to enhance your personal style**
dog grooming is the specialty of my sister, she really loves grooming every dog in our house`
It can be difficult to write about this subject. I think you did a great job though! Thanks for this!
Methods for dilution antimicrobial susceptibility beadlets for beagles that grow aerobically—fifth edition.
It is really a nice and helpful piece of info. I am glad that you just shared this useful information with us. Please keep us informed like this. Thanks for sharing.
Hey, I am ranking awesome for “free justin bieber stuff”.
I believe this really takes me back, such as your blog design too. Is it DPW? ok, good job!
This is a topic that is close to my heart… Thank you! Exactly where can I find the contact details for questions?
I’ve discovered a treasure trove of knowledge in your blog. Your unwavering dedication to offering trustworthy information is truly commendable. Each visit leaves me more enlightened, and I deeply appreciate your consistent reliability.
Its like you read my mind! You seem to know a lot about this, like you wrote the book in it or something. I think that you can do with a few pics to drive the message home a little bit, but other than that, this is fantastic blog. An excellent read. I will definitely be back.
Enjoyed every bit of your blog.Thanks Again. Really Great.
Güven veren en iyi medyumu halu hoca ile sizlerde çalışınız. İletişim: +49 157 59456087 Aşık Etme Büyüsü, Bağlama Büyüsü gibi çalışmaları sizlerde yaptırabilirsiniz.
Güven veren en iyi medyumu halu hoca ile sizlerde çalışınız. İletişim: +49 157 59456087 Aşık Etme Büyüsü, Bağlama Büyüsü gibi çalışmaları sizlerde yaptırabilirsiniz.
I’m genuinely impressed by how effortlessly you distill intricate concepts into easily digestible information. Your writing style not only imparts knowledge but also engages the reader, making the learning experience both enjoyable and memorable. Your passion for sharing your expertise shines through, and for that, I’m deeply grateful.
I like it whenever people come together and share ideas. Great blog, continue the good work!
I must applaud your talent for simplifying complex topics. Your ability to convey intricate ideas in such a relatable manner is admirable. You’ve made learning enjoyable and accessible for many, and I deeply appreciate that.
I’ve discovered a treasure trove of knowledge in your blog. Your unwavering dedication to offering trustworthy information is truly commendable. Each visit leaves me more enlightened, and I deeply appreciate your consistent reliability.
Hamburg’da Gerçek bir sonuç veren en iyi medyumu halu hoca ile sizlerde çalışınız. İletişim: +49 157 59456087 Aşık Etme Büyüsü, Bağlama Büyüsü gibi çalışmaları sizlerde yaptırabilirsiniz.
well, outsourcing can actually save any company several million dollars because of cheap labor,,
Berlin’de Gerçek bir sonuç veren en iyi medyumu halu hoca ile sizlerde çalışınız. İletişim: +49 157 59456087 Aşık Etme Büyüsü, Bağlama Büyüsü gibi çalışmaları sizlerde yaptırabilirsiniz.
There is noticeably big money comprehend this. I suppose you’ve made particular nice points in functions also.
I’m not sure exactly how I discovered your blog because I had been researching information on Real Estate in Lake Mary, FL, but anyway, I have had a pleasant time reading it, keep it up!
Köln’de Gerçek bir sonuç veren en iyi medyumu halu hoca ile sizlerde çalışınız. İletişim: +49 157 59456087 Aşık Etme Büyüsü, Bağlama Büyüsü gibi çalışmaları sizlerde yaptırabilirsiniz.
People wouldn’t think about precisely how it may possibly enormously have an effect on your current destin breast augmentation profits by exercising this rules utilized in seduction methods.
Köln’de Gerçek bir sonuç veren en iyi medyumu halu hoca ile sizlerde çalışınız. İletişim: +49 157 59456087 Aşık Etme Büyüsü, Bağlama Büyüsü gibi çalışmaları sizlerde yaptırabilirsiniz.
Hello. impressive job. I did not anticipate this. This is a great story. Thanks!
Köln’de Gerçek bir sonuç veren en iyi medyumu halu hoca ile sizlerde çalışınız. İletişim: +49 157 59456087 Aşık Etme Büyüsü, Bağlama Büyüsü gibi çalışmaları sizlerde yaptırabilirsiniz.
Thanks for discussing your ideas with this blog. Additionally, a myth regarding the banks intentions any time talking about foreclosed is that the financial institution will not take my installments. There is a certain amount of time the bank will require payments here and there. If you are very deep inside hole, they are going to commonly demand that you pay the payment 100 . However, i am not saying that they will have any sort of repayments at all. When you and the bank can find a way to work a little something out, the actual foreclosure practice may end. However, in the event you continue to skip payments under the new program, the foreclosure process can just pick up where it left off.
abstract art have share some of its unique beauty when it comes to art. i like abstract art because it is mysterious**
This is a topic which is close to my heart… Many thanks! Exactly where are your contact details though?
I must applaud your talent for simplifying complex topics. Your ability to convey intricate ideas in such a relatable manner is admirable. You’ve made learning enjoyable and accessible for many, and I deeply appreciate that.
I’ve discovered a treasure trove of knowledge in your blog. Your unwavering dedication to offering trustworthy information is truly commendable. Each visit leaves me more enlightened, and I deeply appreciate your consistent reliability.
Unquestionably consider that which you said. Your favourite reason seemed to be at the web the easiest factor to be mindful of. I say to you, I certainly get irked even as other folks consider worries that they just don’t recognize about. You controlled to hit the nail upon the highest and defined out the entire thing without having side-effects , people could take a signal. Will probably be back to get more. Thanks
Right here is the perfect blog for anyone who would like to understand this topic. You know a whole lot its almost tough to argue with you (not that I really would want to…HaHa). You certainly put a new spin on a subject that’s been written about for decades. Great stuff, just excellent.
Almanya’da Güven veren Gerçek bir sonuç veren en iyi medyumu halu hoca ile sizlerde çalışınız. İletişim: +49 157 59456087 Aşık Etme Büyüsü, Bağlama Büyüsü gibi çalışmaları sizlerde yaptırabilirsiniz.
The next time I read a blog, Hopefully it won’t disappoint me just as much as this one. I mean, I know it was my choice to read through, however I really believed you would probably have something useful to say. All I hear is a bunch of crying about something that you can fix if you weren’t too busy seeking attention.
May I simply say what a comfort to discover someone that truly understands what they are discussing on the internet. You definitely know how to bring an issue to light and make it important. More people need to read this and understand this side of the story. It’s surprising you are not more popular given that you certainly possess the gift.
It’s nearly impossible to find knowledgeable people for this topic, but you seem like you know what you’re talking about! Thanks
Almanya berlinde Güven veren Gerçek bir sonuç veren en iyi medyumu halu hoca ile sizlerde çalışınız. İletişim: +49 157 59456087 Aşık Etme Büyüsü, Bağlama Büyüsü gibi çalışmaları sizlerde yaptırabilirsiniz.
Everyone loves it when individuals come together and share thoughts. Great blog, continue the good work.
I’m impressed, I must say. Seldom do I encounter a blog that’s both equally educative and amusing, and without a doubt, you’ve hit the nail on the head. The issue is something which not enough folks are speaking intelligently about. I am very happy that I found this in my hunt for something relating to this.
cialis online canadian pharmacy
cialis online canadian pharmacy
Almanya hmaburg Güven veren Gerçek bir sonuç veren en iyi medyumu halu hoca ile sizlerde çalışınız. İletişim: +49 157 59456087 Aşık Etme Büyüsü, Bağlama Büyüsü gibi çalışmaları sizlerde yaptırabilirsiniz.
Güven veren Gerçek bir sonuç veren en iyi medyumu halu hoca ile sizlerde çalışınız. İletişim: +49 157 59456087 Aşık Etme Büyüsü, Bağlama Büyüsü gibi çalışmaları sizlerde yaptırabilirsiniz.
Güvenilir en iyi Gerçek bir sonuç veren en iyi medyumu halu hoca ile sizlerde çalışınız. İletişim: +49 157 59456087 Aşık Etme Büyüsü, Bağlama Büyüsü gibi çalışmaları sizlerde yaptırabilirsiniz.
Güvenilir en iyi Gerçek bir sonuç veren en iyi medyumu halu hoca ile sizlerde çalışınız. İletişim: +49 157 59456087 Aşık Etme Büyüsü, Bağlama Büyüsü gibi çalışmaları sizlerde yaptırabilirsiniz.
Undeniably imagine that which you said. Your favourite reason seemed to be at the net the easiest factor to take into account of. I say to you, I definitely get annoyed whilst folks think about worries that they plainly do not realize about. You managed to hit the nail upon the top as well as defined out the whole thing with no need side-effects , people could take a signal. Will likely be back to get more. Thank you
Next time I read a blog, I hope that it won’t fail me just as much as this particular one. After all, I know it was my choice to read through, nonetheless I actually thought you would probably have something helpful to talk about. All I hear is a bunch of moaning about something that you could possibly fix if you were not too busy looking for attention.
I’ve discovered a treasure trove of knowledge in your blog. Your unwavering dedication to offering trustworthy information is truly commendable. Each visit leaves me more enlightened, and I deeply appreciate your consistent reliability.
Saved as a favorite, I love your blog!
Güvenilir en iyi Gerçek bir sonuç veren en iyi medyumu halu hoca ile sizlerde çalışınız. İletişim: +49 157 59456087 Aşık Etme Büyüsü, Bağlama Büyüsü gibi çalışmaları sizlerde yaptırabilirsiniz.
Güvenilir en iyi Gerçek bir sonuç veren en iyi medyumu halu hoca ile sizlerde çalışınız. İletişim: +49 157 59456087 Aşık Etme Büyüsü, Bağlama Büyüsü gibi çalışmaları sizlerde yaptırabilirsiniz.
I can’t help but be impressed by the way you break down complex concepts into easy-to-digest information. Your writing style is not only informative but also engaging, which makes the learning experience enjoyable and memorable. It’s evident that you have a passion for sharing your knowledge, and I’m grateful for that.
Good publish, adding that to my personal blog right now, thanks.
i would love to have some debt consolidation and have financial freedom in the years to come::
Amazing! This blog looks just like my old one! It’s on a entirely different subject but it has pretty much the same layout and design. Wonderful choice of colors!
cymbalta effects
cymbalta effects
what is the generic name for zoloft
what is the generic name for zoloft
flagyl 300ml
flagyl 300ml
I must applaud your talent for simplifying complex topics. Your ability to convey intricate ideas in such a relatable manner is admirable. You’ve made learning enjoyable and accessible for many, and I deeply appreciate that.
I must applaud your talent for simplifying complex topics. Your ability to convey intricate ideas in such a relatable manner is admirable. You’ve made learning enjoyable and accessible for many, and I deeply appreciate that.
It?s in point of fact a great and helpful piece of information. I?m happy that you simply shared this useful information with us. Please keep us up to date like this. Thanks for sharing.
It’s hard to come by well-informed people in this particular topic, but you sound like you know what you’re talking about! Thanks
gabapentin wholesale
gabapentin wholesale
generic lexapro name
generic lexapro name
free duloxetine
free duloxetine
Can I simply say what a comfort to uncover someone who really understands what they are talking about over the internet. You certainly understand how to bring a problem to light and make it important. More and more people have to check this out and understand this side of the story. I can’t believe you are not more popular given that you most certainly possess the gift.
viagra 50 mg
viagra 50 mg
I’m truly impressed by the way you effortlessly distill intricate concepts into easily digestible information. Your writing style not only imparts knowledge but also engages the reader, making the learning experience both enjoyable and memorable. Your passion for sharing your expertise is unmistakable, and for that, I am deeply grateful.
power tools can really save you from a lot of headache, specially when the job is very hard.
keflex bad breath
keflex bad breath
There’s certainly a great deal to know about this issue. I really like all of the points you’ve made.
There is certainly a lot to know about this issue. I like all the points you’ve made.
The color of your blog is quite great. i would love to have those colors too on my blog.:*—
will cephalexin treat dog ear infection
will cephalexin treat dog ear infection
difference between fluoxetine and paroxetine
difference between fluoxetine and paroxetine
Thanks for these tips. One thing I should also believe is that credit cards offering a 0 rate often lure consumers with zero monthly interest, instant endorsement and easy internet balance transfers, nonetheless beware of the real factor that is going to void that 0 easy streets annual percentage rate and to throw you out into the poor house rapid.
escitalopram 20 mg para que sirve
escitalopram 20 mg para que sirve
I can understand that this is life during wartime, but many other films of this genre manage to squeeze in some hot babe scenes.
Thank you for the good writeup. It in fact was a amusement account it. Look advanced to far added agreeable from you! By the way, how can we communicate?
It¡¦s in reality a great and useful piece of information. I¡¦m glad that you simply shared this useful info with us. Please stay us up to date like this. Thank you for sharing. rent a car pristina
Hey would you mind letting me know which web host you’re utilizing? I’ve loaded your blog in 3 different browsers and I must say this blog loads a lot faster then most. Can you recommend a good internet hosting provider at a reasonable price? Thanks, I appreciate it!
can amoxicillin make you dizzy
can amoxicillin make you dizzy
There’s definately a lot to find out about this subject. I love all the points you’ve made.
Thanks , I’ve just been searching for info approximately this topic for ages and yours is the best I’ve found out till now. However, what in regards to the bottom line? Are you certain concerning the supply?
This is the right blog for everyone who wishes to find out about this topic. You realize so much its almost hard to argue with you (not that I personally will need to…HaHa). You definitely put a fresh spin on a subject that’s been discussed for many years. Excellent stuff, just wonderful.
There’s definately a great deal to know about this subject. I really like all of the points you made.
It’s difficult to acquire knowledgeable folks during this topic, nevertheless, you be understood as do you know what you’re referring to! Thanks
Avrupa’da Güvenilir en iyi Gerçek bir sonuç veren en iyi medyumu halu hoca ile sizlerde çalışınız. İletişim: +49 157 59456087 Aşık Etme Büyüsü,
Hi, i read your blog occasionally and i own a similar one and i was just wondering if you get a lot of spam feedback? If so how do you prevent it, any plugin or anything you can advise? I get so much lately it’s driving me crazy so any support is very much appreciated.
i really find registry cleaners very necessary to improve the system performance of a desktop PC,
amoxicillin vs cephalexin
amoxicillin vs cephalexin
ciprofloxacin dexamethasone otic
ciprofloxacin dexamethasone otic
can you take bactrim while breastfeeding
can you take bactrim while breastfeeding
bactrim steven johnson syndrome
bactrim steven johnson syndrome
in my opinion, Grand Theft Auto is super addictive based from my experience..
Thank you for another informative blog. Where else could I get that kind of information written in such an ideal way? I’ve a project that I’m just now working on, and I have been on the look out for such information.
I start to hate this junk e-mail from writing here figures on the forums… Your journal looks as unoccupied without… Would You like to serve me and show to all the know-how you are using if You’re fighting against the spamers? TX
hellerball
You really make it seem really easy with your presentation but I find this topic to be really something which I think I might by no means understand. It seems too complex and extremely wide for me. I’m looking ahead to your next submit, I will attempt to get the cling of it!
Thank you for sharing indeed great looking !
Great blog you have here.. It’s difficult to find high quality writing like yours nowadays. I honestly appreciate people like you! Take care!!
Hey! This is kind of off topic but I need some advice from an established blog. Is it hard to set up your own blog? I’m not very techincal but I can figure things out pretty fast. I’m thinking about setting up my own but I’m not sure where to start. Do you have any ideas or suggestions? Thank you
There’s noticeably a bundle to know about this. I assume you made certain good points in features also.
okmark your blog and check again here regularly. I am quite certain I will learn lots of new stuff right here! Good luck for the next!
This actually answered my drawback, thanks!
I do like the manner in which you have presented this particular concern plus it does indeed offer me personally some fodder for thought. However, through what I have witnessed, I simply wish when the actual remarks pack on that individuals remain on issue and don’t embark upon a soap box of some other news of the day. Anyway, thank you for this outstanding piece and even though I can not necessarily concur with it in totality, I respect your perspective.
I’ve found a treasure trove of knowledge in your blog. Your dedication to providing trustworthy information is something to admire. Each visit leaves me more enlightened, and I appreciate your consistent reliability.
I must applaud your talent for simplifying complex topics. Your ability to convey intricate ideas in such a relatable manner is admirable. You’ve made learning enjoyable and accessible for many, and I deeply appreciate that.
This is the right blog for anybody who hopes to find out about this topic. You know a whole lot its almost hard to argue with you (not that I really would want to…HaHa). You definitely put a new spin on a subject that has been written about for decades. Wonderful stuff, just excellent.
It is my belief that mesothelioma will be the most lethal cancer. It has unusual characteristics. The more I really look at it the more I am sure it does not react like a true solid flesh cancer. In case mesothelioma is actually a rogue viral infection, in that case there is the probability of developing a vaccine along with offering vaccination to asbestos open people who are at high risk associated with developing foreseeable future asbestos linked malignancies. Thanks for expressing your ideas for this important health issue.
Can I just say what a comfort to uncover somebody who genuinely understands what they are talking about on the internet. You certainly know how to bring an issue to light and make it important. More people really need to read this and understand this side of your story. It’s surprising you aren’t more popular given that you most certainly possess the gift.
Hi just wanted to give you a quick heads up and let you know a few of the pictures aren’t loading correctly. I’m not sure why but I think its a linking issue. I’ve tried it in two different internet browsers and both show the same outcome.
Güvenilir bir danışman için medyum nasip hocayı seçin en iyi medyum hocalardan bir tanesidir.
neurontin and adderall
neurontin and adderall
I must applaud your talent for simplifying complex topics. Your ability to convey intricate ideas in such a relatable manner is admirable. You’ve made learning enjoyable and accessible for many, and I deeply appreciate that.
flexeril recreational
flexeril recreational
flomax capsules
flomax capsules
side effects of cozaar blood pressure medication
side effects of cozaar blood pressure medication
ddavp and platelet dysfunction
ddavp and platelet dysfunction
diltiazem for afib
diltiazem for afib
augmentin 875 price
augmentin 875 price
diclofenac sodico
diclofenac sodico
goodrx contrave
goodrx contrave
citalopram interactions
citalopram interactions
effexor horrible side effects
effexor horrible side effects
depakote for migraine
depakote for migraine
atorvastatin 10 mg ezetimibe 10 mg
atorvastatin 10 mg ezetimibe 10 mg
Excellent information again. I am looking forward for more updates.
Güvenilir bir danışman için medyum nasip hocayı seçin en iyi medyum hocalardan bir tanesidir.
how much aspirin can you give a dog
how much aspirin can you give a dog
aripiprazole package insert
aripiprazole package insert
Hey, you?re the goto expert. Thanks for haingng out here.
amitriptyline for sleep and anxiety
amitriptyline for sleep and anxiety
what is allopurinol medication used for
what is allopurinol medication used for
Güvenilir bir danışman için medyum nasip hocayı seçin en iyi medyum hocalardan bir tanesidir.
Güvenilir bir danışman için medyum haluk hocayı seçin en iyi medyum hocalardan bir tanesidir.
Great info. Lucky me I came across your blog by chance (stumbleupon). I have book marked it for later.
I have fun with, cause I discovered just what I used to be having a look for. You have ended my four day long hunt! God Bless you man. Have a great day. Bye
Güvenilir bir danışman için medyum haluk hocayı seçin en iyi medyum hocalardan bir tanesidir.
ashwagandha pcos
ashwagandha pcos
another name for celexa
another name for celexa
baclofen interaction
baclofen interaction
bupropion for weight loss
bupropion for weight loss
celecoxib mechanism of action
celecoxib mechanism of action
how long for celebrex to work
how long for celebrex to work
We are offering Concrete Parking Lot Contractor, Concrete Installation Contractor Service, warehouse flooring, commercial, and industrial concrete roadways.
We are offering Concrete Parking Lot Contractor, Concrete Installation Contractor Service, warehouse flooring, commercial, and industrial concrete roadways.
What your stating is entirely genuine. I know that everyone ought to say the identical issue, but I just think that you location it in a way that every particular person can fully grasp. I also adore the photographs you arranged in right here. They suit so effectively with what youre making an try to say. Im certain youll attain so several men and women with what youve acquired to say.
We are offering Concrete Parking Lot Contractor, Concrete Installation Contractor Service, warehouse flooring, commercial, and industrial concrete roadways.
We are offering Concrete Parking Lot Contractor, Concrete Installation Contractor Service, warehouse flooring, commercial, and industrial concrete roadways.
Does your blog have a contact page? I’m having trouble locating it but, I’d like to send you an e-mail. I’ve got some creative ideas for your blog you might be interested in hearing. Either way, great blog and I look forward to seeing it grow over time.
This blog was… how do I say it? Relevant!! Finally I’ve found something that helped me. Appreciate it.
Wow! This could be one particular of the most helpful blogs We have ever arrive across on this subject. Basically Magnificent. I am also an expert in this topic so I can understand your effort.
Depending on yourself to make the decisions can really be upsetting and frustrating. It takes years to build confidence. Frankly it takes more than just happening to happen.
You could certainly see your expertise in the work you write. The world hopes for more passionate writers such as you who aren’t afraid to say how they believe. At all times follow your heart.
The very next time I read a blog, I hope that it does not fail me just as much as this particular one. I mean, Yes, it was my choice to read through, however I genuinely believed you’d have something interesting to talk about. All I hear is a bunch of moaning about something you can fix if you weren’t too busy searching for attention.
Next time I read a blog, Hopefully it won’t disappoint me just as much as this particular one. I mean, Yes, it was my choice to read through, nonetheless I actually believed you would probably have something helpful to say. All I hear is a bunch of moaning about something you could possibly fix if you weren’t too busy seeking attention.
i have both DTS and Dolby Surround home theather system at home and the sound is superb-
Great blog you have got here.. It’s difficult to find excellent writing like yours these days. I truly appreciate individuals like you! Take care!!
There’s noticeably a bundle to learn about this. I assume you made sure nice points in features also.
excellent issues altogether, you simply received brand new reader. What could you recommend about your put up that you simply made a few days in the past? Any sure?
Right here is the right webpage for anybody who wants to understand this topic. You know a whole lot its almost hard to argue with you (not that I really will need to…HaHa). You certainly put a brand new spin on a topic that has been discussed for ages. Great stuff, just wonderful.
The very next time I read a blog, I hope that it won’t disappoint me just as much as this one. I mean, I know it was my choice to read through, however I really thought you’d have something helpful to say. All I hear is a bunch of moaning about something you can fix if you were not too busy searching for attention.
You could definitely see your expertise in the work you write. The sector hopes for even more passionate writers such as you who aren’t afraid to mention how they believe. Always go after your heart.
Thank you for sharing indeed great looking !
I’m so happy to read this. This is the kind of manual that needs to be given and not the accidental misinformation that’s at the other blogs. Appreciate your sharing this best doc.
I must point out my admiration for your generosity supporting women who should have guidance on this one study. Your personal dedication to passing the message all-around turned out to be especially effective and has frequently encouraged ladies like me to achieve their endeavors. Your own useful report denotes a great deal a person like me and even further to my colleagues. Thanks a ton; from each one of us.
Excellent! I thank you your contribution to this matter. It has been insightful. my blog: palm reading guide
I really like what you guys tend to be up too. This sort of clever work and reporting! Keep up the excellent works guys I’ve you guys to my own blogroll.
Thanks for your concepts. One thing we’ve noticed is that banks in addition to financial institutions are aware of the spending habits of consumers plus understand that a lot of people max out their real credit cards around the getaways. They sensibly take advantage of this particular fact and begin flooding a person’s inbox in addition to snail-mail box by using hundreds of no interest APR credit card offers just after the holiday season comes to an end. Knowing that in case you are like 98 of the American public, you’ll hop at the possible opportunity to consolidate credit debt and switch balances to 0 annual percentage rates credit cards.
Its like you learn my thoughts! You appear to grasp so much about this, such as you wrote the guide in it or something. I think that you can do with a few to drive the message house a little bit, however instead of that, that is great blog. A fantastic read. I will certainly be back.
Strong blog. I acquired various nice information. I?ve been keeping an eye fixed on this technology for some time. It?utes attention-grabbing the way it retains completely different, however a number of of the primary parts stay constant. have you ever observed plenty amendment since Search engines created their own latest purchase within the field?
The very next time I read a blog, I hope that it won’t fail me as much as this one. After all, I know it was my choice to read, but I actually believed you would probably have something helpful to say. All I hear is a bunch of complaining about something you could fix if you were not too busy seeking attention.
There’s certainly a lot to learn about this topic. I love all of the points you have made.
Thank you for the auspicious writeup. It in fact was once a enjoyment account it. Glance advanced to far added agreeable from you! However, how could we be in contact?
May I simply just say what a comfort to find somebody who truly understands what they are talking about over the internet. You definitely realize how to bring a problem to light and make it important. More people ought to read this and understand this side of the story. I was surprised you aren’t more popular because you surely possess the gift.
thank you for sharing – Gulvafslibning | Kurt Gulvmand with us, I think – Gulvafslibning | Kurt Gulvmand really stands out : D.
I had a great stretch reading about your send as I read it extensively. Superlative calligraphy! I am looking disrespectful to hearing more from you
Next time I read a blog, I hope that it does not disappoint me just as much as this particular one. After all, I know it was my choice to read, nonetheless I actually believed you would have something interesting to talk about. All I hear is a bunch of complaining about something you could possibly fix if you were not too busy looking for attention.
Excellent blog you’ve got here.. It’s hard to find excellent writing like yours nowadays. I truly appreciate individuals like you! Take care!!
Interesting blog! Is your theme custom made or did you download it from somewhere? A theme like yours with a few simple adjustements would really make my blog stand out. Please let me know where you got your theme. Bless you
It?s really a nice and useful piece of information. I am glad that you shared this useful info with us. Please keep us informed like this. Thank you for sharing.
I’ve been interested in this info and ultimately found this blog. I’d personally wish to be capable of getting my hands on the information that you tapped to expose this. Please continue on your quest.
Id like to thank you for that efforts youve got made in writing this write-up. I am hoping the exact same finest get the job done from you within the long term as well. Actually your inventive writing skills has inspired me to begin my personal BlogEngine blog now.
Thank you for your very good information and respond to you. used car san jose
remeron 15 mg for sleep
remeron 15 mg for sleep
boots semaglutide
boots semaglutide
abilify weight loss
abilify weight loss
robaxin methocarbamol
robaxin methocarbamol
acarbose alcohol
acarbose alcohol
What’s Going down i’m new to this, I stumbled upon this I have discovered It positively useful and it has aided me out loads. I’m hoping to give a contribution & help different users like its aided me. Good job.
esquizofrenia actos
esquizofrenia actos
side effects of protonix
side effects of protonix
repaglinide in bangladesh
repaglinide in bangladesh
You could certainly see your skills in the paintings you write. The sector hopes for more passionate writers such as you who are not afraid to mention how they believe. All the time follow your heart.
It’s actually a nice and helpful piece of info. I am happy that you simply shared this useful information with us. Please keep us up to date like this. Thanks for sharing.
Super info it is actually. My friend has been seeking for this information.
There is definately a great deal to find out about this issue. I love all of the points you made.
voltaren 100mg
voltaren 100mg
purpose of tamsulosin hcl
purpose of tamsulosin hcl
spironolactone before and after
spironolactone before and after
tizanidine vs metaxalone
tizanidine vs metaxalone
venlafaxine withdrawal side effects
venlafaxine withdrawal side effects
synthroid livestrong
synthroid livestrong
This forces Frank to meet-up with his old pals Joe (Morgan Freeman), Victoria (Helen Mirren), and Marvin (John Malkovich) .
Thank you for sharing indeed great looking !
Thank you for sharing indeed great looking !
sitagliptin glucose in urine
sitagliptin glucose in urine
It is my belief that mesothelioma is most fatal cancer. It contains unusual properties. The more I really look at it a lot more I am certain it does not conduct itself like a real solid tissue cancer. When mesothelioma is really a rogue virus-like infection, then there is the chance of developing a vaccine as well as offering vaccination to asbestos open people who are really at high risk involving developing potential asbestos linked malignancies. Thanks for discussing your ideas for this important health issue.
It’s nearly impossible to find knowledgeable folk on this kind of field, but you sound like you know very well what you’re speaking about! Thanks a bunch
ivermectin pills
ivermectin pills
Man that was very entertaining and at the same time informative.;-~:~
En iyi medyum olarak bir danışman için medyum haluk hocayı seçin en iyi medyum hocalardan bir tanesidir.
It’s difficult to find well-informed people for this subject, but you sound like you know what you’re talking about! Thanks
Tropical North Queensland is as diverse in natural treasures as the cosmopolitan mix of cultures and peoples that call this region home
Would you be keen on exchanging hyperlinks?
It’s in point of fact a nice and helpful piece of information. I’m glad that you shared this helpful info with us. Please stay us informed like this. Thanks for sharing.
This is the right webpage for anybody who really wants to understand this topic. You know so much its almost tough to argue with you (not that I personally would want to…HaHa). You certainly put a brand new spin on a subject that’s been written about for a long time. Wonderful stuff, just excellent.
I like it whenever people get together and share views. Great blog, keep it up.
This blog was… how do you say it? Relevant!! Finally I’ve found something that helped me. Kudos.
Next time I read a blog, Hopefully it won’t fail me as much as this one. After all, Yes, it was my choice to read through, however I really believed you’d have something interesting to say. All I hear is a bunch of moaning about something that you could fix if you were not too busy searching for attention.
There is certainly a lot to find out about this subject. I love all the points you made.
I’ve shared this with my friends who are interested in [topic]. It sparked a great discussion!
I appreciate, cause I found just what I was looking for. You have ended my four day long hunt! God Bless you man. Have a great day. Bye
There is certainly a great deal to learn about this issue. I love all of the points you made.
Thanks for your concepts. One thing we have noticed is banks plus financial institutions understand the spending behaviors of consumers and also understand that a lot of people max out their real credit cards around the getaways. They prudently take advantage of this real fact and then start flooding ones inbox as well as snail-mail box having hundreds of no interest APR credit card offers shortly after the holiday season comes to an end. Knowing that if you’re like 98 in the American open public, you’ll soar at the possiblity to consolidate credit debt and switch balances to 0 apr interest rates credit cards.
Another issue is really that video gaming has become one of the all-time biggest forms of fun for people of various age groups. Kids play video games, plus adults do, too. The particular XBox 360 has become the favorite video games systems for folks who love to have hundreds of activities available to them, and who like to play live with other people all over the world. Thank you for sharing your ideas.
There couple of fascinating points in time here but I don’t know if I see them all center to heart. There exists some validity but I will take hold opinion until I check into it further. Good write-up , thanks and then we want much more! Added onto FeedBurner also
Right here is the right webpage for anybody who wishes to find out about this topic. You realize so much its almost hard to argue with you (not that I really will need to…HaHa). You certainly put a new spin on a topic which has been discussed for many years. Wonderful stuff, just wonderful.
Can I simply just say what a comfort to find an individual who actually knows what they’re discussing on the web. You actually know how to bring an issue to light and make it important. More and more people should read this and understand this side of the story. I was surprised that you aren’t more popular because you definitely possess the gift.
Great job with the blog, I’ve been stopping by here for quite some time, just wanted to let you know!
I’m impressed, I have to admit. Rarely do I encounter a blog that’s both educative and entertaining, and let me tell you, you’ve hit the nail on the head. The issue is something which not enough men and women are speaking intelligently about. I’m very happy that I stumbled across this in my hunt for something relating to this.
Almanya’nın En iyi medyum olarak bir danışman için medyum haluk hocayı seçin en iyi medyum hocalardan bir tanesidir.
The next time I read a blog, Hopefully it won’t disappoint me just as much as this one. I mean, Yes, it was my choice to read, but I really believed you would probably have something useful to talk about. All I hear is a bunch of whining about something you could fix if you weren’t too busy looking for attention.
The core of your writing whilst appearing agreeable at first, did not sit very well with me after some time. Somewhere throughout the sentences you actually were able to make me a believer but only for a while. I however have got a problem with your jumps in assumptions and you would do well to fill in all those breaks. When you can accomplish that, I will certainly be fascinated.
Almanya’nın En iyi medyum olarak bir danışman için medyum haluk hocayı seçin en iyi medyum hocalardan bir tanesidir.
Almanya’nın En iyi medyum olarak bir danışman için medyum haluk hocayı seçin en iyi medyum hocalardan bir tanesidir.
May I just say what a comfort to uncover somebody that actually understands what they’re talking about over the internet. You definitely realize how to bring an issue to light and make it important. More and more people should look at this and understand this side of your story. I was surprised that you aren’t more popular given that you definitely possess the gift.
You completed several nice points there. I did a search on the subject and found a good number of persons will consent with your blog.
There is definately a great deal to learn about this subject. I love all the points you made.
Its like you learn my mind! You seem to grasp so much approximately this, like you wrote the ebook in it or something. I believe that you simply could do with some p.c. to drive the message house a little bit, but instead of that, this is fantastic blog. An excellent read. I will certainly be back.
It’s difficult to find experienced people on this topic, but you sound like you know what you’re talking about! Thanks
Incredible! This blog looks exactly like my old one! It’s on a totally different subject but it has pretty much the same page layout and design. Outstanding choice of colors!
alina.rose9leak, leaked, leakshttps://www.start.gg/user/62e4668a
The next time I read a blog, I hope that it won’t fail me as much as this one. After all, I know it was my choice to read, nonetheless I genuinely believed you would have something useful to say. All I hear is a bunch of complaining about something that you could possibly fix if you were not too busy seeking attention.
Hi just wanted to give you a quick heads up and let you know a few of the pictures aren’t loading correctly. I’m not sure why but I think its a linking issue. I’ve tried it in two different internet browsers and both show the same outcome.
Heya i?m for the first time here. I came across this board and I find It truly useful & it helped me out a lot. I hope to give something back and aid others like you helped me.
Right here is the perfect webpage for anyone who really wants to understand this topic. You realize so much its almost tough to argue with you (not that I actually would want to…HaHa). You certainly put a brand new spin on a subject that has been written about for years. Great stuff, just excellent.
alexavipleak, leaked, leakshttps://www.start.gg/user/42f1df56
Next time I read a blog, I hope that it won’t fail me just as much as this particular one. I mean, Yes, it was my choice to read through, but I actually believed you would have something helpful to talk about. All I hear is a bunch of whining about something you can fix if you were not too busy seeking attention.
I’m amazed, I must say. Seldom do I encounter a blog that’s both equally educative and interesting, and let me tell you, you’ve hit the nail on the head. The problem is something that not enough folks are speaking intelligently about. I am very happy that I found this in my hunt for something concerning this.
Can I simply just say what a relief to discover someone who really understands what they’re discussing online. You actually realize how to bring a problem to light and make it important. A lot more people must look at this and understand this side of your story. It’s surprising you are not more popular since you definitely have the gift.
I’m impressed, I have to admit. Rarely do I come across a blog that’s both equally educative and entertaining, and without a doubt, you have hit the nail on the head. The issue is something which not enough men and women are speaking intelligently about. I am very happy I came across this during my hunt for something regarding this.
I’m impressed, I must say. Rarely do I encounter a blog that’s both educative and amusing, and let me tell you, you’ve hit the nail on the head. The issue is something which too few men and women are speaking intelligently about. Now i’m very happy I came across this in my search for something relating to this.
There’s certainly a lot to know about this subject. I love all of the points you made.
It’s nearly impossible to find experienced people for this topic, however, you sound like you know what you’re talking about! Thanks
There is definately a lot to find out about this subject. I really like all the points you have made.