
Fold over elastic (FOE) is one of my favorite finishes. It’s fast, simple, and results in a gorgeous finish. I love using FOE to finish the raw edges on delicate and sheer fabrics – things like tulle and lace. It really is a beautiful way to finish a beautiful fabric.
I also really love using it on knits. Things like sports bras/tops, swim tops, tank tops, and bodysuits. You can even use the FOE to create spaghetti straps!
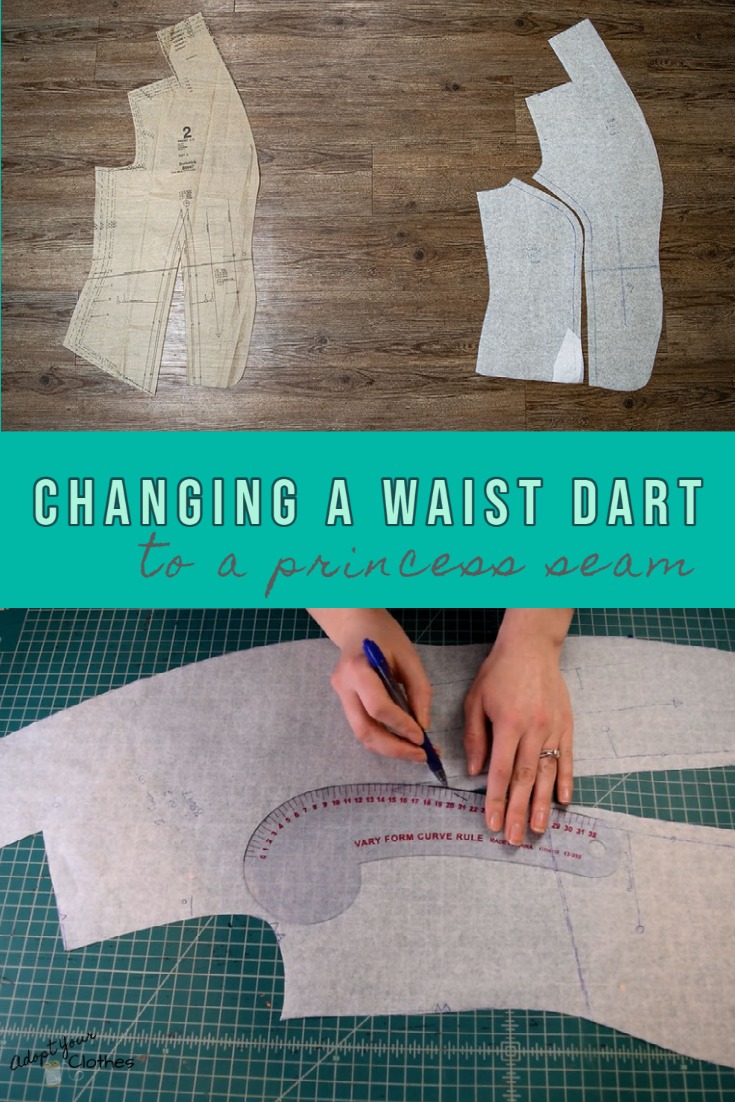
Alright, now let me show you how to use FOE. It’s really simple to apply… but I definitely recommend practicing a bit because it may take a bit of practice to get the feel for handling the elastic and fabric all at once.
Down below you’ll find the video tutorial as well as a written tutorial if you scroll past the video.
But first, what you’ll need!
What you need
*This list contains affiliate links for your DIYing convenience, so I receive a small commission if you buy something through my links. This really helps to support my site so I can keep creating DIY tutorials to help you create your dream wardrobe.
- fold over elastic
- thread
- sewing machine
- stretch needle
- scissors
Video
Written Tutorial
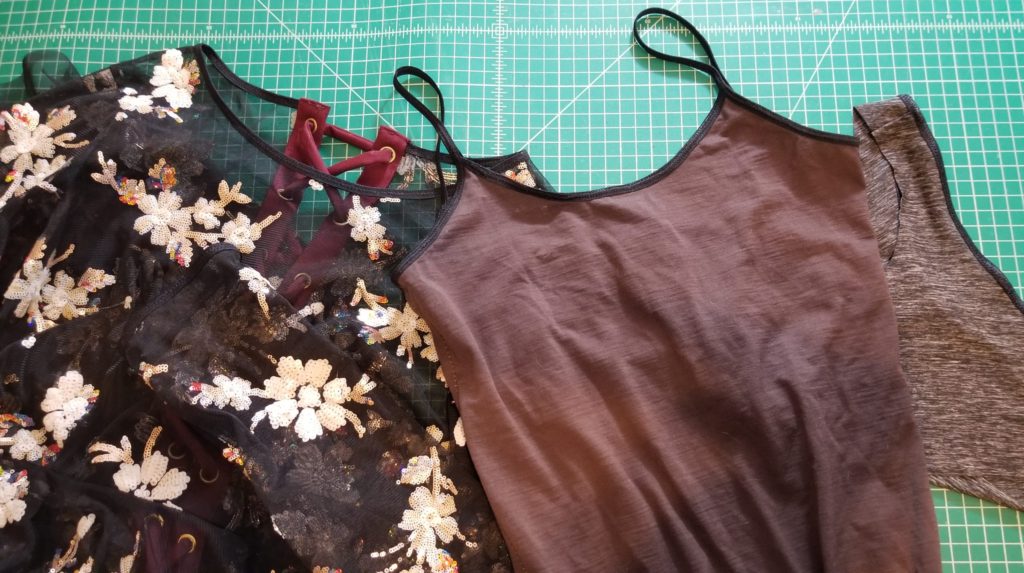
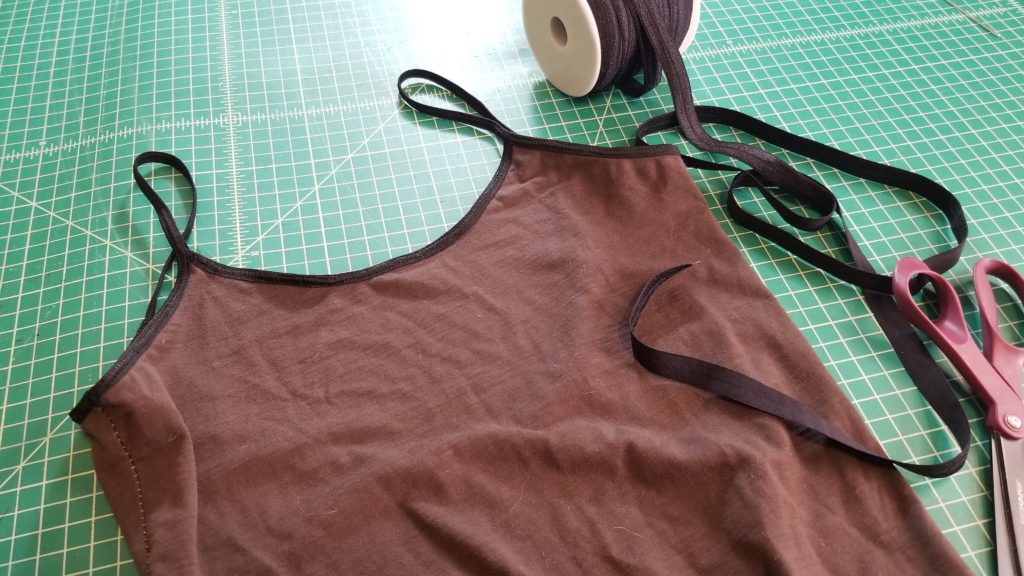
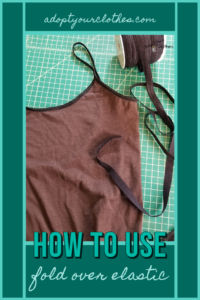
So I like to apply my fold over elastic straight off the roll, or the “cut” if you’re using cut yardage. So I’m going to be applying elastic to the armhole of a basic sports bra top as an example.
First, you’ll want to set your machine to a zigzag or stretch stitch. You also may want to change to a stretch or ballpoint needle – sometimes a universal needle will give me trouble with skipped stitches.
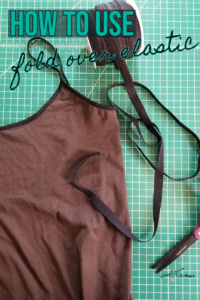
Next, grab the end of your FOE and pick a spot on the back of the garment opening to start (I like to have the elastic overlap in the back just so it’s not super obvious). Place the fabric on top of the FOE, covering half of the elastic. You’ll want the WRONG side (so the matte, not shiny, side) of the elastic facing up towards your fabric.

Next, simply fold the other edge of the elastic up and over the fabric, encasing the raw edge inside.

Holding the end of the elastic in place where it is encasing the fabric, put it under your sewing machine foot and put the presser foot down.

Now start sewing with a zigzag stitch straight down the center of the elastic, doing a small backstitch at the beginning.
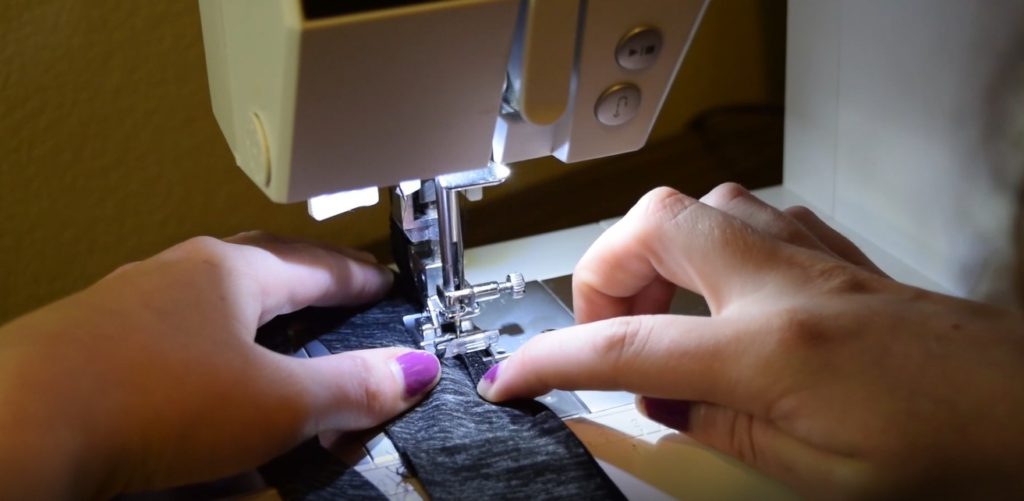
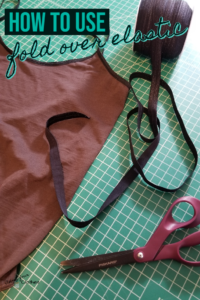
Now just continue sewing the elastic onto the raw edge of the fabric all the way around the opening. The key is to take it slow and continue stopping and readjusting elastic/fabric as you go. You want to make sure that everything is in place before it goes under the presser foot! When in doubt, stop and make sure the elastic is fully encasing the edge of the fabric before continuing.

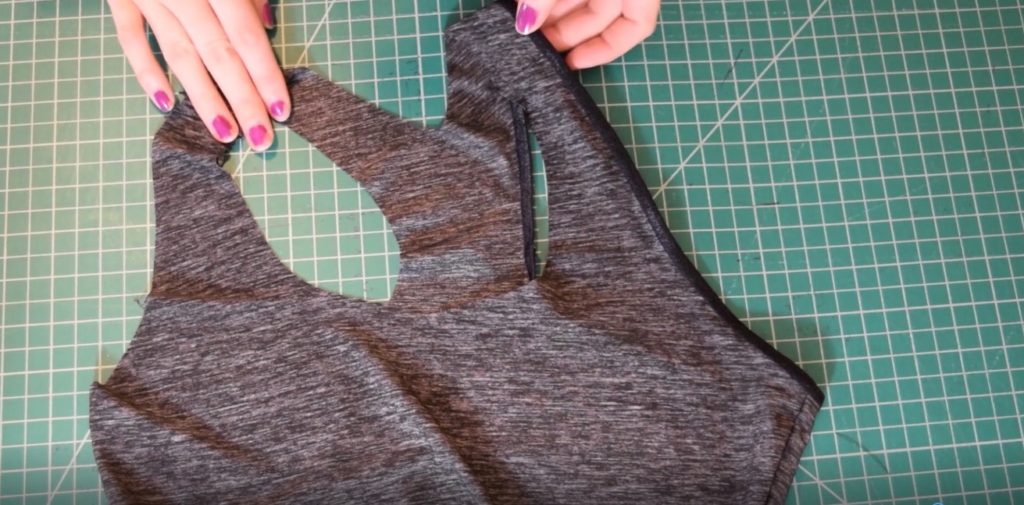
Once you’ve sewn the elastic all the way around and get back to where you started, continue on folding the elastic around the edge about an inch past the first edge of the elastic (so overlap the elastic about an inch). Then do another backstitch and trim your thread tails. Then you can cut away the elastic close to your stitching.

And done! I find that the ends of the fold over elastic don’t tend to fray much at all, so I like this easy overlap method of applying it.
I hope you found this tutorial helpful! If you want more sewing and DIY tips, tricks, and tutorials, I would love to have you subscribe to my email newsletter. 🙂


Hi! This is my first visit to your blog! We are a group of volunteers and starting a new initiative in a community in the same niche. Your blog provided us useful information to work on. You have done a outstanding job!
The very root of your writing whilst sounding reasonable in the beginning, did not really work well with me after some time. Somewhere throughout the paragraphs you actually managed to make me a believer but only for a very short while. I still have a problem with your leaps in logic and you might do nicely to fill in all those gaps. If you actually can accomplish that, I will undoubtedly end up being fascinated.
This design is spectacular! You certainly know how to keep a reader entertained. Between your wit and your videos, I was almost moved to start my own blog (well, almost…HaHa!) Fantastic job. I really enjoyed what you had to say, and more than that, how you presented it. Too cool!
It?s laborious to search out knowledgeable people on this matter, however you sound like you understand what you?re speaking about! Thanks
My spouse and I stumbled over here from a different web page and thought I might as well check things out. I like what I see so now i am following you. Look forward to looking into your web page for a second time.
Neat blog! Is your theme custom made or did you download it from somewhere? A theme like yours with a few simple tweeks would really make my blog stand out. Please let me know where you got your design. Appreciate it
I am extremely impressed with your writing skills and also with the layout on your blog. Is this a paid theme or did you modify it yourself? Either way keep up the excellent quality writing, it is rare to see a nice blog like this one these days..
Hi there, just turned into aware of your blog via Google, and found that it’s really informative. I am gonna be careful for brussels. I will be grateful for those who proceed this in future. Numerous other folks will probably be benefited out of your writing. Cheers!
Thanks for these guidelines. One thing I also believe is the fact that credit cards providing a 0 rate often attract consumers in with zero rate, instant acceptance and easy on-line balance transfers, however beware of the real factor that can void your 0 easy neighborhood annual percentage rate and to throw you out into the very poor house fast.
Today, I went to the beach front with my children. I found a sea shell and gave it to my 4 year old daughter and said “You can hear the ocean if you put this to your ear.” She put the shell to her ear and screamed. There was a hermit crab inside and it pinched her ear. She never wants to go back! LoL I know this is entirely off topic but I had to tell someone!
What i don’t understood is in truth how you are no longer actually a lot more neatly-favored than you may be now. You are so intelligent. You know therefore considerably on the subject of this matter, produced me in my view imagine it from so many numerous angles. Its like women and men don’t seem to be involved until it?s one thing to accomplish with Woman gaga! Your own stuffs nice. Always take care of it up!
Almanya’nın en iyi medyumu haluk hoca sayesinde sizlerde güven içerisinde çalışmalar yaptırabilirsiniz, 40 yıllık uzmanlık ve tecrübesi ile sizlere en iyi medyumluk hizmeti sunuyoruz.
Almanya’nın en çok tercih edilen medyumu haluk yıldız hoca olarak bilinmektedir, 40 yıllık tecrübesi ile sizlere en iyi bağlama işlemini yapan ilk medyum hocadır.
Merhaba Ben Haluk Hoca, Aslen Irak Asıllı Arap Hüseyin Efendinin Torunuyum. Yaklaşık İse 40 Yıldır Havas Ve Hüddam İlmi Üzerinde Sizlere 100 Sonuç Veren Garantili Çalışmalar Hazırlamaktayım, 1964 Yılında Irak’ın Basra Şehrinde Doğdum, Dedem Arap Hüseyin Efendiden El Aldım Ve Sizlere 1990 lı Yıllardan Bu Yana Medyum Hocalık Konularında Hizmet Veriyorum, 100 Sonuç Vermiş Olduğum Çalışmalar İse, Giden Eşleri Sevgilileri Geri Getirme, Aşk Bağlama, Aşık Etme, Kısmet Açma, Büyü Bozma Konularında Garantili Sonuçlar Veriyorum, Başta Almanya Fransa Hollanda Olmak Üzere Dünyanın Neresinde Olursanız Olun Hiç Çekinmeden Benimle İletişim Kurabilirsiniz.
Hi there! This is kind of off topic but I need some help from an established blog. Is it very difficult to set up your own blog? I’m not very techincal but I can figure things out pretty quick. I’m thinking about making my own but I’m not sure where to start. Do you have any ideas or suggestions? Cheers
Almanya’nın en iyi güvenilir medyumunun tüm sosyal medya hesaplarını sizlere paylaşıyoruz, güvenin ve kalitelin tek adresi olan medyum haluk hoca 40 yıllık uzmanlığı ile sizlerle.
I do enjoy the manner in which you have presented this difficulty and it really does supply me some fodder for consideration. However, coming from what I have personally seen, I simply just hope when the actual reviews pile on that folks keep on point and don’t start on a soap box of some other news of the day. Anyway, thank you for this exceptional piece and although I do not really concur with it in totality, I value your viewpoint.
Today, I went to the beach front with my kids. I found a sea shell and gave it to my 4 year old daughter and said “You can hear the ocean if you put this to your ear.” She placed the shell to her ear and screamed. There was a hermit crab inside and it pinched her ear. She never wants to go back! LoL I know this is completely off topic but I had to tell someone!
I know of the fact that now, more and more people will be attracted to cams and the subject of images. However, being a photographer, you need to first invest so much period deciding which model of video camera to buy as well as moving store to store just so you may buy the cheapest camera of the trademark you have decided to pick. But it does not end at this time there. You also have to contemplate whether you should obtain a digital video camera extended warranty. Thx for the good tips I accumulated from your blog.
Dünyaca ünlü medyum haluk hocayı sizlere tanıtıyoruz anlatıyoruz, Avrupanın ilk ve tek medyum hocası 40 yıllık uzmanlık ve tecrübesi ile sizlerle.
This will be a fantastic web page, will you be interested in doing an interview about just how you developed it? If so e-mail me!
Hey there! Do you know if they make any plugins to safeguard against hackers? I’m kinda paranoid about losing everything I’ve worked hard on. Any recommendations?
Dünyaca ünlü medyum haluk hocayı sizlere tanıtıyoruz anlatıyoruz, Avrupanın ilk ve tek medyum hocası 40 yıllık uzmanlık ve tecrübesi ile sizlerle.
Belçika’nın en iyi medyumu medyum haluk hoca ile sizlerde en iyi çalışmalara yakınsınız, hemen arayın farkı görün.
Medyum haluk hoca avrupanın en güvenilir medyum hocasıdır, sizlerinde bilgiği gibi en iyi medyumu bulmak zordur, biz sizlere geldik.
You could certainly see your skills in the work you write. The world hopes for even more passionate writers like you who aren’t afraid to say how they believe. Always go after your heart.
Ünlülerin tercih ettiği medyum hocamıza dilediğiniz zaman ulaşabilirsiniz, medyum haluk hocamız sizlerin daimi yanında olacaktır.
Birincisi güvenilir medyum hocaları bulmak olacaktır, ikinci seçenek ise en iyi medyumları bulmak olacaktır, siz hangisini seçerdiniz.
great points altogether, you simply gained a new reader. What might you suggest in regards to your put up that you simply made a few days in the past? Any positive?
Dünyaca ünlü medyum haluk hoca, 40 yıllık uzmanlık ve tecrübesi ile sizlere en iyi hizmetleri vermeye devam ediyor, Aşk büyüsü bağlama büyüsü giden sevigiliyi geri getirme.
Thanks , I’ve just been searching for info about this topic for ages and yours is the greatest I have discovered so far. But, what about the conclusion? Are you sure about the source?
güvenilir bir medyum hoca bulmak o kadarda zor değil, medyum haluk hoca sizlerin en iyi medyumu.
You actually make it seem so easy together with your presentation but I in finding this topic to be actually one thing that I feel I’d by no means understand. It seems too complex and very huge for me. I’m looking forward to your next put up, I will attempt to get the cling of it!
Ünlülerin tercih ettiği bir medyum hoca bulmak o kadarda zor değil, medyum haluk hoca sizlerin en iyi medyumu.
Yet another thing is that while searching for a good on the web electronics store, look for web shops that are regularly updated, always keeping up-to-date with the most recent products, the very best deals, plus helpful information on services and products. This will ensure you are handling a shop that really stays over the competition and offers you things to make educated, well-informed electronics expenditures. Thanks for the essential tips I have learned from your blog.
Its such as you read my mind! You appear to grasp so much approximately this, like you wrote the e book in it or something. I feel that you just can do with a few percent to drive the message house a little bit, however instead of that, this is magnificent blog. A fantastic read. I’ll certainly be back.
I’m really enjoying the design and layout of your blog. It’s a very easy on the eyes which makes it much more enjoyable for me to come here and visit more often. Did you hire out a designer to create your theme? Fantastic work!
Its like you read my mind! You seem to know a lot about this, like you wrote the book in it or something. I think that you could do with some pics to drive the message home a bit, but instead of that, this is great blog. A fantastic read. I will definitely be back.
It’s my belief that mesothelioma is actually the most dangerous cancer. It has unusual traits. The more I really look at it the harder I am assured it does not work like a true solid cells cancer. If mesothelioma is a rogue viral infection, then there is the prospects for developing a vaccine and also offering vaccination to asbestos open people who are really at high risk regarding developing foreseeable future asbestos relevant malignancies. Thanks for expressing your ideas about this important ailment.
Bağlama büyüsü konularında en iyi büyü yapan medyum haluk hoca sizlerin her zaman kısa sürede yanınızda tek yapmanız gereken aramak.
Today, with all the fast chosen lifestyle that everyone is having, credit cards have a big demand throughout the economy. Persons coming from every discipline are using credit card and people who are not using the credit card have made arrangements to apply for one in particular. Thanks for sharing your ideas about credit cards.
Hamburg medyum haluk hoca sizlerin en iyi danışmanı olarak hizmet vermeye devam ediyor.
Ankara yeminli tercüme bürosu hizmeti, sizleriçin çeviri hizmetini ayağınıza getiriyoruz hemen iletişim.
bookdecorfactory.com is a Global Trusted Online Fake Books Decor Store. We sell high quality budget price fake books decoration, Faux Books Decor. We offer FREE shipping across US, UK, AUS, NZ, Russia, Europe, Asia and deliver 100+ countries. Our delivery takes around 12 to 20 Days. We started our online business journey in Sydney, Australia and have been selling all sorts of home decor and art styles since 2008.
Medyum Astroloji nedir, rüya ilmi nedir hüddam ilmi nedir vefk ilmi ile yapılacak işlemler nelerdir.
Medyum Astroloji hakkında bilmedikleriniz neler var, bunları sizler için derledik yayınladık.
bookdecorfactory.com is a Global Trusted Online Fake Books Decor Store. We sell high quality budget price fake books decoration, Faux Books Decor. We offer FREE shipping across US, UK, AUS, NZ, Russia, Europe, Asia and deliver 100+ countries. Our delivery takes around 12 to 20 Days. We started our online business journey in Sydney, Australia and have been selling all sorts of home decor and art styles since 2008.
Hamburg Medyumunuz Astroloji hakkında bilmedikleriniz neler var, bunları sizler için derledik yayınladık.
One more issue is really that video gaming has become one of the all-time main forms of excitement for people of all ages. Kids play video games, and also adults do, too. The particular XBox 360 is probably the favorite games systems for those who love to have a huge variety of video games available to them, in addition to who like to experiment with live with other folks all over the world. Many thanks for sharing your thinking.
Thanks for the publish. My partner and i have continually observed that a lot of people are desperate to lose weight because they wish to appear slim plus attractive. However, they do not often realize that there are many benefits so that you can losing weight as well. Doctors say that obese people come across a variety of conditions that can be instantly attributed to their excess weight. Fortunately that people who’re overweight in addition to suffering from numerous diseases are able to reduce the severity of their particular illnesses through losing weight. You are able to see a gradual but noted improvement with health as soon as even a slight amount of fat reduction is achieved.
Hamburg Medyumunuz Haluk Hoca Astroloji hakkında bilmedikleriniz neler var, bunları sizler için derledik yayınladık.
I?m impressed, I must say. Actually not often do I encounter a blog that?s each educative and entertaining, and let me let you know, you have got hit the nail on the head. Your thought is outstanding; the problem is one thing that not enough people are speaking intelligently about. I am very completely happy that I stumbled throughout this in my search for something regarding this.
I’ve really noticed that fixing credit activity has to be conducted with tactics. If not, you might find yourself damaging your rating. In order to succeed in fixing to your credit rating you have to make sure that from this time you pay all your monthly costs promptly in advance of their appointed date. It’s really significant since by certainly not accomplishing so, all other methods that you will choose to adopt to improve your credit ranking will not be effective. Thanks for giving your thoughts.
Güvenilir bir medyum için bizi tercih ediniz, medyum haluk hocamız sizler için elinden geleni yapıyor.
Güvenilir bir medyum için bizi tercih ediniz, medyum haluk hocamız sizler için elinden geleni yapıyor.
Hi there! This is kind of off topic but I need some help from an established blog. Is it difficult to set up your own blog? I’m not very techincal but I can figure things out pretty fast. I’m thinking about creating my own but I’m not sure where to begin. Do you have any ideas or suggestions? Many thanks
I’ve really noticed that credit improvement activity ought to be conducted with techniques. If not, you will probably find yourself damaging your standing. In order to realize your aspirations in fixing your credit history you have to ensure that from this moment you pay all of your monthly expenses promptly prior to their scheduled date. Really it is significant because by definitely not accomplishing that, all other steps that you will choose to adopt to improve your credit ranking will not be powerful. Thanks for expressing your ideas.
Its such as you read my thoughts! You seem to grasp a lot about this, like you wrote the ebook in it or something. I think that you just could do with some to power the message house a little bit, however other than that, this is great blog. An excellent read. I will certainly be back.
Güvenilir bir medyum için bizi tercih ediniz, medyum haluk hocamız sizler için elinden geleni yapıyor.
I?m not sure where you’re getting your information, but great topic. I needs to spend some time learning much more or understanding more. Thanks for fantastic info I was looking for this info for my mission.
Thank you, I’ve just been looking for information about this subject for ages and yours is the greatest I’ve discovered so far. But, what about the conclusion? Are you sure about the source?
Have you ever thought about creating an e-book or guest authoring on other blogs? I have a blog based upon on the same ideas you discuss and would really like to have you share some stories/information. I know my viewers would appreciate your work. If you’re even remotely interested, feel free to send me an e mail.
okmark your blog and check again here frequently. I’m quite certain I?ll learn many new stuff right here! Good luck for the next!
I?d have to test with you here. Which is not something I normally do! I get pleasure from reading a put up that may make folks think. Additionally, thanks for permitting me to remark!
It?s really a nice and helpful piece of info. I am glad that you shared this useful info with us. Please keep us up to date like this. Thanks for sharing.
Its such as you read my mind! You appear to know a lot about this, such as you wrote the guide in it or something. I believe that you can do with some to force the message home a little bit, but instead of that, that is magnificent blog. An excellent read. I will definitely be back.
I’m genuinely impressed by how effortlessly you distill intricate concepts into easily digestible information. Your writing style not only imparts knowledge but also engages the reader, making the learning experience both enjoyable and memorable. Your passion for sharing your expertise shines through, and for that, I’m deeply grateful.
I’ve discovered a treasure trove of knowledge in your blog. Your unwavering dedication to offering trustworthy information is truly commendable. Each visit leaves me more enlightened, and I deeply appreciate your consistent reliability.
I’m genuinely impressed by how effortlessly you distill intricate concepts into easily digestible information. Your writing style not only imparts knowledge but also engages the reader, making the learning experience both enjoyable and memorable. Your passion for sharing your expertise shines through, and for that, I’m deeply grateful.
I must applaud your talent for simplifying complex topics. Your ability to convey intricate ideas in such a relatable manner is admirable. You’ve made learning enjoyable and accessible for many, and I deeply appreciate that.
I’ve discovered a treasure trove of knowledge in your blog. Your unwavering dedication to offering trustworthy information is truly commendable. Each visit leaves me more enlightened, and I deeply appreciate your consistent reliability.
What?s Happening i’m new to this, I stumbled upon this I’ve found It absolutely useful and it has helped me out loads. I hope to contribute & assist other users like its aided me. Great job.
I can’t help but be impressed by the way you break down complex concepts into easy-to-digest information. Your writing style is not only informative but also engaging, which makes the learning experience enjoyable and memorable. It’s evident that you have a passion for sharing your knowledge, and I’m grateful for that.
Keep working ,splendid job!
Amazing blog! Is your theme custom made or did you download it from somewhere? A theme like yours with a few simple adjustements would really make my blog jump out. Please let me know where you got your design. Thanks
Hi! Do you know if they make any plugins to safeguard against hackers? I’m kinda paranoid about losing everything I’ve worked hard on. Any recommendations?
I must applaud your talent for simplifying complex topics. Your ability to convey intricate ideas in such a relatable manner is admirable. You’ve made learning enjoyable and accessible for many, and I deeply appreciate that.
I’m genuinely impressed by how effortlessly you distill intricate concepts into easily digestible information. Your writing style not only imparts knowledge but also engages the reader, making the learning experience both enjoyable and memorable. Your passion for sharing your expertise is unmistakable, and for that, I am deeply appreciative.
I’m genuinely impressed by how effortlessly you distill intricate concepts into easily digestible information. Your writing style not only imparts knowledge but also engages the reader, making the learning experience both enjoyable and memorable. Your passion for sharing your expertise shines through, and for that, I’m deeply grateful.
I must applaud your talent for simplifying complex topics. Your ability to convey intricate ideas in such a relatable manner is admirable. You’ve made learning enjoyable and accessible for many, and I deeply appreciate that.
I’m genuinely impressed by how effortlessly you distill intricate concepts into easily digestible information. Your writing style not only imparts knowledge but also engages the reader, making the learning experience both enjoyable and memorable. Your passion for sharing your expertise shines through, and for that, I’m deeply grateful.
I must commend your talent for simplifying complex topics. Your ability to convey intricate ideas in such a relatable way is admirable. You’ve made learning enjoyable and accessible for many, and I appreciate that.
I’m truly impressed by the way you effortlessly distill intricate concepts into easily digestible information. Your writing style not only imparts knowledge but also engages the reader, making the learning experience both enjoyable and memorable. Your passion for sharing your expertise is unmistakable, and for that, I am deeply grateful.
I must applaud your talent for simplifying complex topics. Your ability to convey intricate ideas in such a relatable manner is admirable. You’ve made learning enjoyable and accessible for many, and I deeply appreciate that.
I must applaud your talent for simplifying complex topics. Your ability to convey intricate ideas in such a relatable manner is admirable. You’ve made learning enjoyable and accessible for many, and I deeply appreciate that.
I must applaud your talent for simplifying complex topics. Your ability to convey intricate ideas in such a relatable manner is admirable. You’ve made learning enjoyable and accessible for many, and I deeply appreciate that.
I’ve found a treasure trove of knowledge in your blog. Your dedication to providing trustworthy information is something to admire. Each visit leaves me more enlightened, and I appreciate your consistent reliability.
I must applaud your talent for simplifying complex topics. Your ability to convey intricate ideas in such a relatable manner is admirable. You’ve made learning enjoyable and accessible for many, and I deeply appreciate that.
I’ve discovered a treasure trove of knowledge in your blog. Your unwavering dedication to offering trustworthy information is truly commendable. Each visit leaves me more enlightened, and I deeply appreciate your consistent reliability.
I can’t help but be impressed by the way you break down complex concepts into easy-to-digest information. Your writing style is not only informative but also engaging, which makes the learning experience enjoyable and memorable. It’s evident that you have a passion for sharing your knowledge, and I’m grateful for that.
I’ve discovered a treasure trove of knowledge in your blog. Your unwavering dedication to offering trustworthy information is truly commendable. Each visit leaves me more enlightened, and I deeply appreciate your consistent reliability.
I’ve discovered a treasure trove of knowledge in your blog. Your unwavering dedication to offering trustworthy information is truly commendable. Each visit leaves me more enlightened, and I deeply appreciate your consistent reliability.
I’ve discovered a treasure trove of knowledge in your blog. Your unwavering dedication to offering trustworthy information is truly commendable. Each visit leaves me more enlightened, and I deeply appreciate your consistent reliability.
I must applaud your talent for simplifying complex topics. Your ability to convey intricate ideas in such a relatable manner is admirable. You’ve made learning enjoyable and accessible for many, and I deeply appreciate that.
Hmm is anyone else having problems with the images on this blog loading? I’m trying to determine if its a problem on my end or if it’s the blog. Any responses would be greatly appreciated.
I must applaud your talent for simplifying complex topics. Your ability to convey intricate ideas in such a relatable manner is admirable. You’ve made learning enjoyable and accessible for many, and I deeply appreciate that.
I’ve found a treasure trove of knowledge in your blog. Your dedication to providing trustworthy information is something to admire. Each visit leaves me more enlightened, and I appreciate your consistent reliability.
I must applaud your talent for simplifying complex topics. Your ability to convey intricate ideas in such a relatable manner is admirable. You’ve made learning enjoyable and accessible for many, and I deeply appreciate that.
I’ve discovered a treasure trove of knowledge in your blog. Your unwavering dedication to offering trustworthy information is truly commendable. Each visit leaves me more enlightened, and I deeply appreciate your consistent reliability.
I’ve discovered a treasure trove of knowledge in your blog. Your unwavering dedication to offering trustworthy information is truly commendable. Each visit leaves me more enlightened, and I deeply appreciate your consistent reliability.
I’ve discovered a treasure trove of knowledge in your blog. Your unwavering dedication to offering trustworthy information is truly commendable. Each visit leaves me more enlightened, and I deeply appreciate your consistent reliability.
Have you ever considered creating an ebook or guest authoring on other blogs? I have a blog centered on the same information you discuss and would love to have you share some stories/information. I know my readers would value your work. If you are even remotely interested, feel free to shoot me an e-mail.
I’ve discovered a treasure trove of knowledge in your blog. Your unwavering dedication to offering trustworthy information is truly commendable. Each visit leaves me more enlightened, and I deeply appreciate your consistent reliability.
I must applaud your talent for simplifying complex topics. Your ability to convey intricate ideas in such a relatable manner is admirable. You’ve made learning enjoyable and accessible for many, and I deeply appreciate that.
I’m genuinely impressed by how effortlessly you distill intricate concepts into easily digestible information. Your writing style not only imparts knowledge but also engages the reader, making the learning experience both enjoyable and memorable. Your passion for sharing your expertise shines through, and for that, I’m deeply grateful.
An outstanding share! I’ve just forwarded this onto a coworker who was doing a little research on this. And he actually ordered me breakfast simply because I found it for him… lol. So let me reword this…. Thank YOU for the meal!! But yeah, thanx for spending some time to talk about this issue here on your web page.
The next time I read a blog, I hope that it doesnt disappoint me as a lot as this one. I mean, I do know it was my choice to read, however I truly thought youd have one thing interesting to say. All I hear is a bunch of whining about one thing that you could repair for those who werent too busy searching for attention.
I can’t help but be impressed by the way you break down complex concepts into easy-to-digest information. Your writing style is not only informative but also engaging, which makes the learning experience enjoyable and memorable. It’s evident that you have a passion for sharing your knowledge, and I’m grateful for that.
I’m amazed, I must say. Seldom do I encounter a blog that’s equally educative and amusing, and let me tell you, you’ve hit the nail on the head. The issue is something not enough people are speaking intelligently about. I am very happy that I found this in my search for something regarding this.
Right here is the right blog for anybody who hopes to find out about this topic. You realize so much its almost hard to argue with you (not that I really will need to…HaHa). You definitely put a brand new spin on a topic that’s been discussed for many years. Excellent stuff, just wonderful.
This is a topic which is near to my heart… Many thanks! Exactly where are your contact details though?
It’s nearly impossible to find well-informed people about this topic, however, you seem like you know what you’re talking about! Thanks
I have learned new things as a result of your blog. One other thing I’d really like to say is the fact newer laptop or computer operating systems are inclined to allow additional memory to be played with, but they furthermore demand more memory space simply to run. If an individual’s computer is unable to handle additional memory as well as the newest computer software requires that memory increase, it may be the time to buy a new Personal computer. Thanks
Your web page does not render properly on my iphone – you may want to try and fix that
I must applaud your talent for simplifying complex topics. Your ability to convey intricate ideas in such a relatable manner is admirable. You’ve made learning enjoyable and accessible for many, and I deeply appreciate that.
This blog was… how do you say it? Relevant!! Finally I have found something which helped me. Many thanks!
Hello there, just became alert to your blog through Google, and found that it’s really informative. I?m going to watch out for brussels. I?ll appreciate if you continue this in future. Many people will be benefited from your writing. Cheers!
It’s difficult to find educated people for this topic, however, you seem like you know what you’re talking about! Thanks
I like it whenever people come together and share opinions. Great blog, stick with it!
May I just say what a relief to find someone who actually understands what they are talking about on the net. You definitely understand how to bring an issue to light and make it important. More people need to read this and understand this side of the story. I was surprised that you aren’t more popular because you surely possess the gift.
I’m genuinely impressed by how effortlessly you distill intricate concepts into easily digestible information. Your writing style not only imparts knowledge but also engages the reader, making the learning experience both enjoyable and memorable. Your passion for sharing your expertise shines through, and for that, I’m deeply grateful.
I’ve discovered a treasure trove of knowledge in your blog. Your unwavering dedication to offering trustworthy information is truly commendable. Each visit leaves me more enlightened, and I deeply appreciate your consistent reliability.
I’m truly impressed by the way you effortlessly distill intricate concepts into easily digestible information. Your writing style not only imparts knowledge but also engages the reader, making the learning experience both enjoyable and memorable. Your passion for sharing your expertise is unmistakable, and for that, I am deeply grateful.
This is a topic that’s close to my heart… Take care! Exactly where can I find the contact details for questions?
I’ve discovered a treasure trove of knowledge in your blog. Your unwavering dedication to offering trustworthy information is truly commendable. Each visit leaves me more enlightened, and I deeply appreciate your consistent reliability.
I must applaud your talent for simplifying complex topics. Your ability to convey intricate ideas in such a relatable manner is admirable. You’ve made learning enjoyable and accessible for many, and I deeply appreciate that.
It’s hard to come by educated people on this subject, but you seem like you know what you’re talking about! Thanks
May I simply just say what a relief to find someone that truly knows what they’re talking about over the internet. You actually know how to bring a problem to light and make it important. More people ought to read this and understand this side of the story. It’s surprising you aren’t more popular because you definitely possess the gift.
I’m amazed, I have to admit. Rarely do I come across a blog that’s equally educative and amusing, and without a doubt, you’ve hit the nail on the head. The issue is something that too few people are speaking intelligently about. I’m very happy that I found this in my hunt for something regarding this.
Today, I went to the beach front with my children. I found a sea shell and gave it to my 4 year old daughter and said “You can hear the ocean if you put this to your ear.” She placed the shell to her ear and screamed. There was a hermit crab inside and it pinched her ear. She never wants to go back! LoL I know this is entirely off topic but I had to tell someone!
You ought to be a part of a contest for one of the greatest blogs on the internet. I am going to recommend this blog!
I must commend your talent for simplifying complex topics. Your ability to convey intricate ideas in such a relatable way is admirable. You’ve made learning enjoyable and accessible for many, and I appreciate that.
I savor, cause I discovered just what I used to be looking for. You have ended my four day lengthy hunt! God Bless you man. Have a nice day. Bye
This is a topic that is near to my heart… Best wishes! Exactly where can I find the contact details for questions?
Right here is the right webpage for anybody who wants to find out about this topic. You realize so much its almost tough to argue with you (not that I really will need to…HaHa). You certainly put a new spin on a topic which has been written about for ages. Excellent stuff, just excellent.
I’m genuinely impressed by how effortlessly you distill intricate concepts into easily digestible information. Your writing style not only imparts knowledge but also engages the reader, making the learning experience both enjoyable and memorable. Your passion for sharing your expertise shines through, and for that, I’m deeply grateful.
This blog was… how do you say it? Relevant!! Finally I have found something that helped me. Many thanks.
Great information. Lucky me I came across your blog by accident (stumbleupon). I’ve book marked it for later.
I must applaud your talent for simplifying complex topics. Your ability to convey intricate ideas in such a relatable manner is admirable. You’ve made learning enjoyable and accessible for many, and I deeply appreciate that.
There is definately a lot to find out about this issue. I like all of the points you have made.
Excellent blog you have got here.. It’s hard to find quality writing like yours these days. I honestly appreciate people like you! Take care!!
This is a topic that is close to my heart… Take care! Where are your contact details though?
This is a topic that is close to my heart… Thank you! Exactly where are your contact details though?
I must applaud your talent for simplifying complex topics. Your ability to convey intricate ideas in such a relatable manner is admirable. You’ve made learning enjoyable and accessible for many, and I deeply appreciate that.
Very good info. Lucky me I ran across your blog by accident (stumbleupon). I have saved it for later.
The next time I read a blog, I hope that it does not disappoint me as much as this one. I mean, Yes, it was my choice to read, but I genuinely believed you’d have something interesting to talk about. All I hear is a bunch of moaning about something you could possibly fix if you were not too busy looking for attention.
I’m genuinely impressed by how effortlessly you distill intricate concepts into easily digestible information. Your writing style not only imparts knowledge but also engages the reader, making the learning experience both enjoyable and memorable. Your passion for sharing your expertise is unmistakable, and for that, I am deeply appreciative.
I’m impressed, I have to admit. Rarely do I encounter a blog that’s both educative and entertaining, and let me tell you, you’ve hit the nail on the head. The issue is something that too few folks are speaking intelligently about. I’m very happy that I stumbled across this in my search for something concerning this.
Köln’de Gerçek bir sonuç veren en iyi medyumu halu hoca ile sizlerde çalışınız. İletişim: +49 157 59456087 Aşık Etme Büyüsü, Bağlama Büyüsü gibi çalışmaları sizlerde yaptırabilirsiniz.
The very next time I read a blog, I hope that it doesn’t fail me as much as this particular one. After all, Yes, it was my choice to read through, but I truly thought you would have something helpful to talk about. All I hear is a bunch of moaning about something that you could possibly fix if you were not too busy searching for attention.
Köln’de Gerçek bir sonuç veren en iyi medyumu halu hoca ile sizlerde çalışınız. İletişim: +49 157 59456087 Aşık Etme Büyüsü, Bağlama Büyüsü gibi çalışmaları sizlerde yaptırabilirsiniz.
I must applaud your talent for simplifying complex topics. Your ability to convey intricate ideas in such a relatable manner is admirable. You’ve made learning enjoyable and accessible for many, and I deeply appreciate that.
Next time I read a blog, Hopefully it won’t disappoint me just as much as this particular one. I mean, Yes, it was my choice to read, but I genuinely thought you’d have something useful to say. All I hear is a bunch of complaining about something you could fix if you weren’t too busy seeking attention.
I’m impressed, I must say. Rarely do I encounter a blog that’s equally educative and amusing, and without a doubt, you have hit the nail on the head. The problem is an issue that not enough men and women are speaking intelligently about. Now i’m very happy that I stumbled across this during my search for something relating to this.
This is the perfect webpage for everyone who would like to understand this topic. You realize a whole lot its almost tough to argue with you (not that I actually will need to…HaHa). You certainly put a fresh spin on a topic which has been written about for many years. Great stuff, just wonderful.
Hi, I do believe this is a great blog. I stumbledupon it 😉 I am going to return once again since I book-marked it. Money and freedom is the greatest way to change, may you be rich and continue to guide others.
I’ve discovered a treasure trove of knowledge in your blog. Your unwavering dedication to offering trustworthy information is truly commendable. Each visit leaves me more enlightened, and I deeply appreciate your consistent reliability.
I must applaud your talent for simplifying complex topics. Your ability to convey intricate ideas in such a relatable manner is admirable. You’ve made learning enjoyable and accessible for many, and I deeply appreciate that.
It’s nearly impossible to find educated people for this topic, however, you seem like you know what you’re talking about! Thanks
Good blog you have got here.. It’s difficult to find quality writing like yours nowadays. I seriously appreciate individuals like you! Take care!!
Can I simply say what a comfort to discover someone who truly knows what they’re discussing over the internet. You certainly understand how to bring an issue to light and make it important. A lot more people ought to check this out and understand this side of the story. It’s surprising you aren’t more popular since you most certainly possess the gift.
I’m genuinely impressed by how effortlessly you distill intricate concepts into easily digestible information. Your writing style not only imparts knowledge but also engages the reader, making the learning experience both enjoyable and memorable. Your passion for sharing your expertise shines through, and for that, I’m deeply grateful.
You need to take part in a contest for one of the most useful blogs on the web. I am going to highly recommend this blog!
I’ve discovered a treasure trove of knowledge in your blog. Your unwavering dedication to offering trustworthy information is truly commendable. Each visit leaves me more enlightened, and I deeply appreciate your consistent reliability.
This is a topic that’s close to my heart… Cheers! Exactly where are your contact details though?
An outstanding share! I have just forwarded this onto a coworker who had been conducting a little homework on this. And he in fact bought me lunch because I discovered it for him… lol. So let me reword this…. Thanks for the meal!! But yeah, thanks for spending some time to discuss this subject here on your blog.
I must applaud your talent for simplifying complex topics. Your ability to convey intricate ideas in such a relatable manner is admirable. You’ve made learning enjoyable and accessible for many, and I deeply appreciate that.
I must applaud your talent for simplifying complex topics. Your ability to convey intricate ideas in such a relatable manner is admirable. You’ve made learning enjoyable and accessible for many, and I deeply appreciate that.
I know this if off topic but I’m looking into starting my own blog and was curious what all is required to get set up? I’m assuming having a blog like yours would cost a pretty penny? I’m not very internet savvy so I’m not 100 certain. Any tips or advice would be greatly appreciated. Thank you
Great blog you have got here.. It’s difficult to find good quality writing like yours nowadays. I really appreciate people like you! Take care!!
This is the perfect blog for everyone who wants to find out about this topic. You know so much its almost hard to argue with you (not that I personally will need to…HaHa). You definitely put a fresh spin on a topic which has been written about for many years. Wonderful stuff, just wonderful.
An outstanding share! I’ve just forwarded this onto a colleague who has been conducting a little homework on this. And he in fact ordered me breakfast simply because I stumbled upon it for him… lol. So let me reword this…. Thanks for the meal!! But yeah, thanx for spending some time to discuss this subject here on your web page.
Whats up this is kind of of off topic but I was wanting to know if blogs use WYSIWYG editors or if you have to manually code with HTML. I’m starting a blog soon but have no coding knowledge so I wanted to get guidance from someone with experience. Any help would be enormously appreciated!
I must applaud your talent for simplifying complex topics. Your ability to convey intricate ideas in such a relatable manner is admirable. You’ve made learning enjoyable and accessible for many, and I deeply appreciate that.
I really like it whenever people get together and share views. Great blog, continue the good work!
I’m impressed, I have to admit. Rarely do I encounter a blog that’s both equally educative and amusing, and let me tell you, you’ve hit the nail on the head. The problem is something which too few people are speaking intelligently about. Now i’m very happy I came across this in my search for something relating to this.
I’m amazed, I have to admit. Rarely do I come across a blog that’s both equally educative and entertaining, and without a doubt, you have hit the nail on the head. The problem is something which not enough folks are speaking intelligently about. I’m very happy I stumbled across this in my hunt for something relating to this.
This is the perfect webpage for everyone who would like to find out about this topic. You understand a whole lot its almost hard to argue with you (not that I personally will need to…HaHa). You definitely put a brand new spin on a subject which has been discussed for ages. Excellent stuff, just excellent.
This blog was… how do you say it? Relevant!! Finally I have found something which helped me. Thanks a lot!
Almanya berlinde Güven veren Gerçek bir sonuç veren en iyi medyumu halu hoca ile sizlerde çalışınız. İletişim: +49 157 59456087 Aşık Etme Büyüsü, Bağlama Büyüsü gibi çalışmaları sizlerde yaptırabilirsiniz.
I’m impressed, I must say. Seldom do I encounter a blog that’s both educative and amusing, and let me tell you, you’ve hit the nail on the head. The problem is something not enough people are speaking intelligently about. Now i’m very happy that I came across this in my search for something regarding this.
It’s hard to find well-informed people in this particular topic, but you seem like you know what you’re talking about! Thanks
An impressive share! I’ve just forwarded this onto a colleague who was conducting a little research on this. And he actually bought me lunch simply because I discovered it for him… lol. So let me reword this…. Thank YOU for the meal!! But yeah, thanx for spending some time to talk about this subject here on your web page.
I’m amazed, I have to admit. Seldom do I encounter a blog that’s both equally educative and entertaining, and without a doubt, you’ve hit the nail on the head. The problem is something not enough folks are speaking intelligently about. I am very happy I stumbled across this during my search for something concerning this.
This is the right blog for anybody who hopes to find out about this topic. You realize a whole lot its almost hard to argue with you (not that I personally would want to…HaHa). You definitely put a brand new spin on a topic which has been discussed for a long time. Great stuff, just wonderful.
Unquestionably believe that which you said. Your favorite justification appeared to be on the web the easiest thing to be aware of. I say to you, I definitely get annoyed while people consider worries that they plainly do not know about. You managed to hit the nail upon the top and defined out the whole thing without having side-effects , people can take a signal. Will likely be back to get more. Thanks
I love it when folks come together and share opinions. Great blog, keep it up.
May I simply say what a relief to uncover somebody who actually understands what they’re talking about online. You definitely realize how to bring an issue to light and make it important. More people ought to look at this and understand this side of your story. I was surprised you aren’t more popular since you surely possess the gift.
There’s certainly a great deal to find out about this topic. I love all of the points you have made.
I like it whenever people get together and share thoughts. Great blog, stick with it.
I’ve discovered a treasure trove of knowledge in your blog. Your unwavering dedication to offering trustworthy information is truly commendable. Each visit leaves me more enlightened, and I deeply appreciate your consistent reliability.
I’ve discovered a treasure trove of knowledge in your blog. Your unwavering dedication to offering trustworthy information is truly commendable. Each visit leaves me more enlightened, and I deeply appreciate your consistent reliability.
I must applaud your talent for simplifying complex topics. Your ability to convey intricate ideas in such a relatable manner is admirable. You’ve made learning enjoyable and accessible for many, and I deeply appreciate that.
I’m impressed, I have to admit. Seldom do I come across a blog that’s both educative and engaging, and without a doubt, you’ve hit the nail on the head. The issue is something that not enough men and women are speaking intelligently about. Now i’m very happy I came across this in my search for something relating to this.
Hello there, There’s no doubt that your blog could possibly be having web browser compatibility issues. Whenever I take a look at your blog in Safari, it looks fine however, if opening in I.E., it’s got some overlapping issues. I merely wanted to provide you with a quick heads up! Other than that, excellent blog!
I must applaud your talent for simplifying complex topics. Your ability to convey intricate ideas in such a relatable manner is admirable. You’ve made learning enjoyable and accessible for many, and I deeply appreciate that.
Güvenilir en iyi Gerçek bir sonuç veren en iyi medyumu halu hoca ile sizlerde çalışınız. İletişim: +49 157 59456087 Aşık Etme Büyüsü, Bağlama Büyüsü gibi çalışmaları sizlerde yaptırabilirsiniz.
Almanya’da Güvenilir en iyi Gerçek bir sonuç veren en iyi medyumu halu hoca ile sizlerde çalışınız. İletişim: +49 157 59456087 Aşık Etme Büyüsü, Bağlama Büyüsü gibi çalışmaları sizlerde yaptırabilirsiniz.
The next time I read a blog, I hope that it does not fail me as much as this one. I mean, Yes, it was my choice to read through, however I genuinely believed you would have something interesting to talk about. All I hear is a bunch of crying about something you could possibly fix if you weren’t too busy looking for attention.
May I simply say what a relief to find an individual who actually understands what they’re discussing on the internet. You definitely know how to bring a problem to light and make it important. More people really need to read this and understand this side of your story. It’s surprising you’re not more popular because you most certainly have the gift.
This blog was… how do I say it? Relevant!! Finally I have found something that helped me. Thanks a lot!
Heya i?m for the first time here. I came across this board and I find It really useful & it helped me out much. I hope to give something back and help others like you aided me.
You can certainly see your expertise in the work you write. The world hopes for even more passionate writers like you who aren’t afraid to say how they believe. Always go after your heart.
Good blog you have got here.. It’s hard to find high-quality writing like yours these days. I truly appreciate individuals like you! Take care!!
What i don’t understood is actually how you’re not actually much more well-liked than you may be now. You are so intelligent. You realize thus significantly relating to this subject, produced me personally consider it from numerous varied angles. Its like women and men aren’t fascinated unless it?s one thing to accomplish with Lady gaga! Your own stuffs excellent. Always maintain it up!
I?m impressed, I must say. Actually not often do I encounter a blog that?s both educative and entertaining, and let me inform you, you’ve gotten hit the nail on the head. Your thought is outstanding; the issue is something that not sufficient individuals are talking intelligently about. I am very happy that I stumbled throughout this in my seek for one thing regarding this.
I’m impressed, I have to admit. Rarely do I come across a blog that’s equally educative and engaging, and without a doubt, you’ve hit the nail on the head. The issue is something which not enough men and women are speaking intelligently about. Now i’m very happy I came across this during my search for something relating to this.
Great blog you have here.. It’s hard to find high-quality writing like yours nowadays. I really appreciate people like you! Take care!!
I like it whenever people come together and share views. Great blog, keep it up!
I must applaud your talent for simplifying complex topics. Your ability to convey intricate ideas in such a relatable manner is admirable. You’ve made learning enjoyable and accessible for many, and I deeply appreciate that.
There is certainly a lot to learn about this issue. I love all of the points you have made.
Today, I went to the beach with my children. I found a sea shell and gave it to my 4 year old daughter and said “You can hear the ocean if you put this to your ear.” She put the shell to her ear and screamed. There was a hermit crab inside and it pinched her ear. She never wants to go back! LoL I know this is completely off topic but I had to tell someone!
May I just say what a comfort to uncover somebody that actually understands what they are talking about over the internet. You actually understand how to bring a problem to light and make it important. More and more people really need to read this and understand this side of the story. I can’t believe you aren’t more popular because you certainly have the gift.
Excellent read, I just passed this onto a friend who was doing some research on that. And he actually bought me lunch as I found it for him smile Thus let me rephrase that: Thank you for lunch!
It?s exhausting to seek out knowledgeable individuals on this matter, however you sound like you recognize what you?re speaking about! Thanks
Almanya’da Güvenilir en iyi Gerçek bir sonuç veren en iyi medyumu halu hoca ile sizlerde çalışınız. İletişim: +49 157 59456087 Aşık Etme Büyüsü, Bağlama Büyüsü gibi çalışmaları sizlerde yaptırabilirsiniz.
I enjoy what you guys are usually up too. This sort of clever work and exposure! Keep up the amazing works guys I’ve added you guys to our blogroll.
Thank you for the auspicious writeup. It in fact was a amusement account it.
Look advanced to more added agreeable from you! However, how could
we communicate?
The very next time I read a blog, I hope that it doesn’t disappoint me as much as this one. I mean, Yes, it was my choice to read through, nonetheless I really believed you would have something interesting to talk about. All I hear is a bunch of complaining about something you could fix if you were not too busy seeking attention.
I’ve discovered a treasure trove of knowledge in your blog. Your unwavering dedication to offering trustworthy information is truly commendable. Each visit leaves me more enlightened, and I deeply appreciate your consistent reliability.
Thanks for another informative blog. Where else could I get that kind of information written in such an ideal way? I have a project that I am just now working on, and I’ve been on the look out for such info.
I?d should examine with you here. Which isn’t something I usually do! I get pleasure from studying a put up that can make people think. Additionally, thanks for permitting me to remark!
May I just say what a relief to uncover someone that genuinely knows what they are talking about over the internet. You actually realize how to bring an issue to light and make it important. More and more people should look at this and understand this side of your story. I was surprised you’re not more popular since you surely possess the gift.
Hi! I’ve been reading your blog for some time now and finally got the bravery to go ahead and give you a shout out from Lubbock Tx! Just wanted to tell you keep up the fantastic work!
I’m truly impressed by the way you effortlessly distill intricate concepts into easily digestible information. Your writing style not only imparts knowledge but also engages the reader, making the learning experience both enjoyable and memorable. Your passion for sharing your expertise is unmistakable, and for that, I am deeply grateful.
This is a topic that is close to my heart… Best wishes! Exactly where are your contact details though?
Yes! Finally someone writes about 출장.
I’ve found a treasure trove of knowledge in your blog. Your dedication to providing trustworthy information is something to admire. Each visit leaves me more enlightened, and I appreciate your consistent reliability.
This is a topic which is near to my heart… Best wishes! Where are your contact details though?
Virtually all of what you point out happens to be supprisingly precise and that makes me ponder why I hadn’t looked at this in this light before. Your piece truly did turn the light on for me personally as far as this subject goes. Nonetheless at this time there is actually one point I am not necessarily too cozy with so while I attempt to reconcile that with the central theme of the issue, permit me observe what the rest of your readers have to say.Nicely done.
The digital revolution in education is an ongoing journey, with each technological innovation shaping the way we teach and learn.
Thank you for the good writeup. It if truth be told was once a enjoyment account it. Look complicated to more brought agreeable from you! However, how could we be in contact?
I must applaud your talent for simplifying complex topics. Your ability to convey intricate ideas in such a relatable manner is admirable. You’ve made learning enjoyable and accessible for many, and I deeply appreciate that.
Yes! Finally someone writes about 출장.
I’m impressed, I must say. Seldom do I encounter a blog that’s equally educative and entertaining, and let me tell you, you have hit the nail on the head. The issue is an issue that not enough folks are speaking intelligently about. I am very happy I found this during my search for something regarding this.
It’s nearly impossible to find experienced people about this subject, but you sound like you know what you’re talking about! Thanks
The information shared is of top quality which has to get appreciated at all levels. Well done…
The information shared is of top quality which has to get appreciated at all levels. Well done…
Thanks for expressing your ideas. I’d personally also like to express that video games have been actually evolving. Modern technology and improvements have served create reasonable and fun games. These kind of entertainment video games were not really sensible when the concept was first being used. Just like other areas of technological know-how, video games also have had to develop by many decades. This itself is testimony towards the fast continuing development of video games.
I must applaud your talent for simplifying complex topics. Your ability to convey intricate ideas in such a relatable manner is admirable. You’ve made learning enjoyable and accessible for many, and I deeply appreciate that.
I’m truly impressed by the way you effortlessly distill intricate concepts into easily digestible information. Your writing style not only imparts knowledge but also engages the reader, making the learning experience both enjoyable and memorable. Your passion for sharing your expertise is unmistakable, and for that, I am deeply grateful.
Can I simply say what a comfort to find somebody that truly knows what they’re talking about online. You definitely realize how to bring an issue to light and make it important. More people have to look at this and understand this side of your story. I can’t believe you are not more popular because you most certainly possess the gift.
I must applaud your talent for simplifying complex topics. Your ability to convey intricate ideas in such a relatable manner is admirable. You’ve made learning enjoyable and accessible for many, and I deeply appreciate that.
You can certainly see your expertise in the work you write. The world hopes for more passionate writers like you who are not afraid to say how they believe. Always follow your heart.
You can certainly see your expertise in the work you write. The world hopes for even more passionate writers like you who aren’t afraid to say how they believe. Always follow your heart.
I think one of your advertisings triggered my internet browser to resize, you might want to put that on your blacklist.
There’s definately a great deal to learn about this issue. I really like all the points you have made.
Güvenilir bir danışman için medyum nasip hocayı seçin en iyi medyum hocalardan bir tanesidir.
Its such as you read my thoughts! You seem to grasp a lot about this, like you wrote the e-book in it or something. I think that you simply can do with some percent to pressure the message house a little bit, however other than that, this is great blog. A great read. I will certainly be back.
I have fun with, result in I found just what I used to be looking for. You’ve ended my 4 day long hunt! God Bless you man. Have a nice day. Bye
Good day! Do you know if they make any plugins to safeguard against hackers? I’m kinda paranoid about losing everything I’ve worked hard on. Any suggestions?
I’m truly impressed by the way you effortlessly distill intricate concepts into easily digestible information. Your writing style not only imparts knowledge but also engages the reader, making the learning experience both enjoyable and memorable. Your passion for sharing your expertise is unmistakable, and for that, I am deeply grateful.
I’ve discovered a treasure trove of knowledge in your blog. Your unwavering dedication to offering trustworthy information is truly commendable. Each visit leaves me more enlightened, and I deeply appreciate your consistent reliability.
Güvenilir bir danışman için medyum nasip hocayı seçin en iyi medyum hocalardan bir tanesidir.
okmark your blog and check again here regularly. I’m quite sure I will learn plenty of new stuff right here! Good luck for the next!
You can definitely see your skills in the work you write. The world hopes for even more passionate writers like you who aren’t afraid to mention how they believe. At all times follow your heart.
This is a topic which is close to my heart… Best wishes! Where can I find the contact details for questions?
Hurrah! At last I got a webpage from where I can really obtain valuable facts
concerning my study and knowledge.
Güvenilir bir danışman için medyum haluk hocayı seçin en iyi medyum hocalardan bir tanesidir.
Can I simply say what a comfort to discover somebody who truly knows what they’re discussing on the net. You actually understand how to bring a problem to light and make it important. More people really need to look at this and understand this side of your story. I was surprised that you aren’t more popular given that you certainly have the gift.
The next time I read a blog, Hopefully it won’t disappoint me just as much as this particular one. After all, I know it was my choice to read through, nonetheless I truly thought you would probably have something useful to talk about. All I hear is a bunch of crying about something you could possibly fix if you were not too busy seeking attention.
Hello there, just became aware of your blog through Google, and found that it’s truly informative.
I’m going to watch out for brussels. I will be grateful if you continue this in future.
A lot of people will be benefited from your writing. Cheers!
You really make it seem really easy along with your presentation but I in finding this topic to be actually one thing that I feel I’d by no means understand. It sort of feels too complex and extremely huge for me. I am taking a look forward on your next submit, I?ll try to get the grasp of it!
I love what you guys tend to be up too. This type of clever work and exposure! Keep up the excellent works guys I’ve included you guys to our blogroll.
I am very happy to read this. This is the type of manual that needs to be given and not the random misinformation that’s at the other blogs. Appreciate your sharing this greatest doc.
We are offering Concrete Parking Lot Contractor, Concrete Installation Contractor Service, warehouse flooring, commercial, and industrial concrete roadways.
We are offering Concrete Parking Lot Contractor, Concrete Installation Contractor Service, warehouse flooring, commercial, and industrial concrete roadways.
We are offering Concrete Parking Lot Contractor, Concrete Installation Contractor Service, warehouse flooring, commercial, and industrial concrete roadways.
This design is wicked! You obviously know how to keep a reader amused. Between your wit and your videos, I was almost moved to start my own blog (well, almost…HaHa!) Wonderful job. I really enjoyed what you had to say, and more than that, how you presented it. Too cool!
Together with the whole thing which appears to be developing within this subject material, a significant percentage of points of view tend to be very refreshing. Having said that, I beg your pardon, but I can not subscribe to your entire idea, all be it radical none the less. It looks to everyone that your remarks are generally not entirely validated and in reality you are your self not even completely convinced of the point. In any event I did appreciate reading through it.
Hi! This is my first visit to your blog! We are a team of volunteers and starting a new initiative in a community in the same niche. Your blog provided us valuable information to work on. You have done a extraordinary job!
This blog was… how do I say it? Relevant!! Finally I have found something that helped me. Thanks a lot.
The next time I read a blog, Hopefully it won’t fail me as much as this particular one. I mean, I know it was my choice to read through, however I genuinely believed you would have something helpful to talk about. All I hear is a bunch of whining about something that you could possibly fix if you weren’t too busy seeking attention.
The things i have generally told people today is that when you are evaluating a good on the net electronics retail store, there are a few variables that you have to think about. First and foremost, you should really make sure to discover a reputable and reliable shop that has received great testimonials and ratings from other individuals and business sector advisors. This will ensure you are handling a well-known store providing you with good assistance and aid to the patrons. Thanks for sharing your ideas on this blog.
This is a topic that’s close to my heart… Many thanks! Exactly where are your contact details though?
I beloved up to you’ll obtain carried out right here. The caricature is tasteful, your authored subject matter stylish. nevertheless, you command get got an edginess over that you would like be delivering the following. in poor health indubitably come further in the past again since precisely the same just about very frequently inside case you shield this hike.
My brother suggested I would possibly like this blog. He was once totally right. This put up truly made my day. You can not believe just how a lot time I had spent for this info! Thank you!
It¦s in reality a great and helpful piece of info. I¦m happy that you simply shared this helpful information with us. Please stay us up to date like this. Thanks for sharing.
Audio began playing when I opened up this blog, so frustrating!
Hello! This is my first visit to your blog! We are a group of volunteers and starting a new project in a community in the same niche. Your blog provided us useful information to work on. You have done a wonderful job!
My spouse and I stumbled over here by a different page and thought I might check things out. I like what I see so i am just following you. Look forward to looking over your web page for a second time.
It’s nearly impossible to find well-informed people about this topic, however, you seem like you know what you’re talking about! Thanks
I’m not sure why but this blog is loading incredibly slow for me. Is anyone else having this issue or is it a problem on my end? I’ll check back later on and see if the problem still exists.
I appreciate, cause I found just what I was looking for. You have ended my four day long hunt! God Bless you man. Have a great day. Bye
It?s in reality a great and useful piece of info. I am satisfied that you just shared this useful info with us. Please keep us informed like this. Thank you for sharing.
Touche. Solid arguments. Keep up the good work.
This really answered my problem, thanks!
Wonderful blog! I found it while browsing on Yahoo News. Do you have any suggestions on how to get listed in Yahoo News? I’ve been trying for a while but I never seem to get there! Many thanks
Hello would you mind letting me know which hosting company you’re using? I’ve loaded your blog in 3 completely different web browsers and I must say this blog loads a lot quicker then most. Can you recommend a good internet hosting provider at a fair price? Thank you, I appreciate it!
Thank you, I’ve been seeking for info about this subject matter for ages and yours is the best I’ve discovered so far.
Thanks , I’ve recently been looking for info about this topic for ages and yours is the best I’ve discovered so far. But, what about the conclusion? Are you sure about the source?
Unquestionably imagine that which you said. Your favorite reason seemed to be at the net the simplest thing to take into accout of. I say to you, I definitely get annoyed even as other folks think about concerns that they just don’t know about. You managed to hit the nail upon the highest and also defined out the entire thing without having side effect , other folks could take a signal. Will probably be again to get more. Thanks
One thing I have actually noticed is the fact there are plenty of fallacies regarding the banking companies intentions when talking about home foreclosure. One delusion in particular would be the fact the bank wishes to have your house. The bank wants your money, not the house. They want the bucks they gave you with interest. Steering clear of the bank will only draw a foreclosed final result. Thanks for your publication.
We stumbled over here coming from a different web address and thought I might as well check things out. I like what I see so i am just following you. Look forward to going over your web page again.
Also I believe that mesothelioma cancer is a scarce form of most cancers that is generally found in all those previously familiar with asbestos. Cancerous tissues form inside the mesothelium, which is a shielding lining that covers a lot of the body’s internal organs. These cells commonly form in the lining of your lungs, tummy, or the sac that really encircles the heart. Thanks for revealing your ideas.
What is Alpha Tonic? Alpha Tonic stands as a natural health supplement designed to comprehensively address men’s overall well-being.
What is Alpha Tonic? Alpha Tonic stands as a natural health supplement designed to comprehensively address men’s overall well-being.
There’s definately a great deal to know about this topic. I like all of the points you have made.
Together with every little thing that seems to be building within this subject matter, all your perspectives are generally relatively stimulating. Nonetheless, I beg your pardon, because I can not give credence to your whole idea, all be it exciting none the less. It looks to us that your opinions are actually not entirely justified and in fact you are generally yourself not even fully confident of the argument. In any event I did appreciate looking at it.
It’s difficult to find educated people about this subject, but you seem like you know what you’re talking about! Thanks
Great blog! Is your theme custom made or did you download it from somewhere? A theme like yours with a few simple tweeks would really make my blog shine. Please let me know where you got your design. Thank you
Its such as you learn my mind! You seem to know so much approximately this, such as you wrote the e book in it or something. I believe that you simply could do with some to force the message house a little bit, however instead of that, this is excellent blog. A fantastic read. I’ll definitely be back.
Thanks for every other informative blog. The place else may I get that kind of information written in such an ideal approach? I have a venture that I’m simply now operating on, and I’ve been on the glance out for such information.
Amazing! This blog looks just like my old one! It’s on a completely different subject but it has pretty much the same layout and design. Superb choice of colors!
This webpage does not show up correctly on my droid – you might want to try and fix that
Its like you read my mind! You seem to know so much about this, like you wrote the book in it or something.
I think that you could do with a few pics to drive the message
home a bit, but other than that, this is great
blog. A fantastic read. I’ll certainly be back.
This is the perfect blog for everyone who wants to find out about this topic. You understand so much its almost hard to argue with you (not that I really will need to…HaHa). You certainly put a new spin on a topic which has been discussed for years. Great stuff, just great.
Great information. Lucky me I recently found your blog by chance (stumbleupon). I’ve saved as a favorite for later!
Howdy! Do you know if they make any plugins to safeguard against hackers? I’m kinda paranoid about losing everything I’ve worked hard on. Any suggestions?
I do love the manner in which you have framed this concern and it does give us a lot of fodder for thought. Nonetheless, from just what I have observed, I just simply hope when other remarks stack on that people keep on point and in no way get started on a tirade associated with the news of the day. All the same, thank you for this fantastic point and though I do not necessarily concur with the idea in totality, I respect your point of view.
It?s really a nice and useful piece of information. I am glad that you shared this useful info with us. Please keep us up to date like this. Thank you for sharing.
I appreciate, cause I found exactly what I was looking for. You have ended my four day long hunt! God Bless you man. Have a great day. Bye
It?s actually a great and useful piece of information. I am glad that you shared this useful information with us. Please stay us up to date like this. Thank you for sharing.
En iyi medyum olarak bir danışman için medyum haluk hocayı seçin en iyi medyum hocalardan bir tanesidir.
The next time I read a blog, Hopefully it doesn’t disappoint me just as much as this one. I mean, I know it was my choice to read, nonetheless I truly thought you would probably have something useful to talk about. All I hear is a bunch of complaining about something that you could fix if you weren’t too busy looking for attention.
Undeniably believe that which you stated. Your favourite justification appeared to be at the internet the easiest thing to have in mind of. I say to you, I definitely get annoyed while other folks consider concerns that they just do not recognise about. You managed to hit the nail upon the top and outlined out the whole thing with no need side effect , folks can take a signal. Will likely be back to get more. Thank you
It’s nearly impossible to find educated people on this topic, but you seem like you know what you’re talking about! Thanks
It’s hard to find experienced people about this subject, however, you seem like you know what you’re talking about! Thanks
I never thought about [topic] in that way before. Thanks for sharing your perspective
An outstanding share! I’ve just forwarded this onto a friend who was doing a little homework on this. And he in fact bought me breakfast due to the fact that I stumbled upon it for him… lol. So let me reword this…. Thanks for the meal!! But yeah, thanks for spending time to discuss this topic here on your blog.
Thanks for the tips about credit repair on this amazing blog. The things i would advice people will be to give up the actual mentality they will buy at this point and fork out later. As a society most people tend to do this for many factors. This includes vacation trips, furniture, as well as items we’d like. However, you’ll want to separate your current wants from the needs. When you are working to raise your credit ranking score you have to make some sacrifices. For example you may shop online to save money or you can look at second hand outlets instead of high priced department stores regarding clothing.
I’m extremely pleased to find this page. I need to to thank you for ones time for this wonderful read!! I definitely loved every little bit of it and I have you book marked to see new things in your blog.
Very descriptive blog, I liked that a lot. Will there be a part 2?
Hi, I think your blog might be having browser compatibility issues. When I look at your blog in Opera, it looks fine but when opening in Internet Explorer, it has some overlapping. I just wanted to give you a quick heads up! Other then that, terrific blog!
Heya i am for the primary time here. I found this board and I
in finding It truly helpful & it helped me out a lot.
I hope to offer something back and help others such as you helped me.
Can I simply say what a reduction to find someone who actually knows what theyre talking about on the internet. You definitely know find out how to carry a difficulty to mild and make it important. More people need to learn this and understand this aspect of the story. I cant believe youre no more common because you undoubtedly have the gift.
The next time I read a blog, I hope that it doesnt disappoint me as much as this one. I mean, I know it was my option to learn, however I truly thought youd have something interesting to say. All I hear is a bunch of whining about something that you could fix when you werent too busy searching for attention.
Almanya’nın En iyi medyum olarak bir danışman için medyum haluk hocayı seçin en iyi medyum hocalardan bir tanesidir.
Hey there this is kind of of off topic but I was wanting to know if blogs use WYSIWYG editors or if you have to manually code with HTML. I’m starting a blog soon but have no coding knowledge so I wanted to get guidance from someone with experience. Any help would be enormously appreciated!