
Where I live, we’re currently in the midst of winter. As I write this, snow is piled up in our driveway and it’s 30 degrees out. That’s why I’m in need of a little escape from the cold weather, by making myself some cute summer outfits!
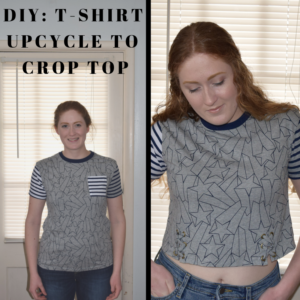
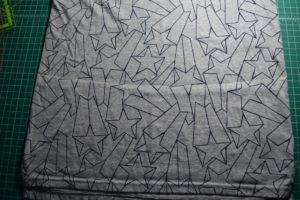
I found this t-shirt at the local Goodwill store for a couple dollars; the cute, quirky star pattern was irresistible. It’s definitely not an old, ugly shirt; just not really my style. Also, it’s a little tight around my hips.


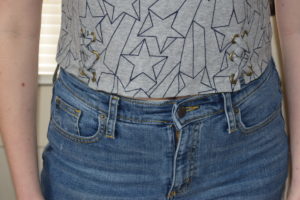
I couldn’t help but think that this shirt would be adorable as a crop top; which would also solve the tight-around-the-hips problem.
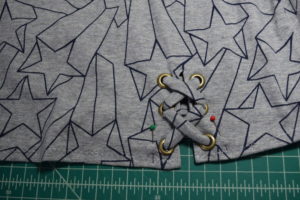
I thought a lace-up detail at the front would give this already quirky shirt even more character.


So, let’s jump into the tutorial!
What you need:
*This list contains affiliate links for your DIYing convenience, so I receive a small commission if you buy something through my links. This really helps to support my site so I can keep creating DIY tutorials to help you create your dream wardrobe.
- T shirt
- Scissors
- Fabric marker or chalk
- Jersey knit needle
- Jersey knit pins
- Thread
- Eyelets
- Eyelet pliers
- Ruler
- Iron
Instructions:
Crop the shirt:
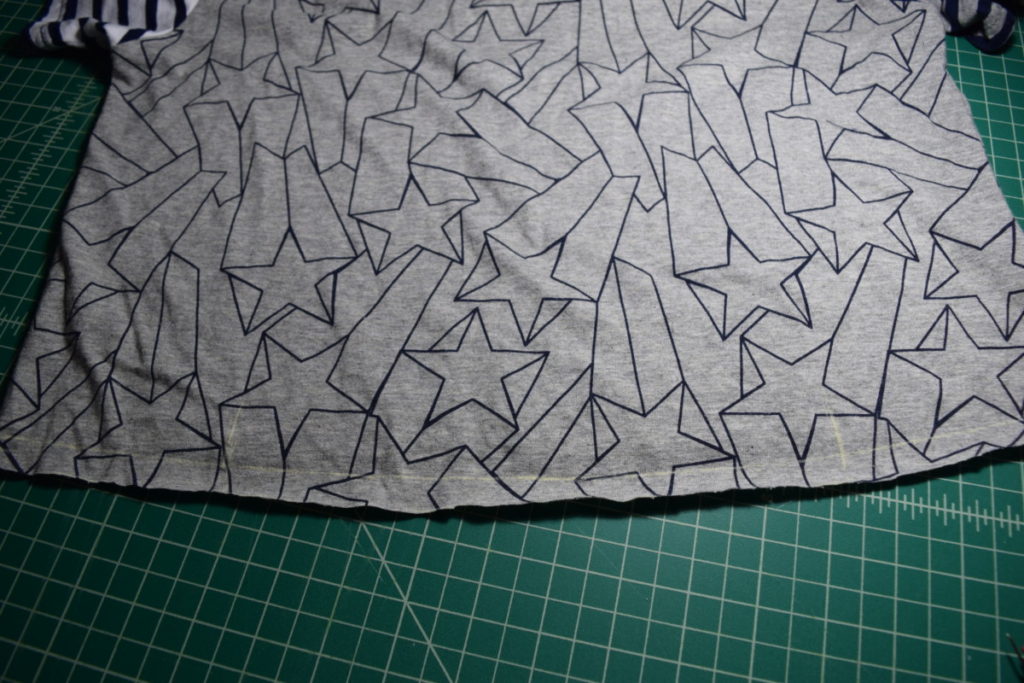
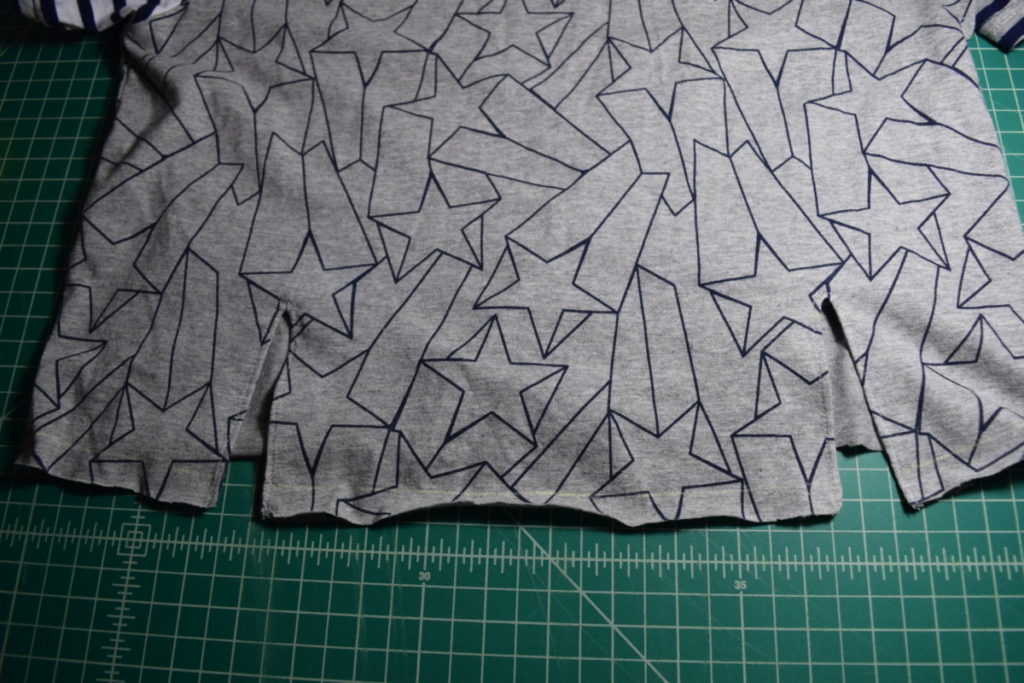
First, you’ll want to try on the shirt and pin it up to the length you want; I used four pins total: one in the center front, center back, and the two side seams. Then take the shirt off and mark with your fabric marker where the pins are.
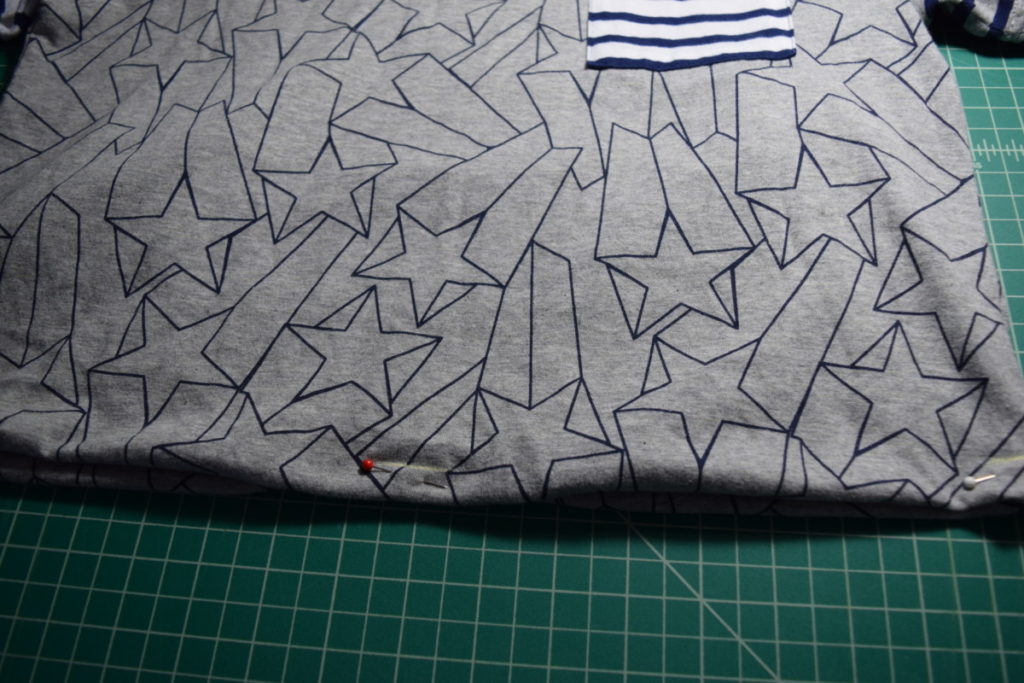
You can then take the pins out and unfold the shirt. Measure up from the bottom of the shirt to make sure your side seam marks are an equal distance from the hem (mine are 8 inches from the hem) and adjust one of the marks if necessary.
Using a ruler, draw a straight line across the back from side seam to side seam mark, going approximately through your center back mark. If it doesn’t line up exactly with the center back mark, don’t worry; it was just a guide.

Next, I used a curved ruler to draw a line from one side seam mark to the center front mark; then repeated on the other side. If you don’t have a curved ruler you can just eyeball your curve; or if you have a relatively flat chest, just drawing a straight line across will work just fine.
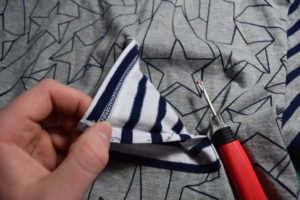
I then used a seam ripper to remove the pocket from the shirt; you could also do this carefully with scissors.
To make slits:
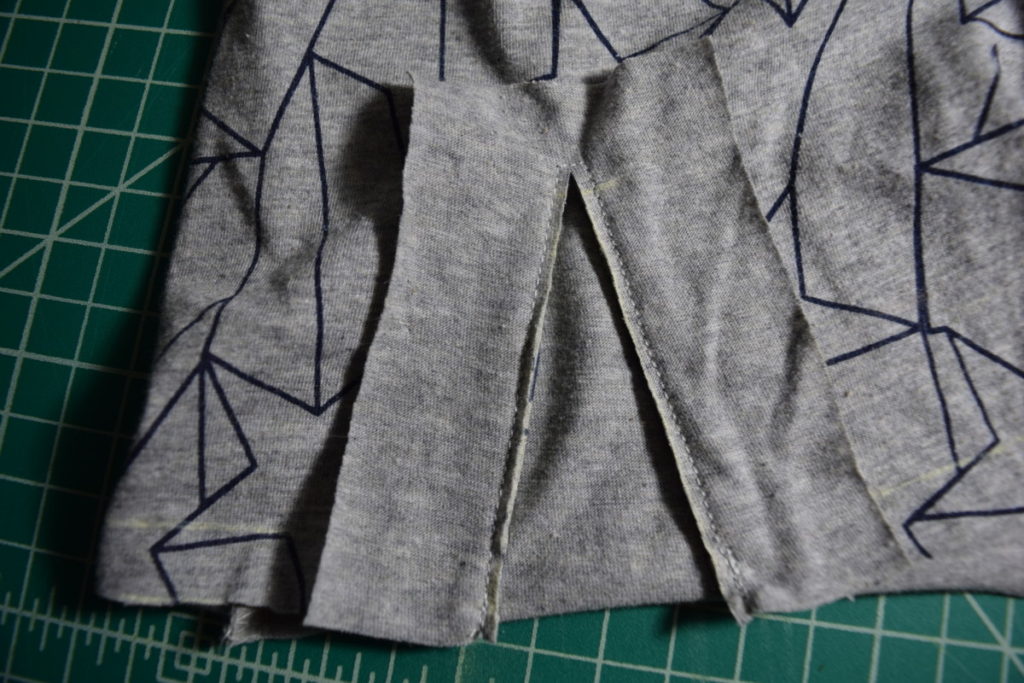
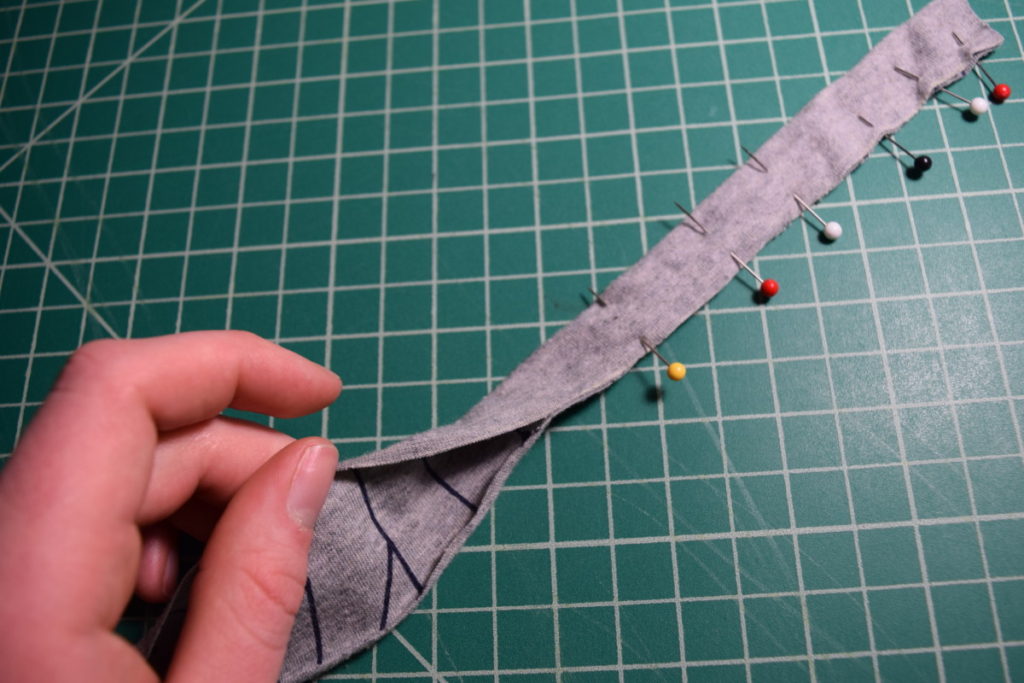
Mark on one side where you want your lace-up slit to be, then measure from the side seam and mark the other side the same distance from the side seam.
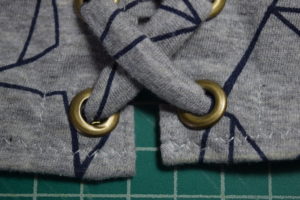
Next, line up your eyelets along the mark and draw another mark where you want the slit to end. My lines are 3.25 inches from the raw edge.
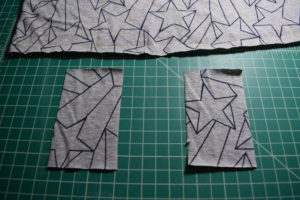
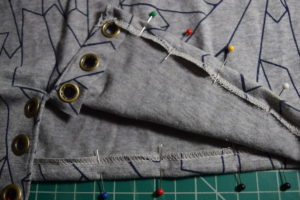
Using the leftover material from cutting the bottom off the shirt, cut two rectangles of fabric large enough to cover the entire area around the slit plus at least 1/2 inch beyond the eyelets on each side. My pieces are 2.5 inches by 4 inches. These pieces will be used as facings on the inside of each slit.
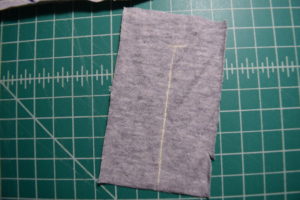
Next, on the wrong side of the fabric of each of the facing pieces, draw a line up the center matching the lines on the shirt.
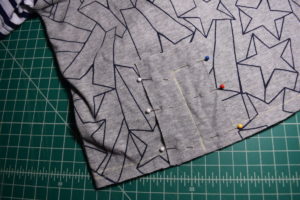
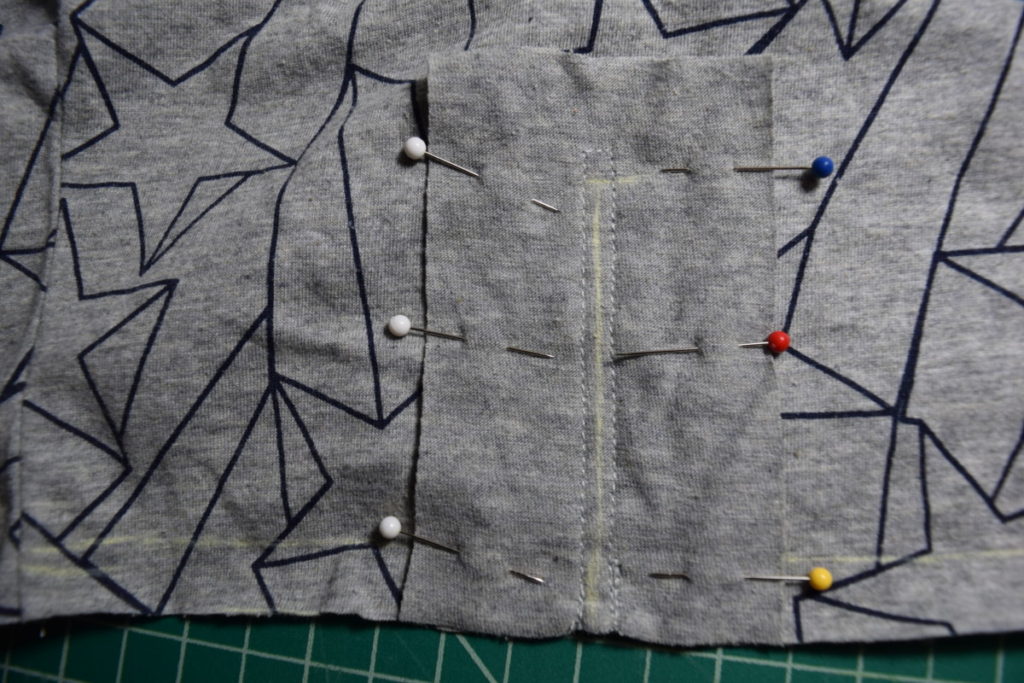
Pin each facing piece to the shirt, making sure right sides are together and matching the slit markings.
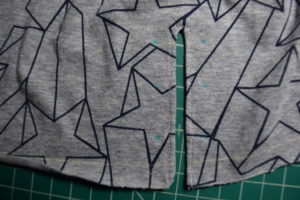
Sew up each of the long sides of the line and across the top, about 1/8 inch from the marking. Repeat for the other slit.
Use your scissors to cut a straight line up the center of your stitching, being careful not to cut through any stitches.
Next, turn your facing to the inside of the shirt and iron flat, making sure none of the facing shows on the outside of the shirt. Pin the facing to the inside.
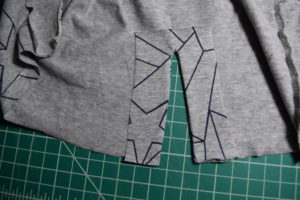
Sew along the slit; about 1/8 inch from the edge.
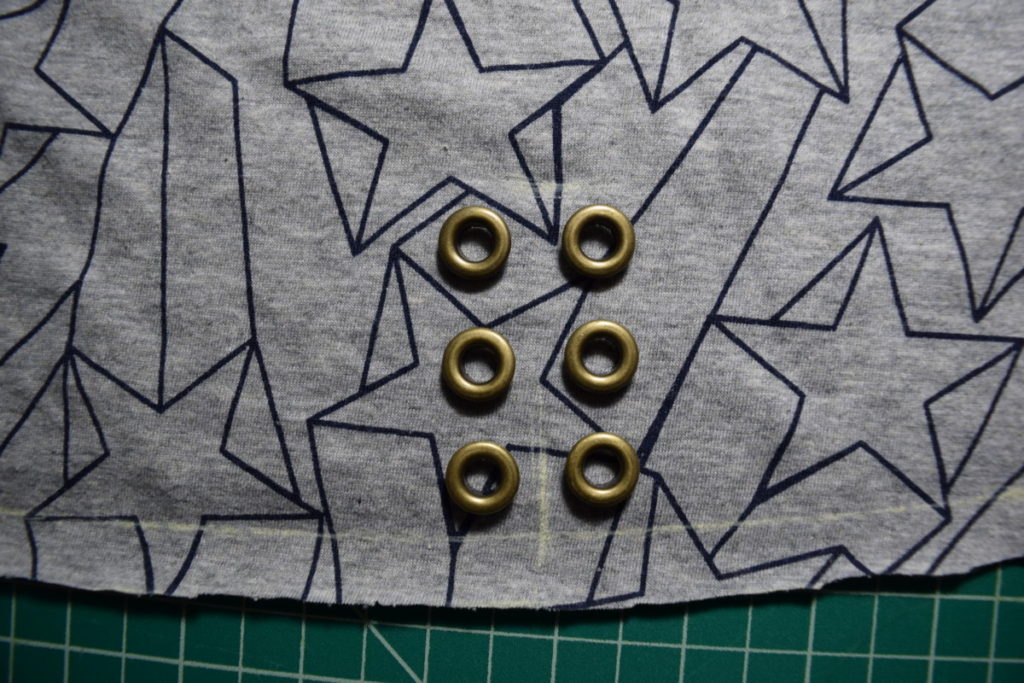
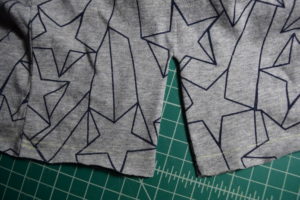
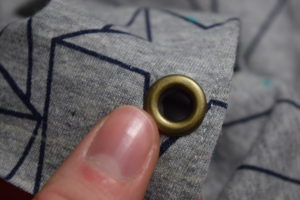
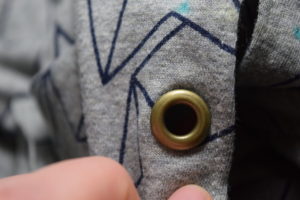
To insert eyelets:
Line up the eyelets around the slit and mark in the center of each eyelet.
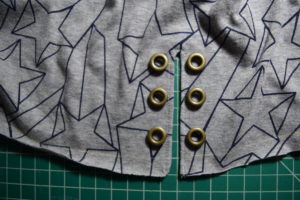
To insert an eyelet, cut a very small hole in one of the marks.
Then insert the front of the eyelet into the hole; stretching the fabric to fit (if you cut your holes too large, the eyelets will not be inserted snugly; it’s better to start small and make the hole larger if needed).
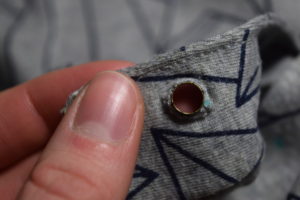
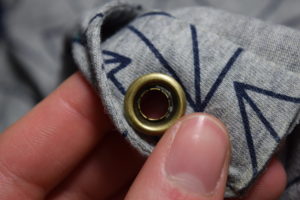
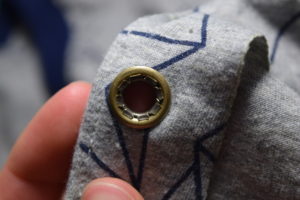
Next, place the eyelet back over the back of the eyelet front. Place eyelet pliers over the eyelet and squeeze until you feel a “click.” Repeat to insert the rest of the eyelets. You can then trim the facing so that it doesn’t stick out way beyond the eyelets.

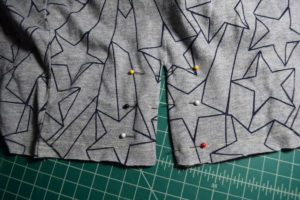
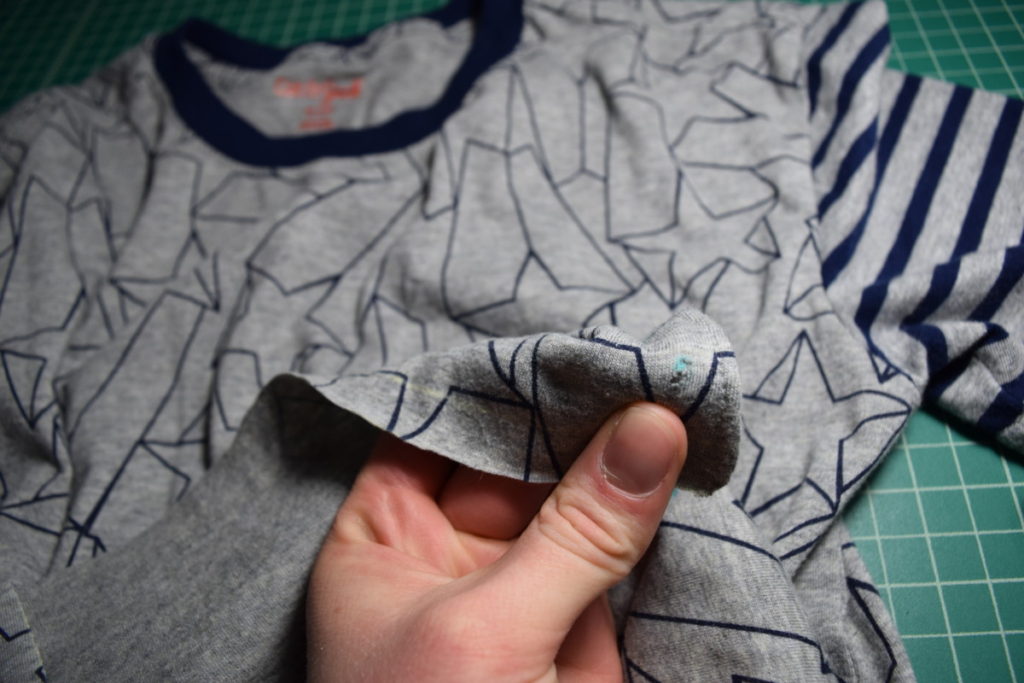
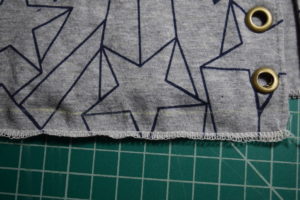
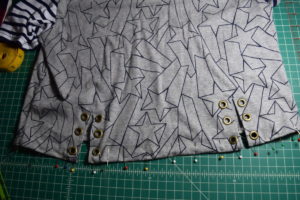
Next, to finish the hem I serged the raw edge (you can finish the raw edge with a serger, zigzag stitch, or just leave it raw because the knit fabric won’t fray). Then, turn up the hem and pin in place. Sew along the hem with a zigzag stitch or double needle, then iron for a crisp finish.
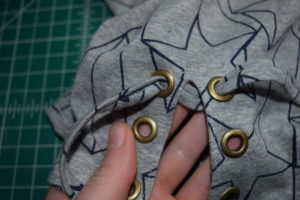
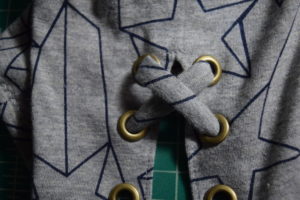
From here, you can thread ribbon or shoelaces through the eyelets if you like; or you can keep following along to make matching fabric strips to thread the eyelets.
To make the fabric strips:
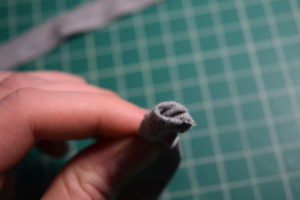
First cut two long rectangular pieces from your leftover fabric (mine are 14.5 inches by 1.5 inches). Pin the strips in half lengthwise, with right sides together, then sew about 1/2 inch from the raw edge.
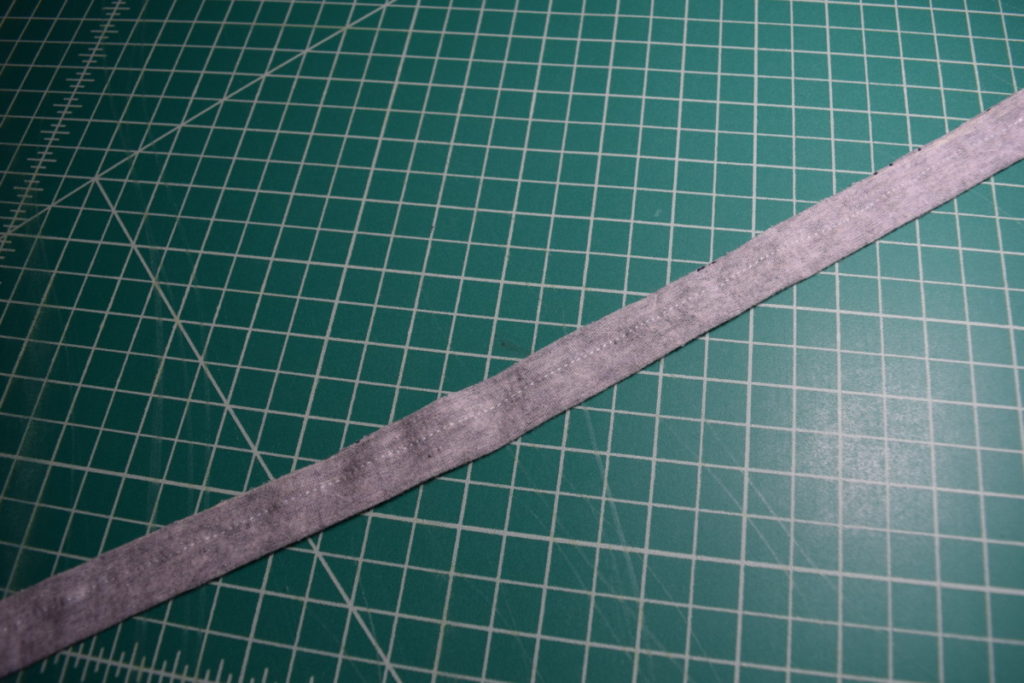
Trim the raw edge approximately 1/4 inch from the stitching to reduce bulk.
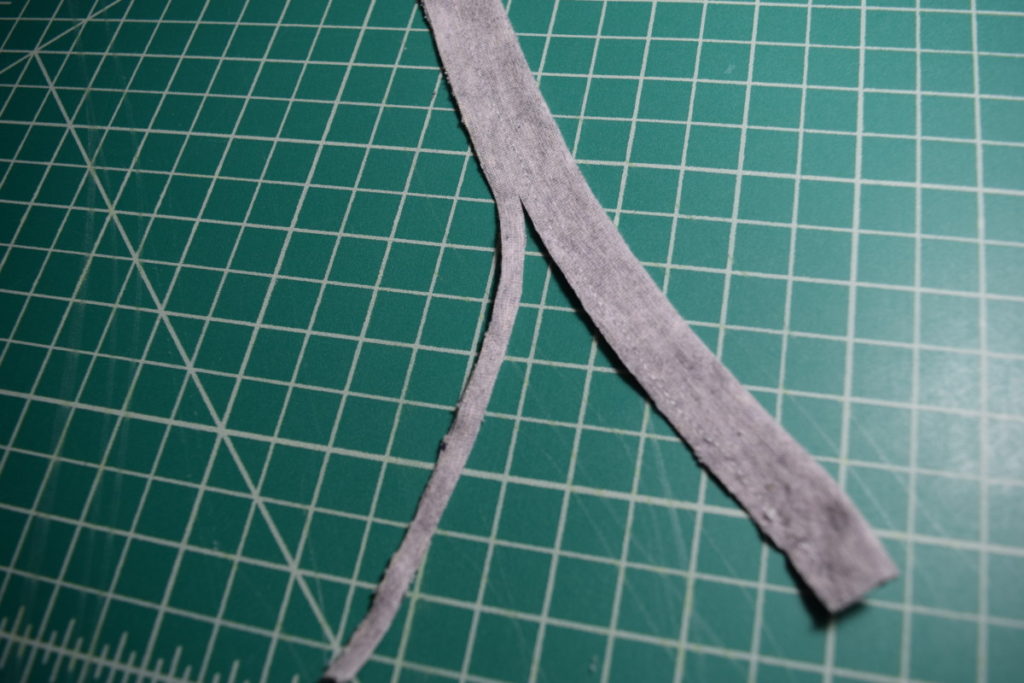
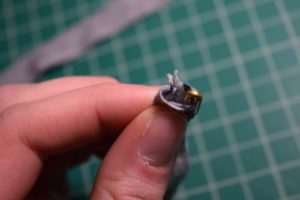
Next, attach a safety pin to the strip and push it down into the tube. Move the safety pin down through the tube to turn the tube right side out.
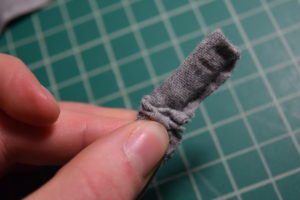
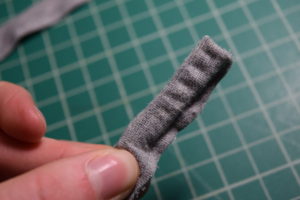

Press the strip flat with an iron, with the seam in the center (so that the seam will be hidden on the back of the strip). Repeat this process for the other strip.
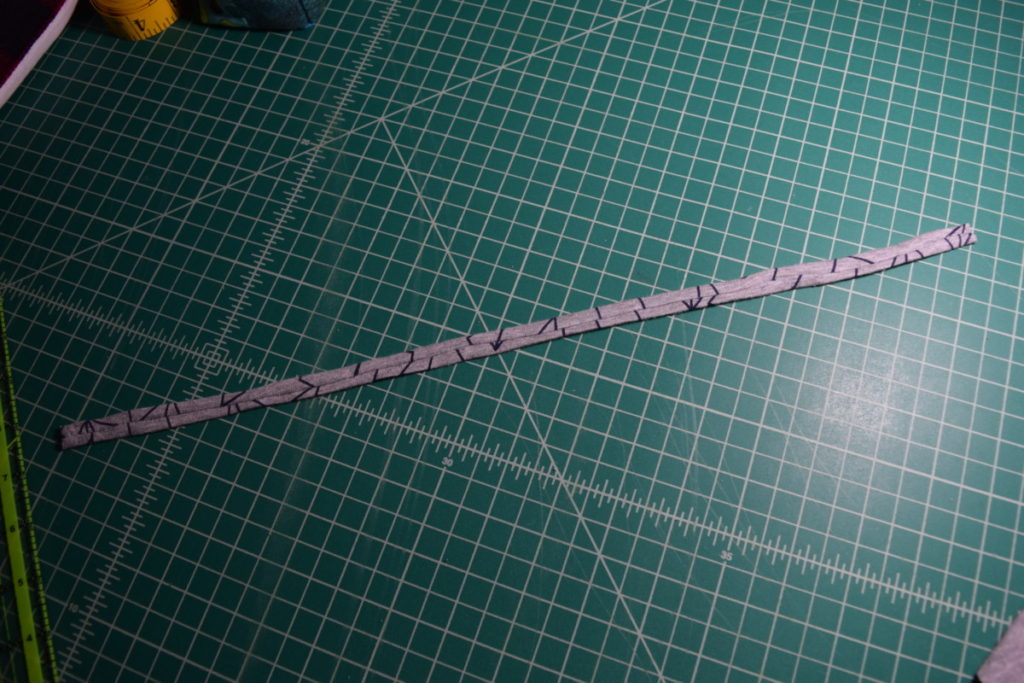
Thread your strips through your eyelets in a pattern you like. Here are some photos of the method I used to thread mine:
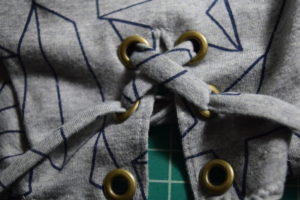
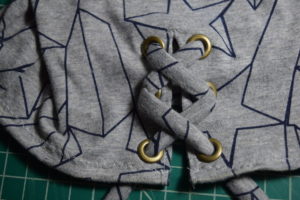
I then sewed the ends of the strips down with a small line of stitching and trimmed the ends close to the stitching.

And you’re done!


[…] T-shirt upcycle to crop top with lace-up detail […]
How to take CBD Gummies for the best results: There are many benefits of CBD Gummies, but the question of how to take them is still a bit mysterious. Here are some of the most common questions and answers.You can also read more about their ingredients. You may also be interested in how to take them at work. After all, how can CBD gummy help you in the office? Let’s find out! Keep reading! Then, you will be able to decide if they are for you! Taking CBD Gummies with you to work is a convenient way to boost your energy levels and combat anxiety. These tasty treats do not take up much space and will not disturb your day. Besides, there are no obvious side effects that will draw attention to your consumption.These tasty Gummies are as harmless as any other supplement or medication. So, you can use them without worrying about being judged or ridiculed. CBD is an effective pain reliever. When taken regularly, these Gummies can significantly boost your energy levels. It has been shown that CBD improves the ECS, which regulates sleep-wake cycles. This in turn leads to less pain.CBD Gummies offer a delicious way to boost your energy levels and get the rest you need at work. For optimal results, use a single dose every day CBD Gummies are a popular way to supplement your CBD intake. They are made from hemp extracts and come in a variety of flavours. CBD Gummies dosing:osing depends on your body’s tolerance to cannabidiol (CBD) and how much you’re willing to consume. They are easy to take, but the proper dosage for you will depend on your weight and the strength of the gummy.CBD is a compound extracted from the hemp plant, a member of the cannabis plant family. CBD is extracted from the hemp plant and is known as CBD oil. Dosage will depend on the desired effects. The recommended dose for adults is 0.25mg to 0.5mg per kilogram of body weight. Regular CBD dosages will improve immune function, limit environmental hypersensitivity, and reduce minor discomfort.You can double your dosage to 0.5mg every 8 hours or up to twice a day. If you feel like you need more CBD, you can double or triple it. To take CBD in gummies, you can either take one or two gummies once or twice a day. Taking CBD Gummies with you everywhere:
CBD Gummies are a new twist on the CBD supplement, providing a convenient and fun way to get your daily dose of CBD. These chewy sweets are made of CBD and come in a variety of flavours and shapes. They are also THC-free. Gummies are the most convenient way to take CBD.The CBD in these gummies is not a sedative, so it will not make you fall asleep. You should be mindful of your body’s signals to know how much CBD you should take.Some people may feel more energised in the morning or after a workout. In such a situation, best CBD gummies UK can also work as a reminder to drink water or eat a snack. Ingredients in CBD Gummies UK:Before purchasing any sort of CBD gummy, be sure to know what they are made of. Your gummies should come with a certificate of analysis, which certifies that they contain no more than 0.3 percent THC.These certificates will also show that the gummies passed laboratory tests to determine whether they are free of harmful adulterants or pesticides. When shopping for the best CBD Gummies UK, check what’s in them. Many of them contain the CBD isolate, which is devoid of other Cannabinoids. In contrast, full-spectrum Hemp extract contains most Cannabinoids.Full-spectrum gummies may contain traces of THC, but that is minimal. Other common ingredients found are sweeteners and other natural flavours. When buying them, you should also check the ingredients for any allergens. aking CBD Gummies with you to work:Taking CBD gummies with you at work is a convenient way to boost your energy levels and combat anxiety. These tasty treats do not take up much space and will not disturb your day. Besides, there are no obvious side effects that will draw attention to your consumption.These tasty gummies are as harmless as any other supplement or medication. So, you can use them without worrying about being judged or ridiculed.CBD is an effective pain reliever. When taken regularly, these gummies can significantly boost your energy levels. It has been shown that CBD improves the ECS, which regulates sleep-wake cycles. This in turn leads to less pain.CBD gummy is a delicious way to boost your energy levels and get the rest you need at work. For optimal results, use a single dose every day.Are CBD Gummies worth buying?CBD Gummies is a great option for those who is looking to incorporate CBD into their daily routine in a tasty and convenient way. There are several benefits that make them worth considering. Firstly, they provide a easy method of consumption, allowing you to enjoy the benefits of CBD without drawing attention. Secondly, CBD Gummies are pre-dosed, making it easy to control your CBD intake and experiment with different dosages. Additionally, they come in a wide variety of flavours, which adds a fun and delicious twist to your CBD experience. However, it’s important to note that the efficacy of CBD Gummies can vary depending on factors such as the quality of the product, individual metabolism, and the desired effects. What are the potential benefits of CBD gummies in the UK? CBD Gummies in the UK offer a range of potential benefits. CBD engages with the body’s endocannabinoid system, a vital regulator of numerous physiological processes.Consuming CBD Gummies may lead to various benefits such as relaxation, decreased stress or anxiety levels, enhanced sleep quality, cbd gummies for pain and an overall sense of well-being. Some individuals also report CBD Gummies aiding in pain relief, promoting a calm mind, and supporting overall balance.Read more about CBD Gummies can you drive. It is important to keep in mind that the specific benefits can differ among individuals, making it advisable to begin with a lower dosage and gradually adjust as necessary. What is considered a strong CBD gummy? A strong CBD gummy typically refers to a gummy with a higher concentration of CBD. Typically, the strength or the strength of CBD gummies is determined by the quantity of CBD milligrams in each gummy.For example, gummies with 25mg or more per serving are often considered strong. However, what is considered strong for one person may not be the same for another, as individual tolerance and desired effects can vary.To ensure optimal results and accommodate individual requirements. It is crucial to commence with a lower dosage of CBD and make adjustments based on personal needs and the body’s response. Can you take a CBD gummy every day? Taking a CBD gummy every day is generally safe for most individuals. CBD is widely tolerated and does not cause intoxication in most individuals. Nonetheless, it is always advisable to seek advice from a healthcare professional before initiating any new supplementation routine, including CBD.They can provide guidance based on your specific health condition, medications you may be taking, and any potential interactions or considerations. Adhering to the manufacturer’s recommended dosage instructions is of utmost importance. What are the best CBD gummies in the UK? etermining the best CBD Gummies in the UK can depend on various factors such as quality, taste, potency, and customer reviews. Some highly regarded options include BRITISH CANNABIS, ACCESS CBD, CBD by BRITISH CANNABIS, and Elixinol.
Your CBD experience will rely greatly on a number of factors. These include personal bioavailability factors (such as height, weight, and body mass), the strength of your CBD oil product, and the supporting ingredients. In general, CBD has a gentle calming effect for the mind and body. In CBD oil sweets, containing ingredients to boost energy or nutrition, that calming effect can help to focus the mind. In relaxation-based products, that calming effect can be more pronounced — especially CBD products formulated for sleep.Is CBD Legal In The UK?Yes! CBD is legal in the UK, provided the product contains less than 0.2 THC as measured by dry weight.
How delicious are our CBD gummies? Don’t just take our word for it, professional football player, John Hartson, said “I take the 4800mg gummies and I love them. I don’t have to worry about missing my CBD, all I do is put the tub in my gym bag and I can take it in between sessions. I can already feel the benefits and the flavours are great”. If that’s still not enough, just check out our amazing 5 star reviews on Trustpilot from over 3000 testimonials from happy customers across the UK. Join the SupremeCBD family today to start benefiting from our incredible edibles. Free UK Delivery on All Orders Over £50 Enjoy FREE UK delivery on all orders of £50 or more. Don’t miss out on this amazing offer and make the most of your CBD experience with our delicious gummies, delivered straight to your door! Shop now and unlock the power of CBD Gummies in the UK
CBD Edibles are currently legal in the UK, making them a safe and convenient option for those looking to incorporate CBD into their wellness routine. At our store, we use only high-quality CBD oil in our edibles, ensuring that you get the best possible experience.