
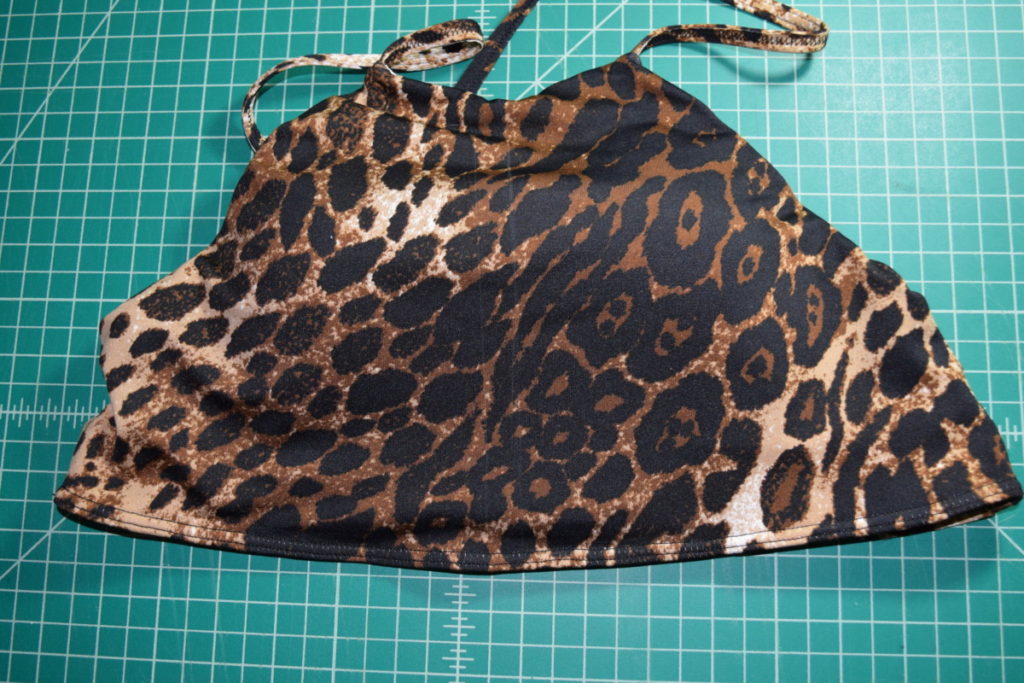
Swimsuits are so fun to make. They’re just so easy to sew together and the stretchy fabric is so forgiving fit-wise! I don’t live anywhere near a beach, but I have at least 5 swimsuits… oops.


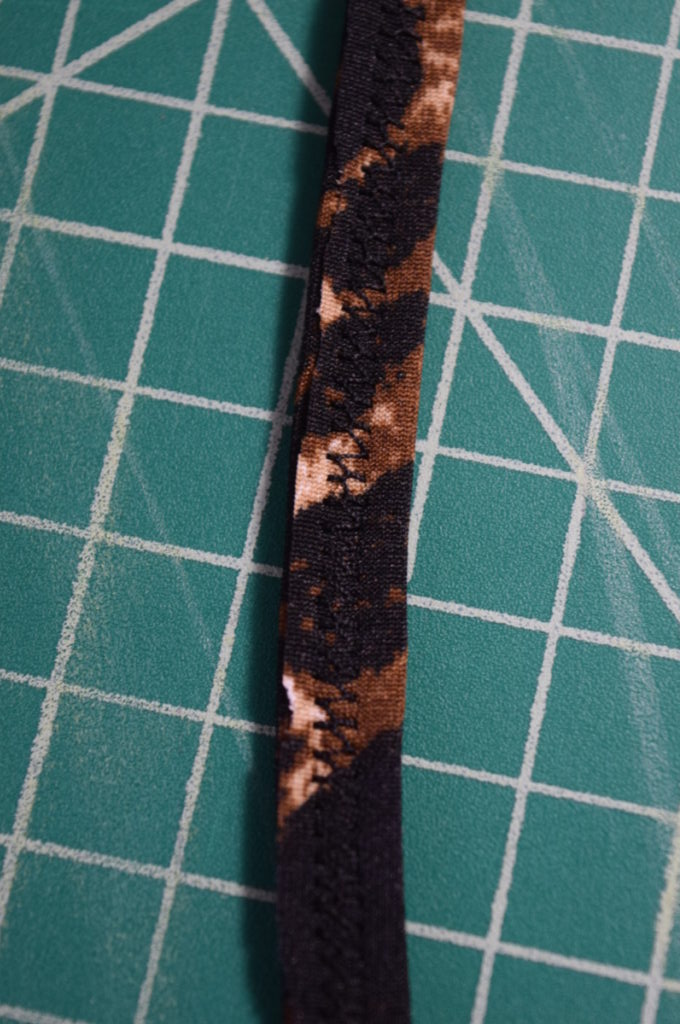
I found this leopard… or cheetah… print dress at the thrift store and when I felt the material I knew it was destined to become a swimsuit!

After some scrolling through pinterest for inspiration, I decided to make a high waisted bikini because that was one style I didn’t have yet in my swimsuit collection.


If you want to learn how to make yourself a gorgeous swimsuit, read on!
*This post contains affiliate links, which means that if you purchase through my links I get a small commission at no extra cost to you. This really helps to support my blog so I can continue to create content.
What you need:
- A dress or swimsuit fabric (the fabric you use needs to be able to stretch in all directions and not turn transparent when wet)
- Swimsuit lining (if you use a dress that is large enough you can use it for both the outer fabric and lining)
- Sewing machine
- Thread (make sure to use regular polyester thread so it doesn’t break down in chlorine)
- Jersey knit or stretch needle
- Optional: double needle
- Ballpoint (knit) sewing pins
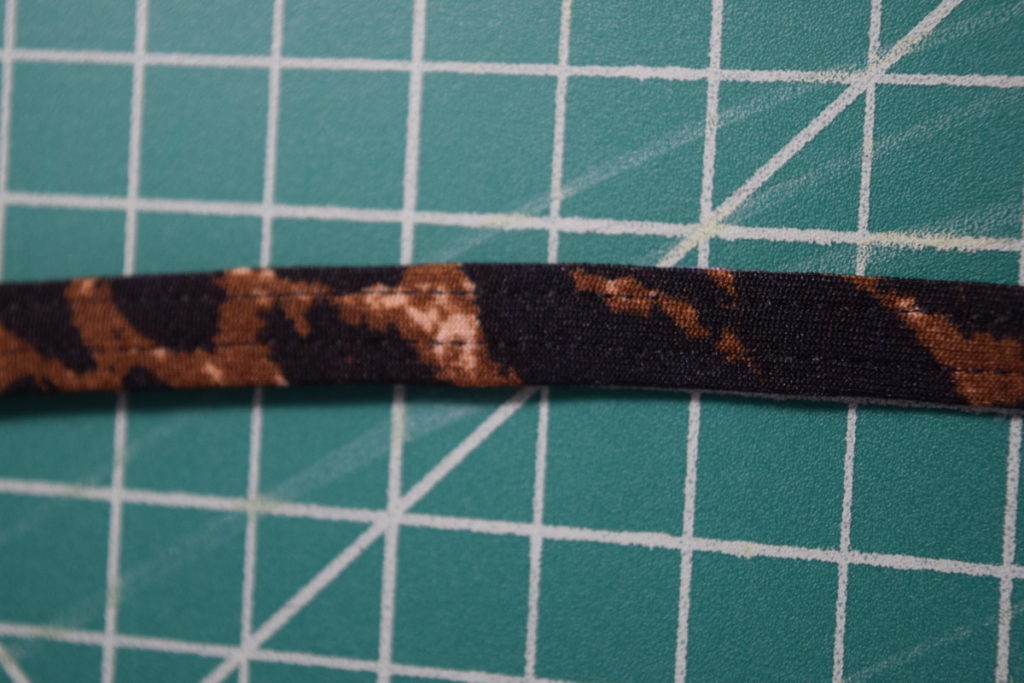
- 1/4 inch swimsuit elastic (I used THIS elastic from Amazon, you can get 75 yards!)
- Iron
- Scissors
- Fabric marker or chalk
Instructions:
Cutting out the pieces for the bottoms:
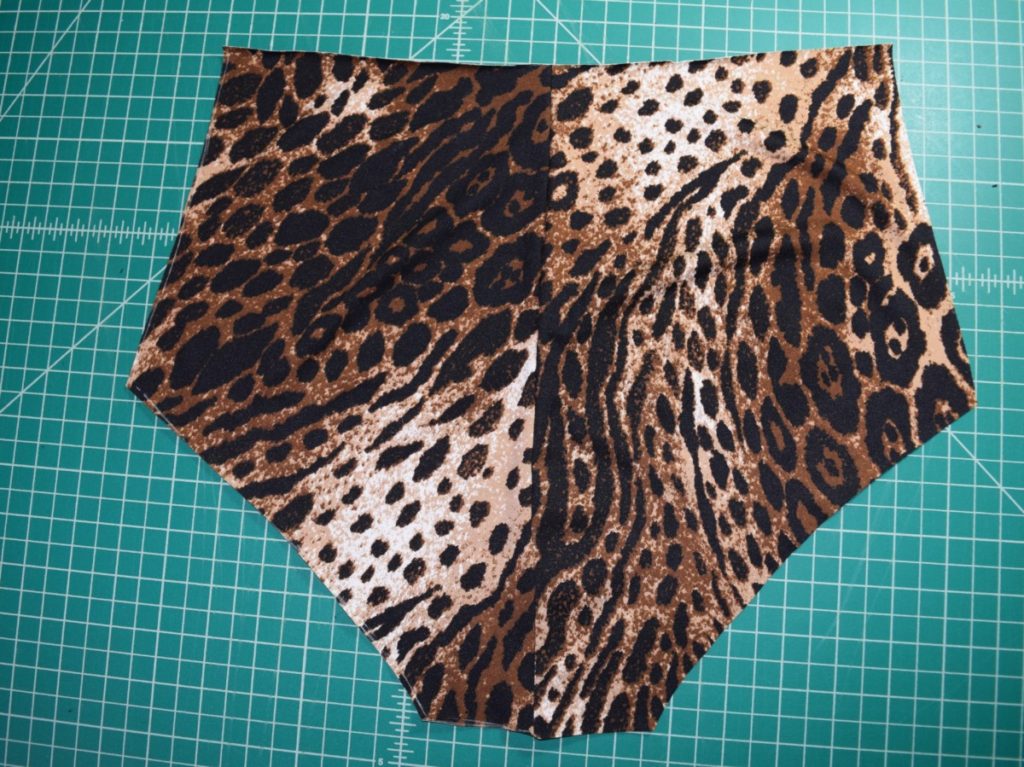
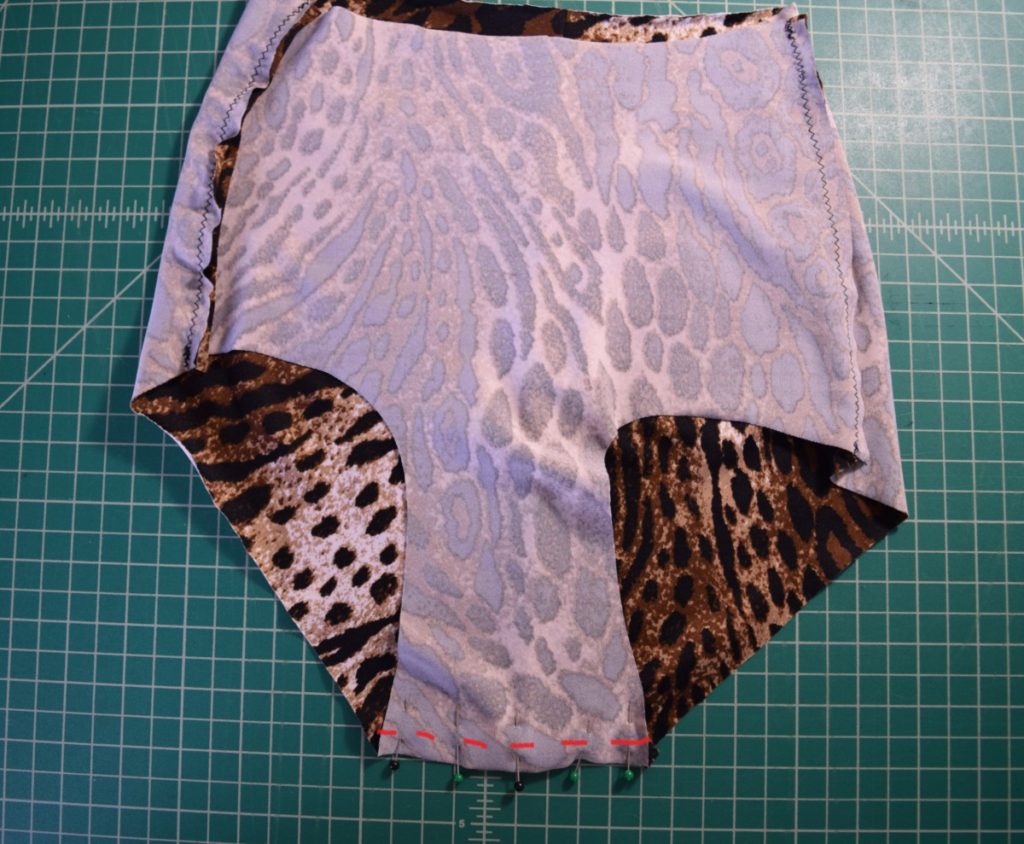
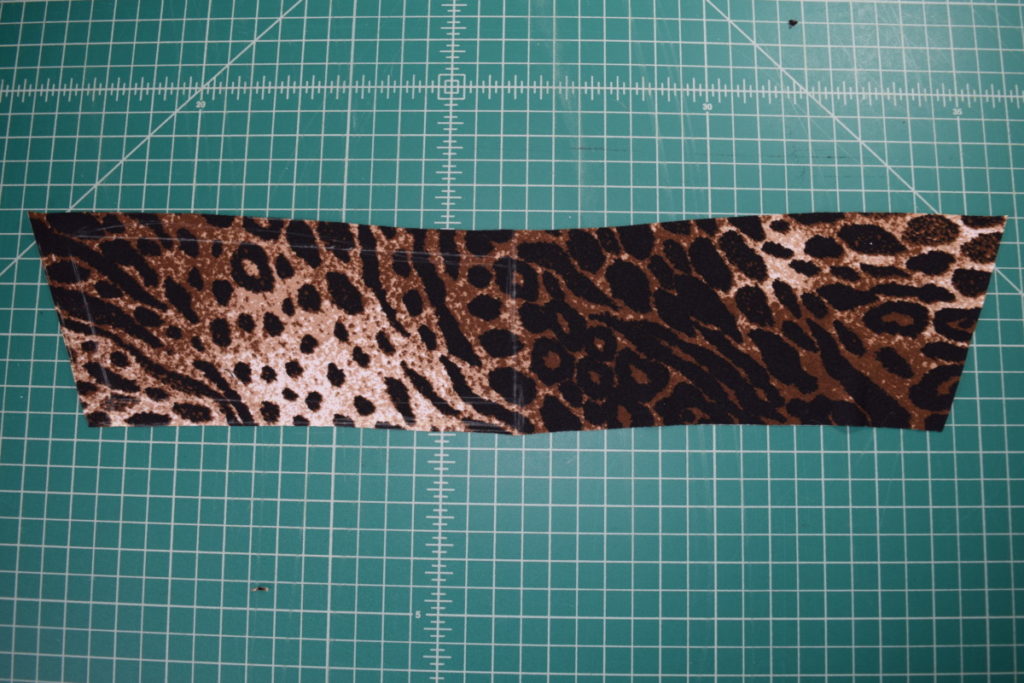
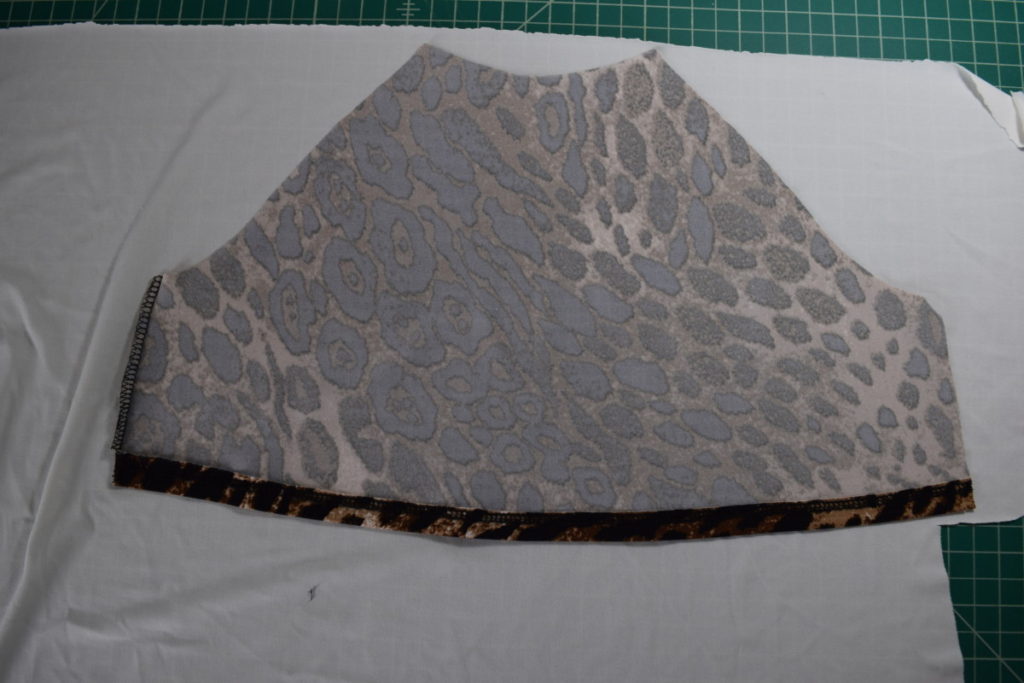
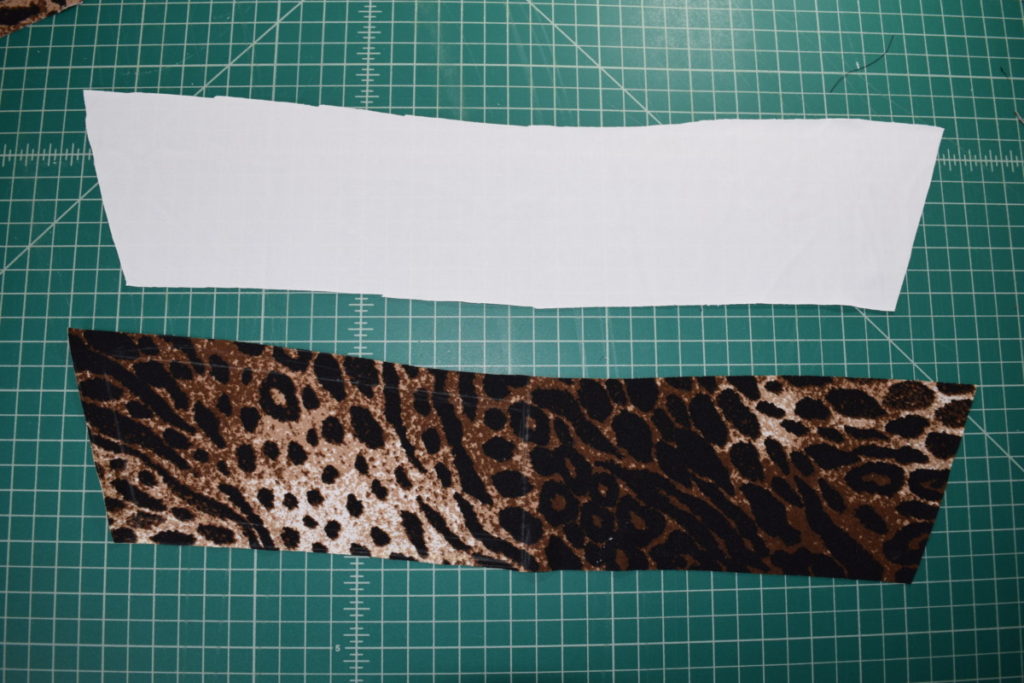
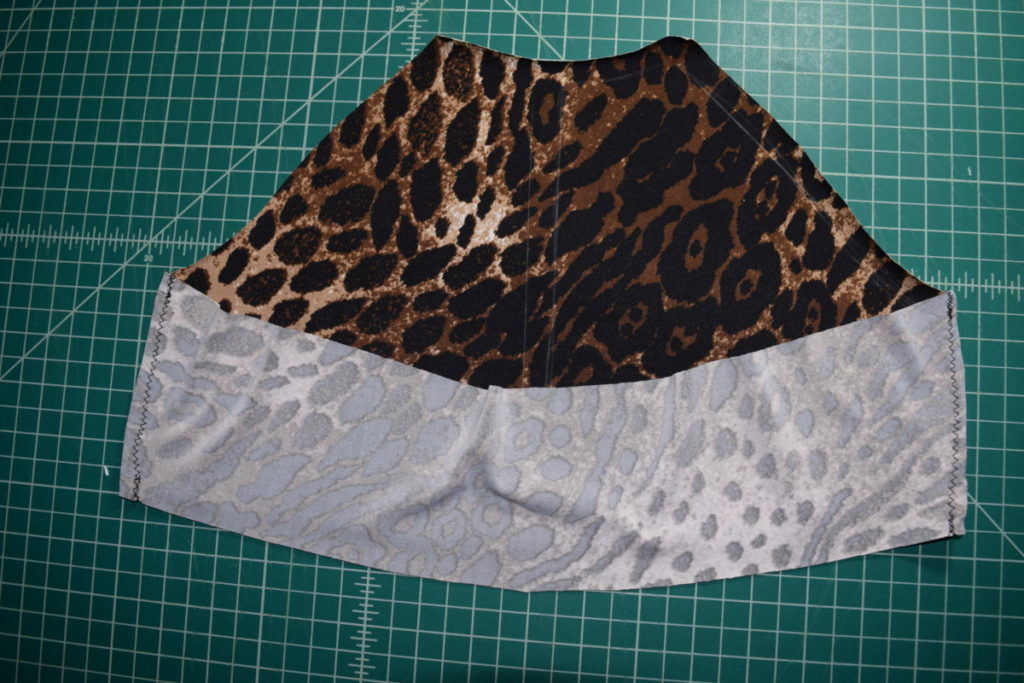
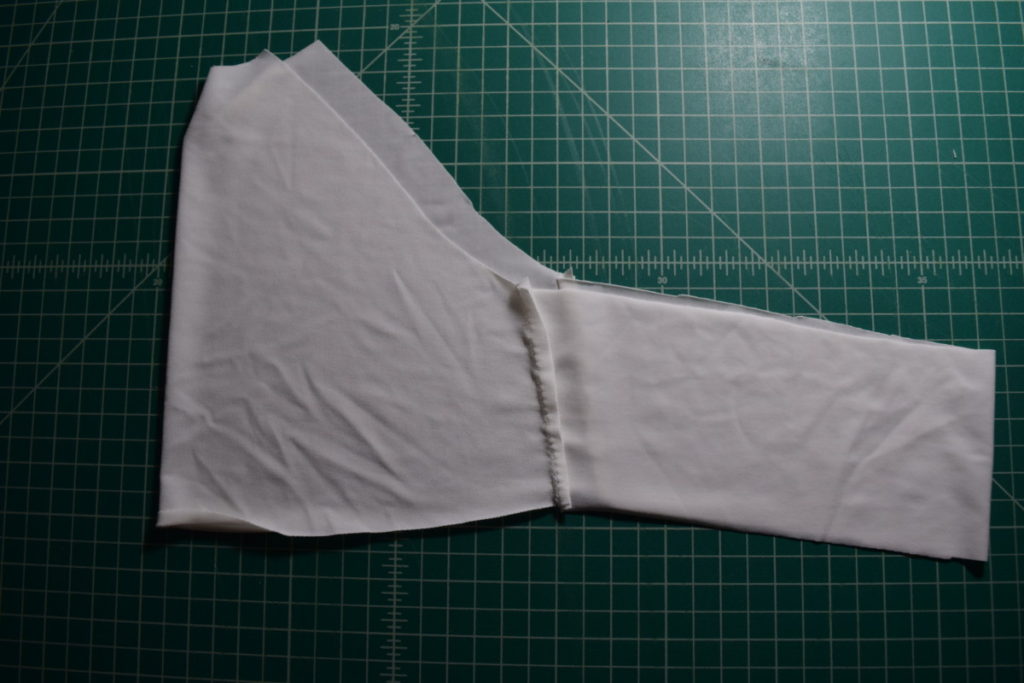
I first cut my dress apart so I could use the fabric. My dress was paneled so I ended up with two larger panels and two sets of smaller panels with a seam up the center.
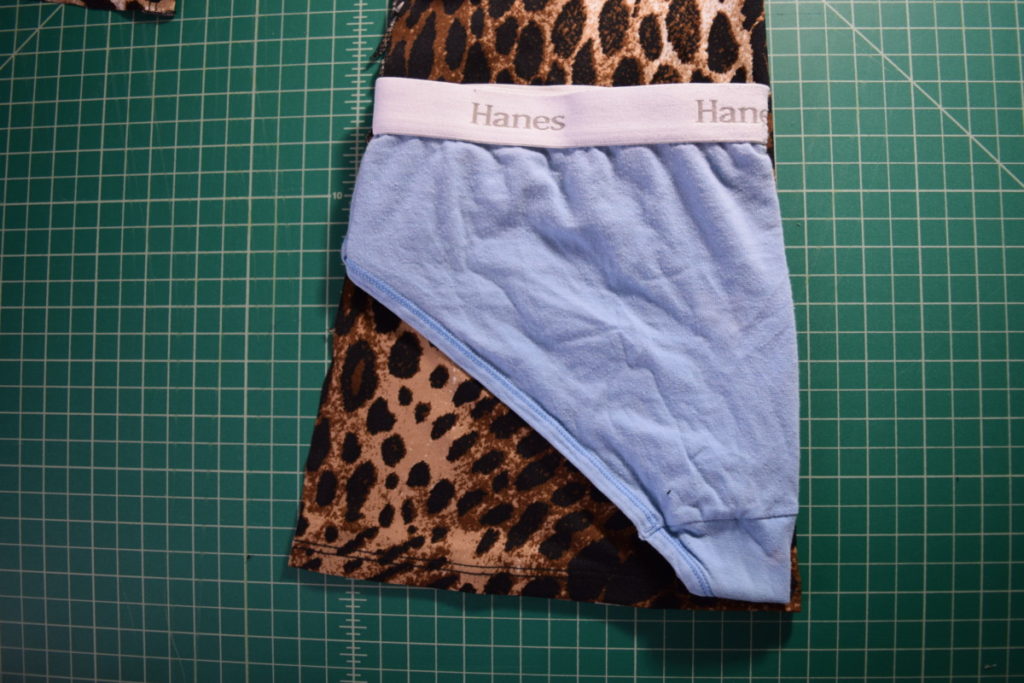
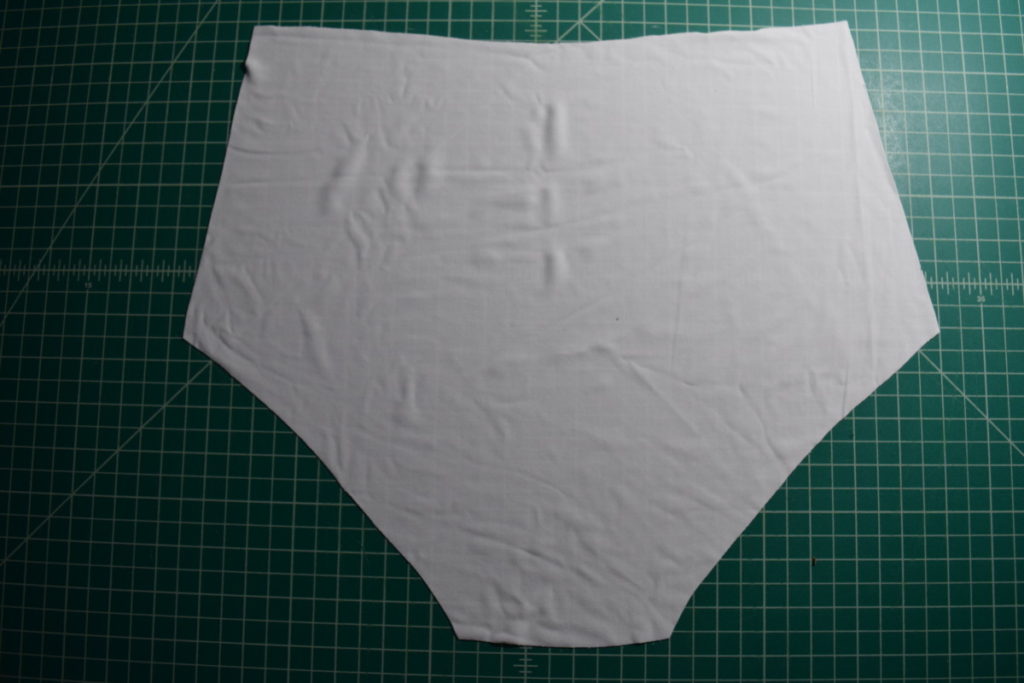
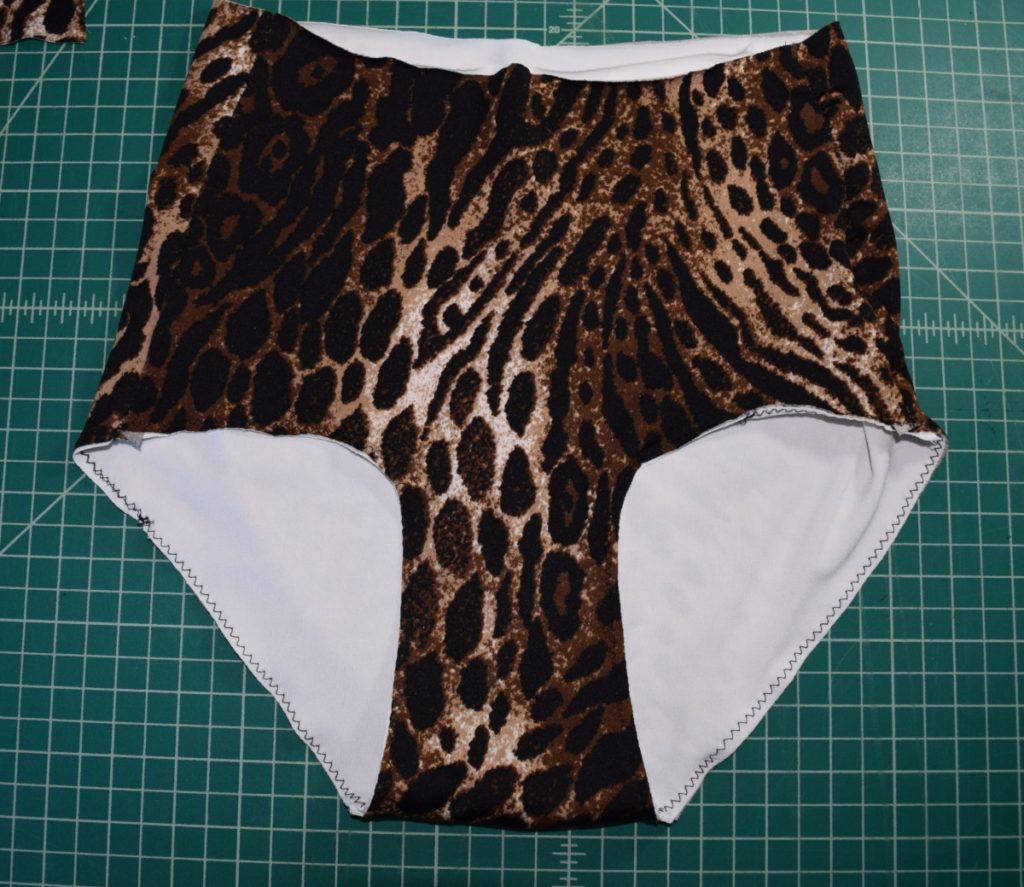
To make the pattern for the swimsuit bottoms, I traced a pair of underwear I liked the fit of. First, I folded the underwear in half with the front towards the inside of the fold. I then folded my fabric and laid the folded underwear on the fabric with the fold of the underwear lined up with the fold of the fabric.
The fabric I used for this part was one of the panel sets with a seam up the center, so I folded my fabric along the seam. Because of this, my swimsuit bottoms will have a seam in the center back.
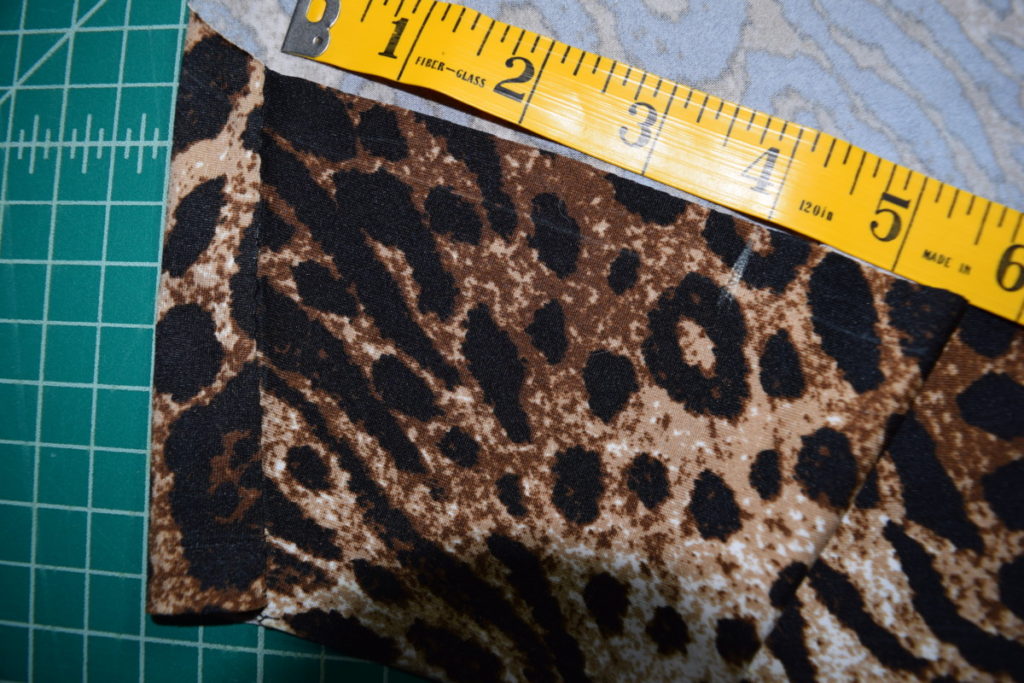
Next, trace around the underwear, tracing about 1/2 inch beyond the underwear for seam allowance. I also extended the waist up 4 inches from the top of the underwear to make it high waisted.
Now just cut along the lines you drew. This is the back of your bikini bottoms.
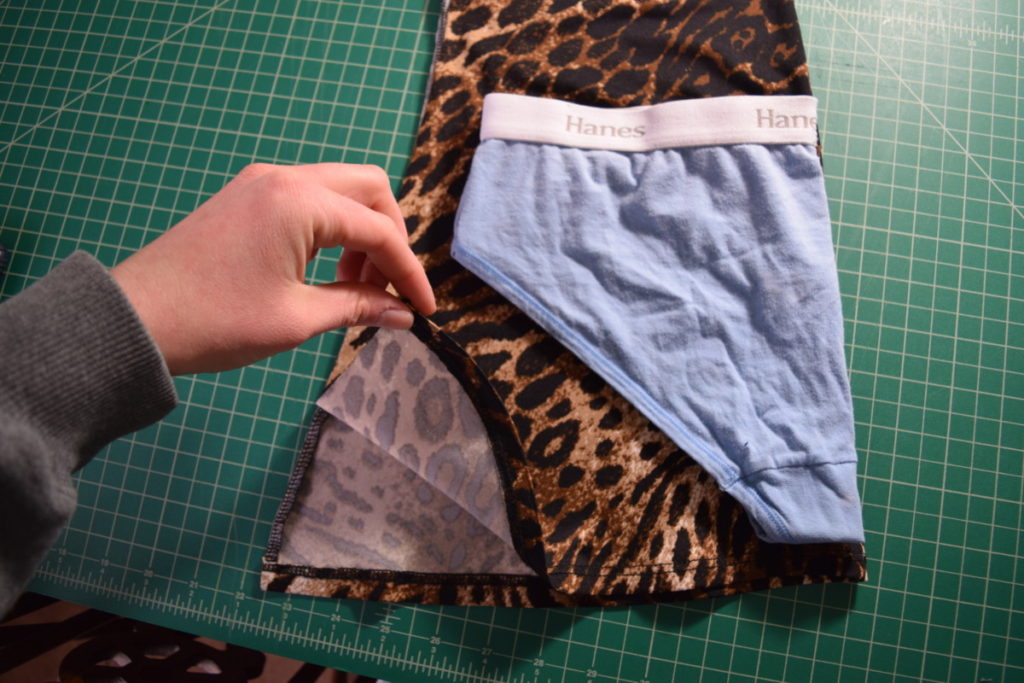
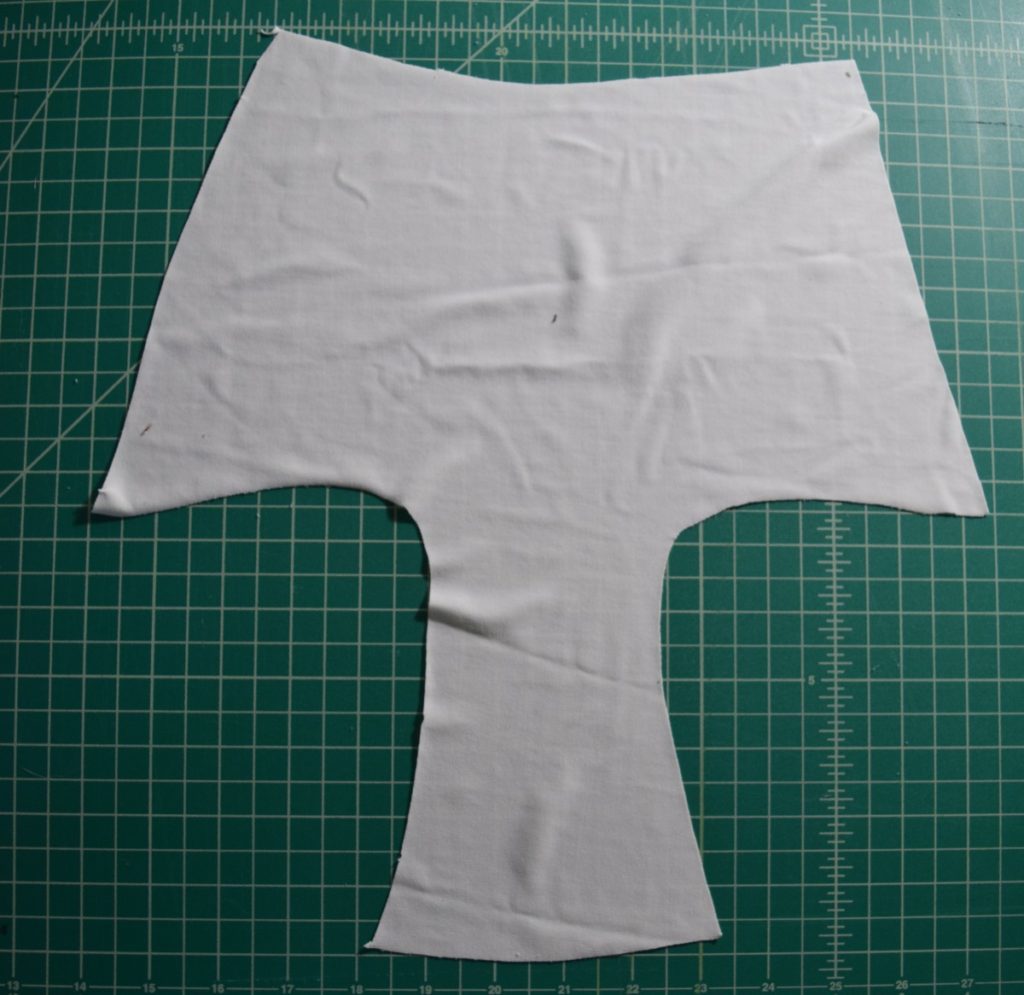
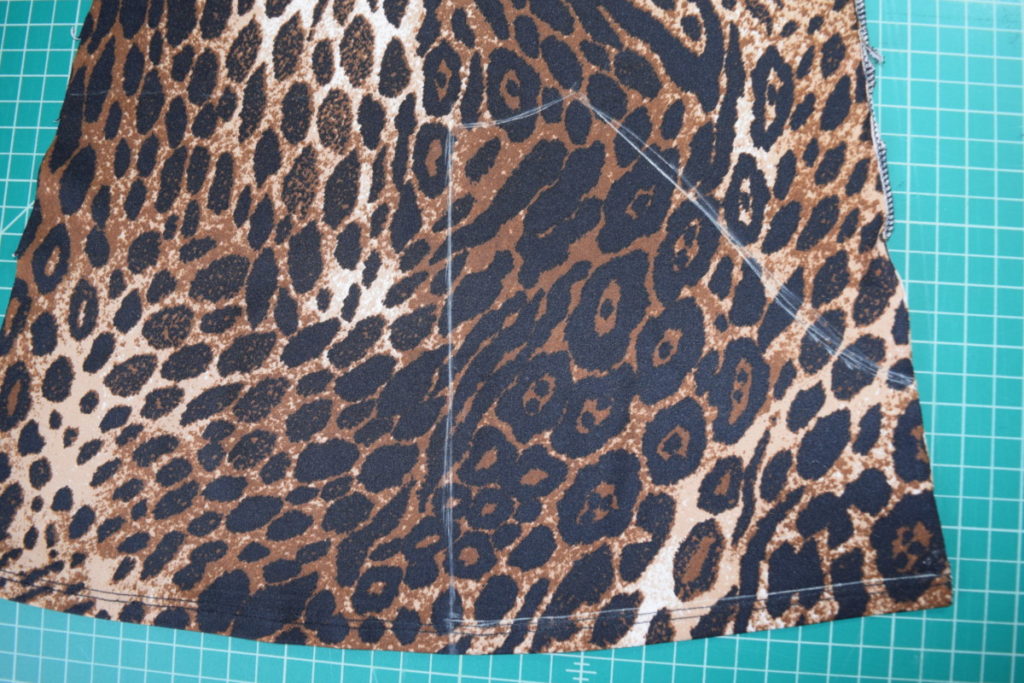
Now we’ll cut the front out. Fold the underwear you’re using as a pattern in the other direction (with the back to the inside). Fold your fabric and lay the underwear down on the fabric with the fold along the fold of the fabric. Now trace around the underwear, leaving about 1/2 inch extra for seam allowance. I also added 4 inches to the waist from the top of the underwear. Make sure you’re only tracing around the front of the underwear:
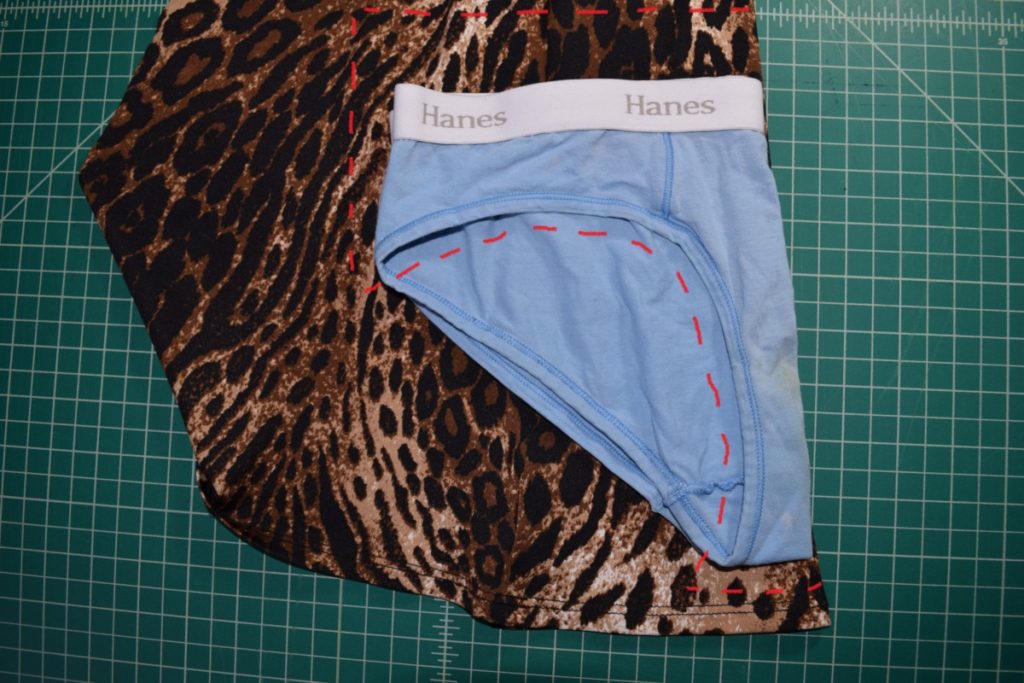
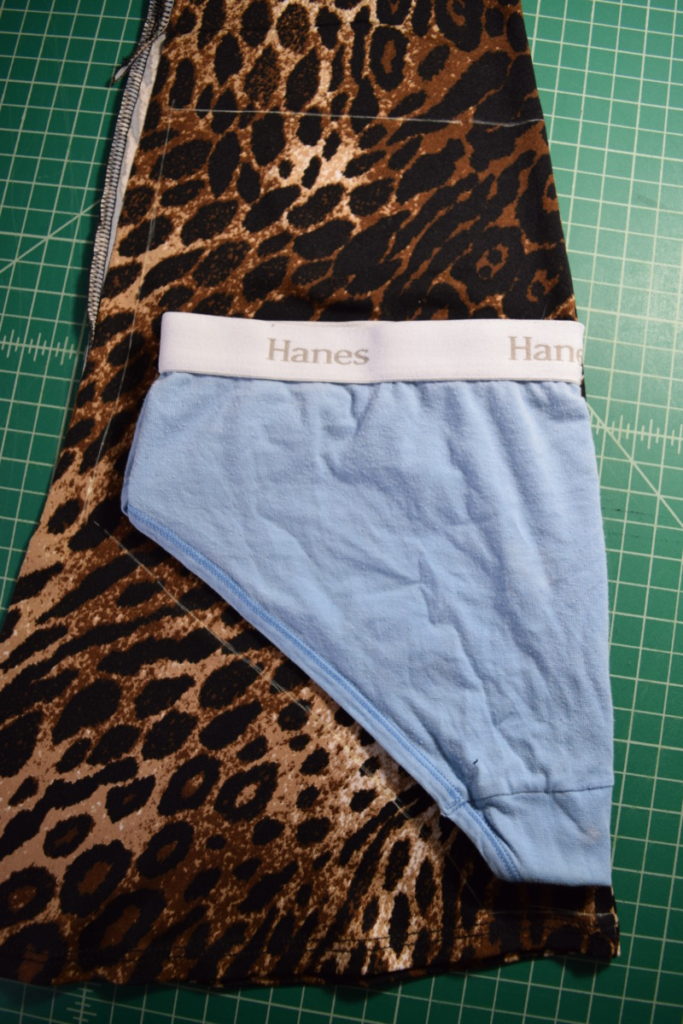
Next, cut it out along the lines you drew and you have the front!
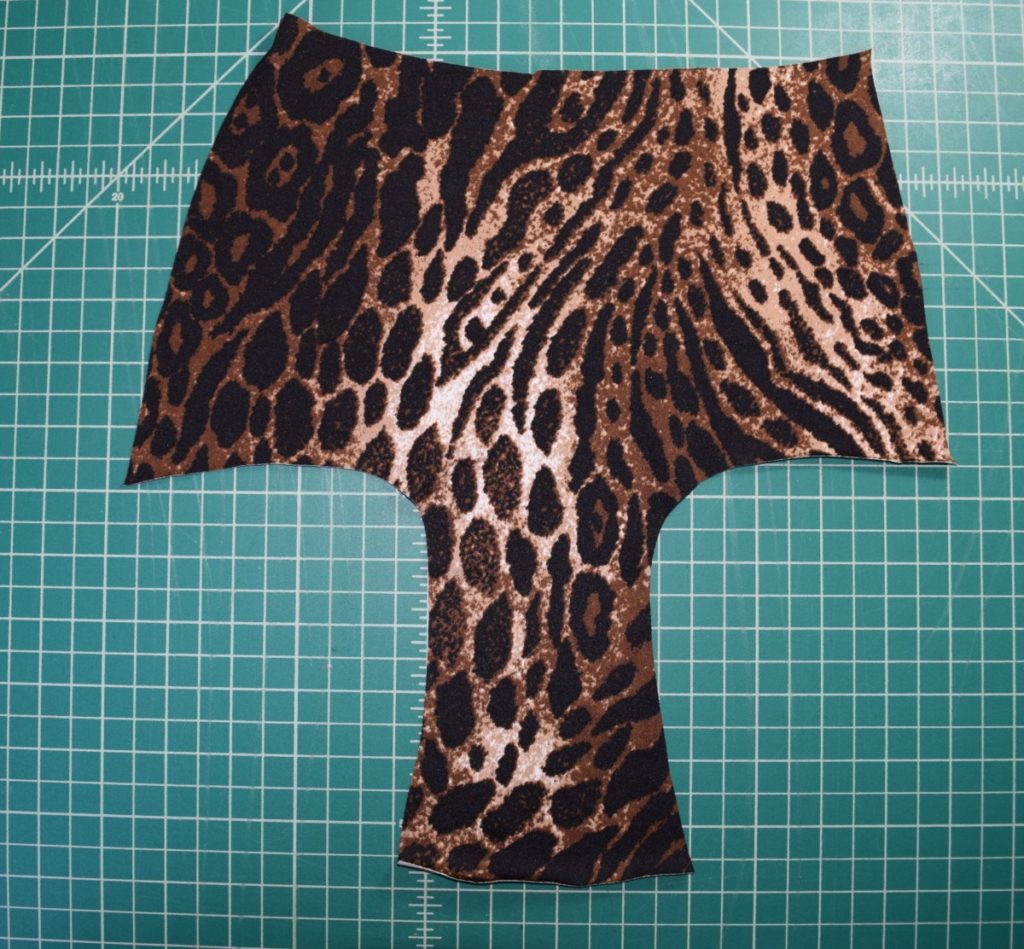
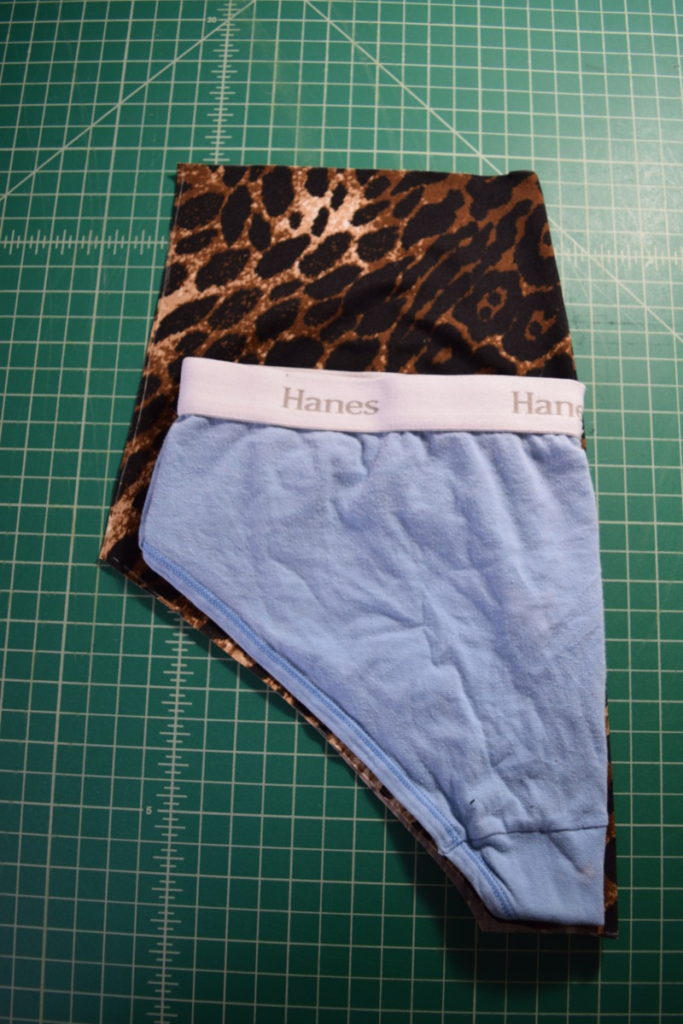
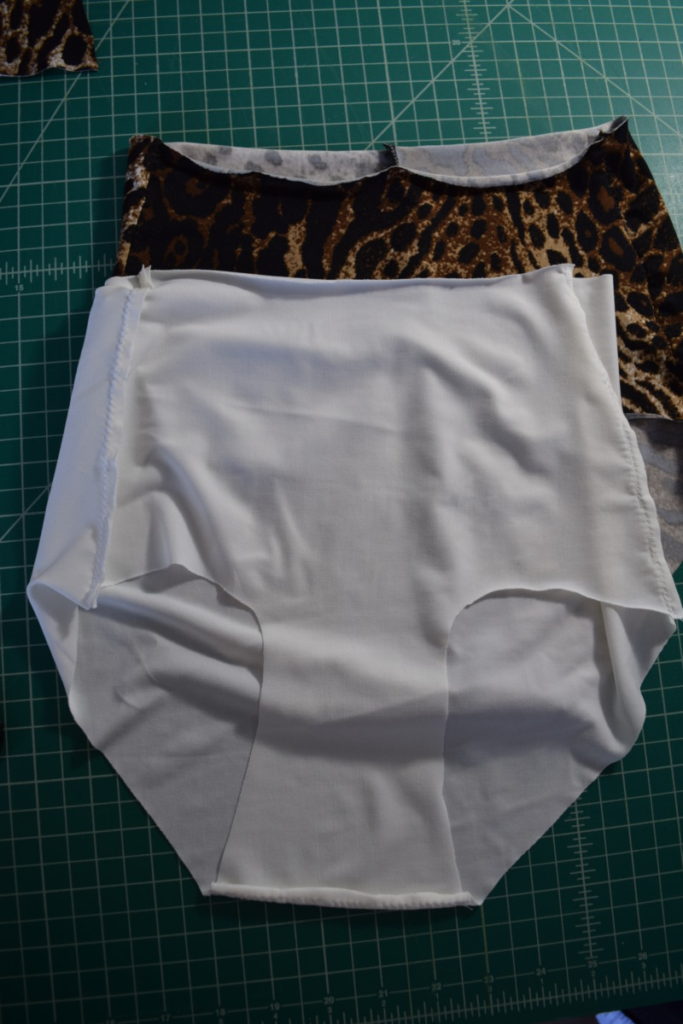
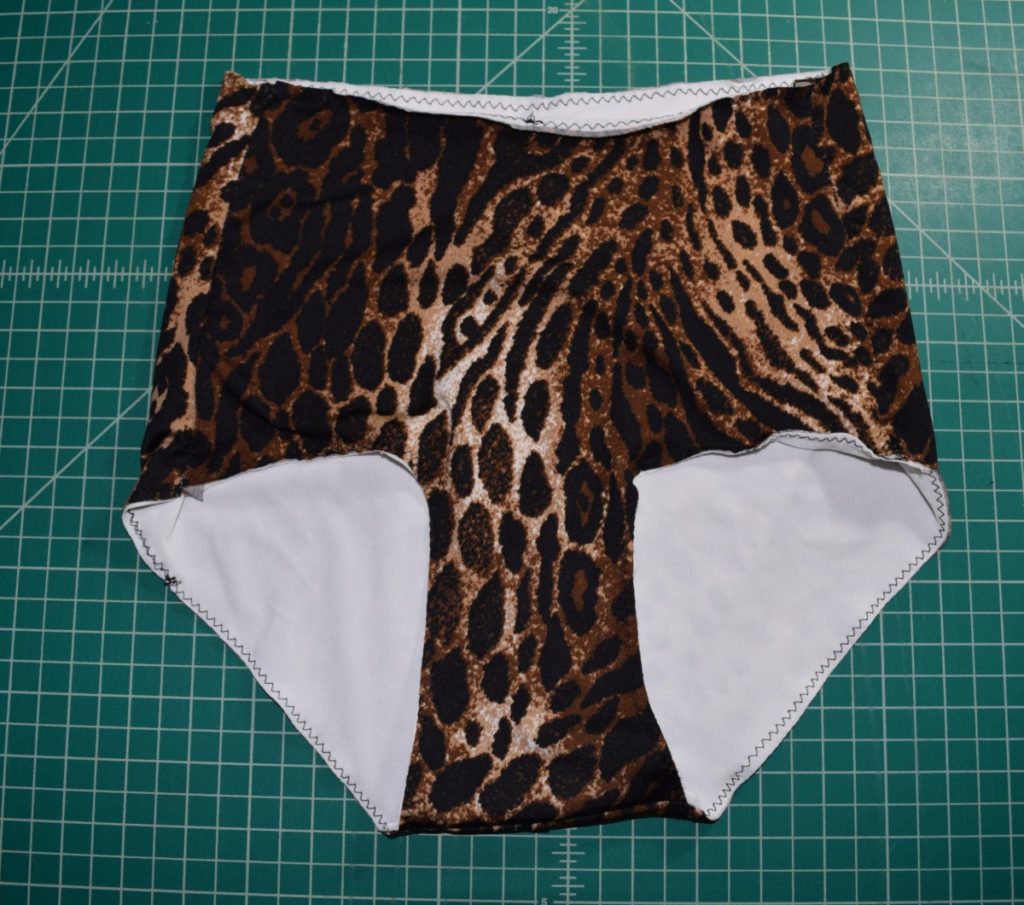
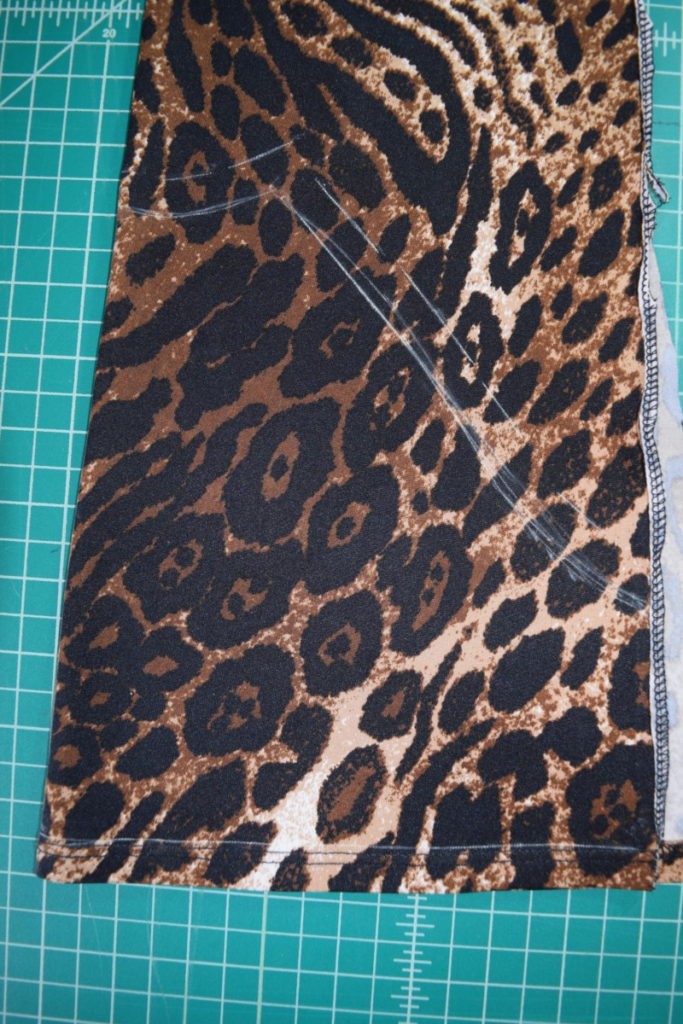
To cut the back lining piece, place the swimsuit back down on the lining fabric with wrong sides together. Cut around it to get a matching (mirror image) back lining piece.
Now repeat the process with the front piece to cut a lining front.
Sewing together the bikini bottoms:
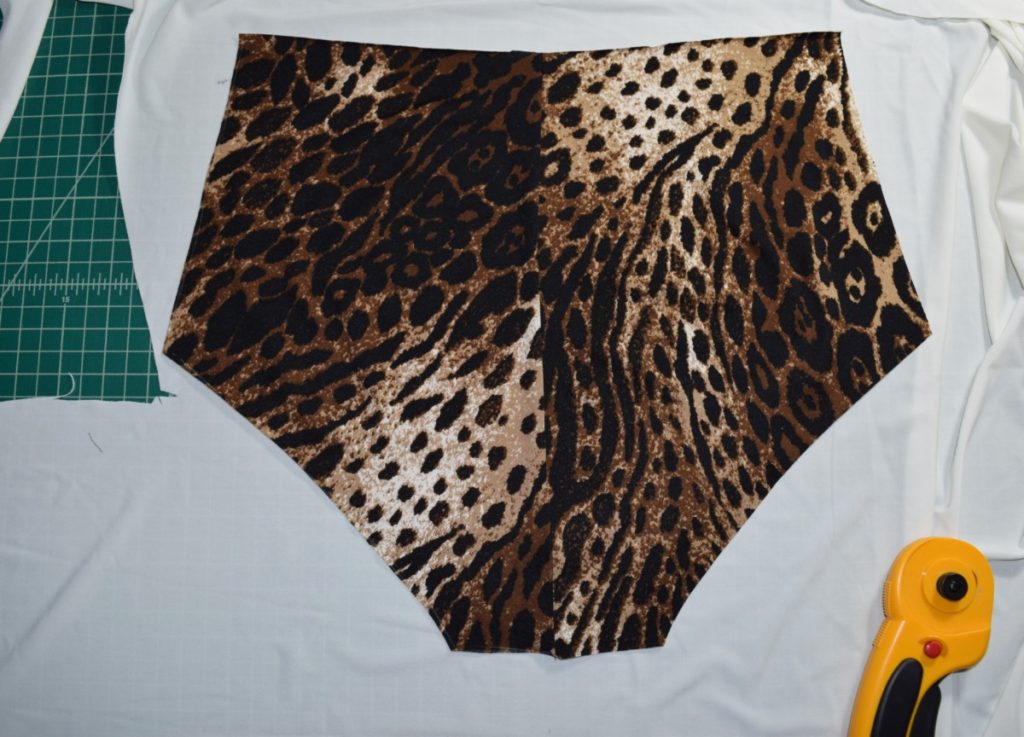
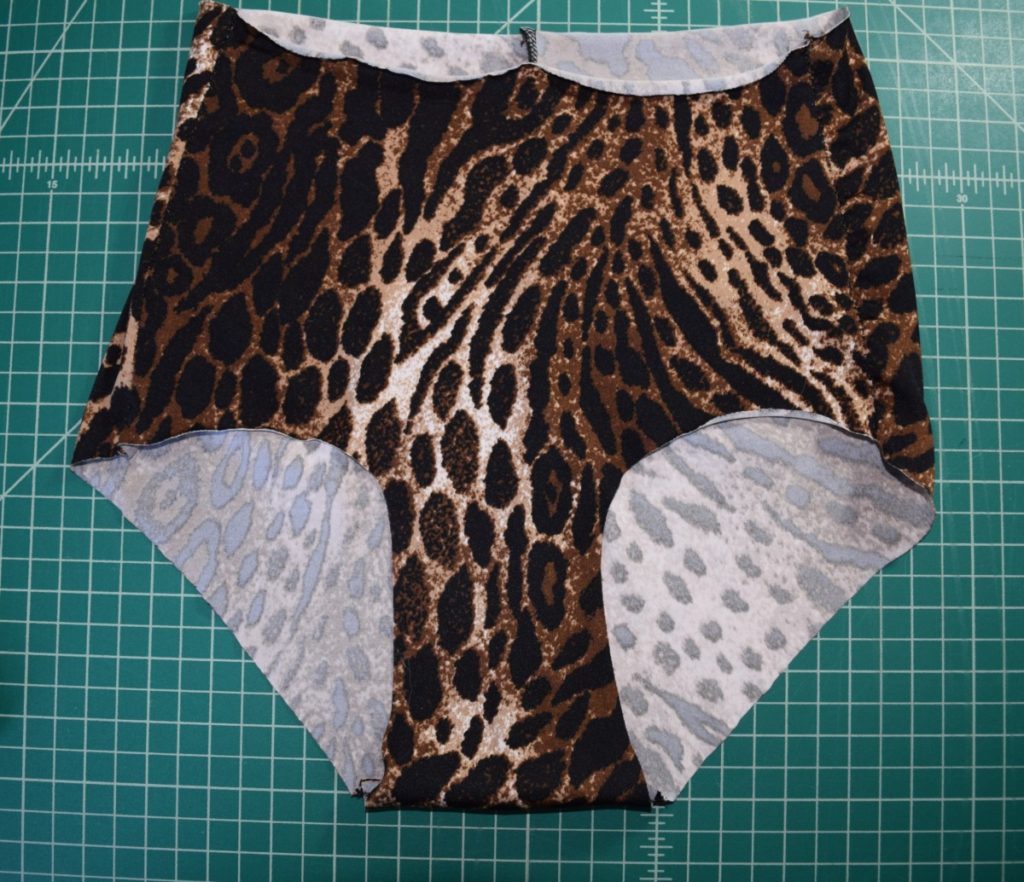
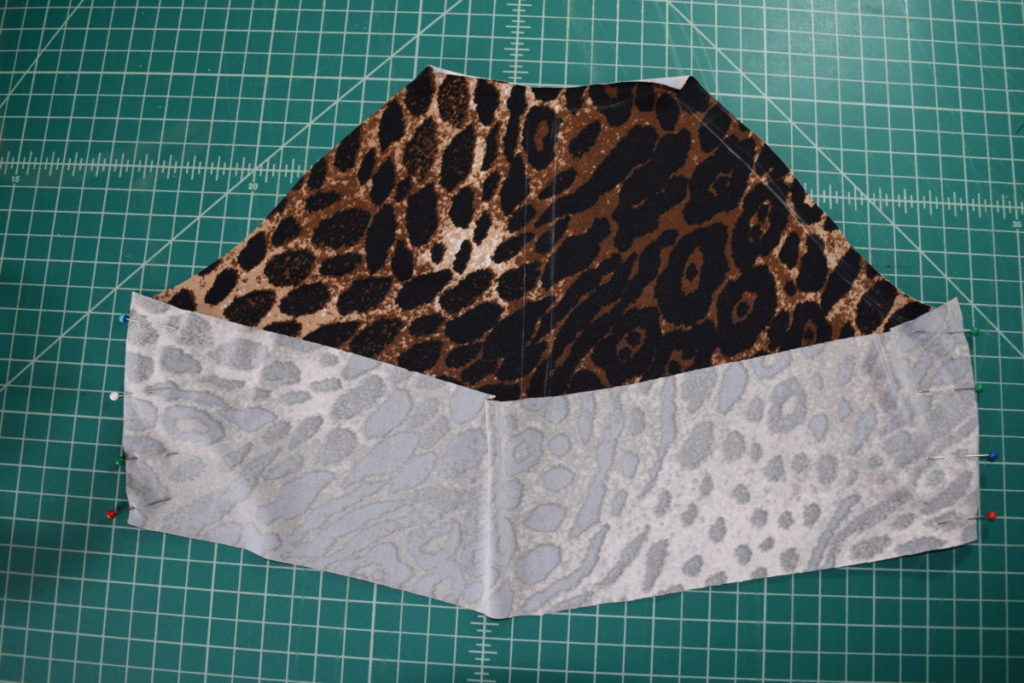
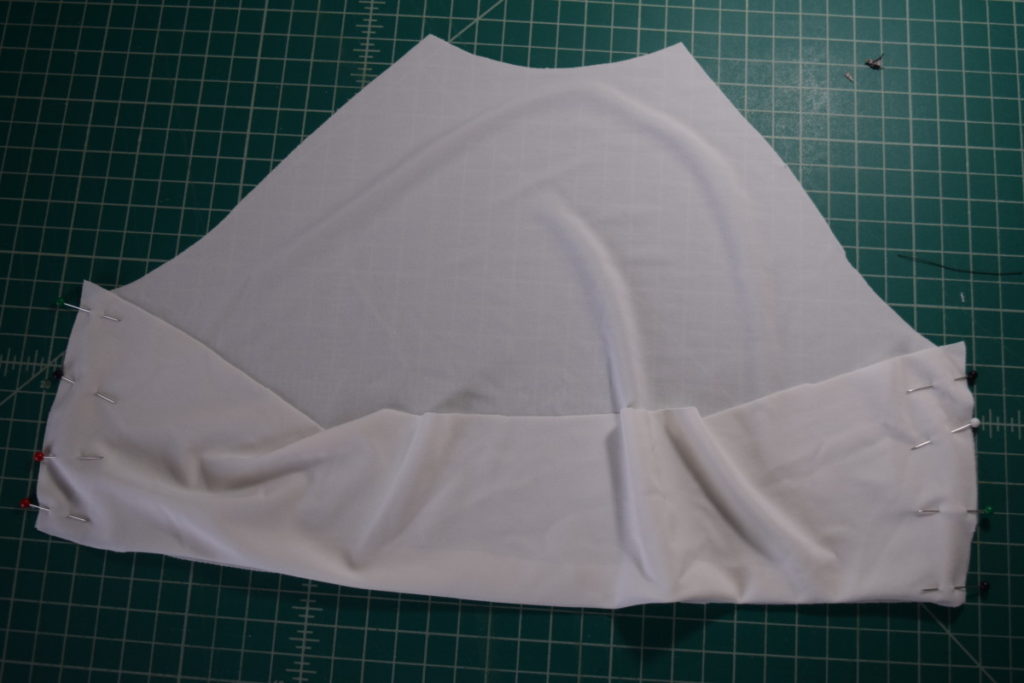
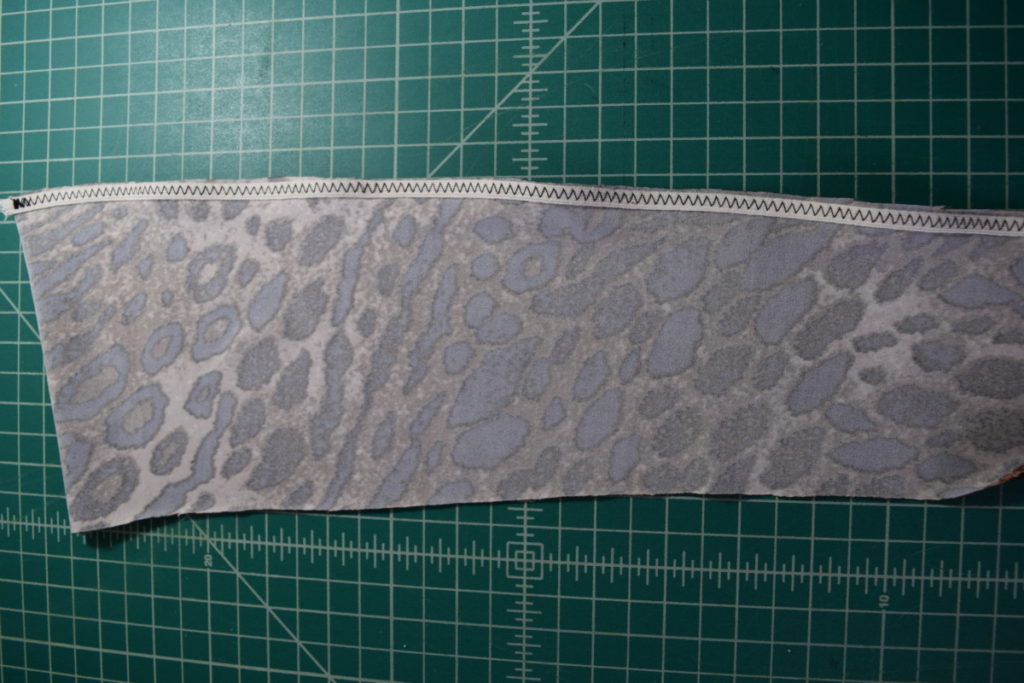
Now let’s put together the bikini bottoms! First, pin the front to the back at one of the side seams and sew down it with a zigzag stitch.
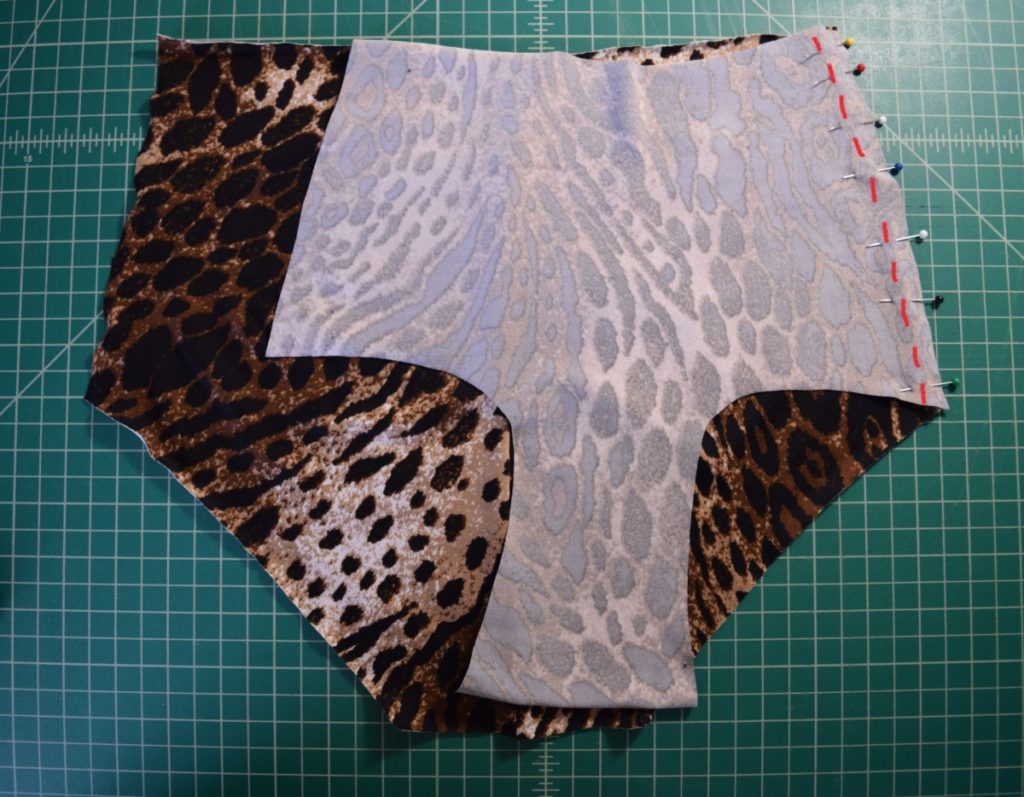
Repeat with the other side seam.
Next, pin and sew the crotch seam.
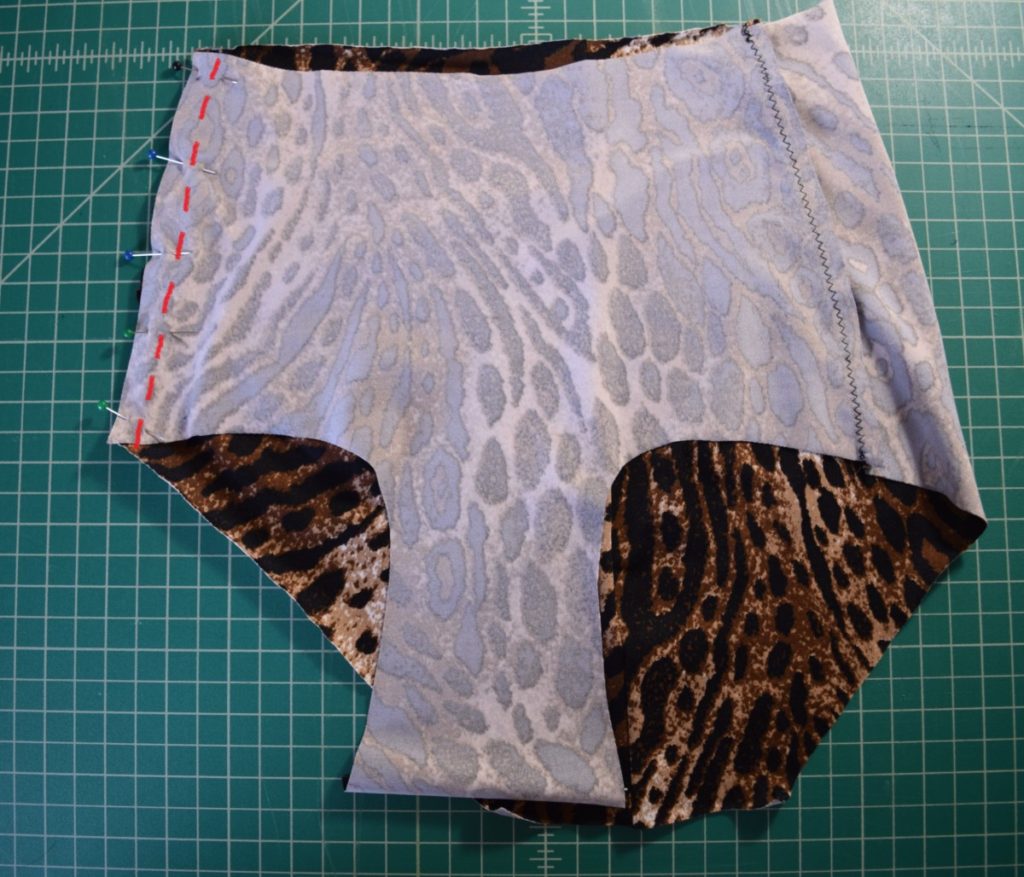
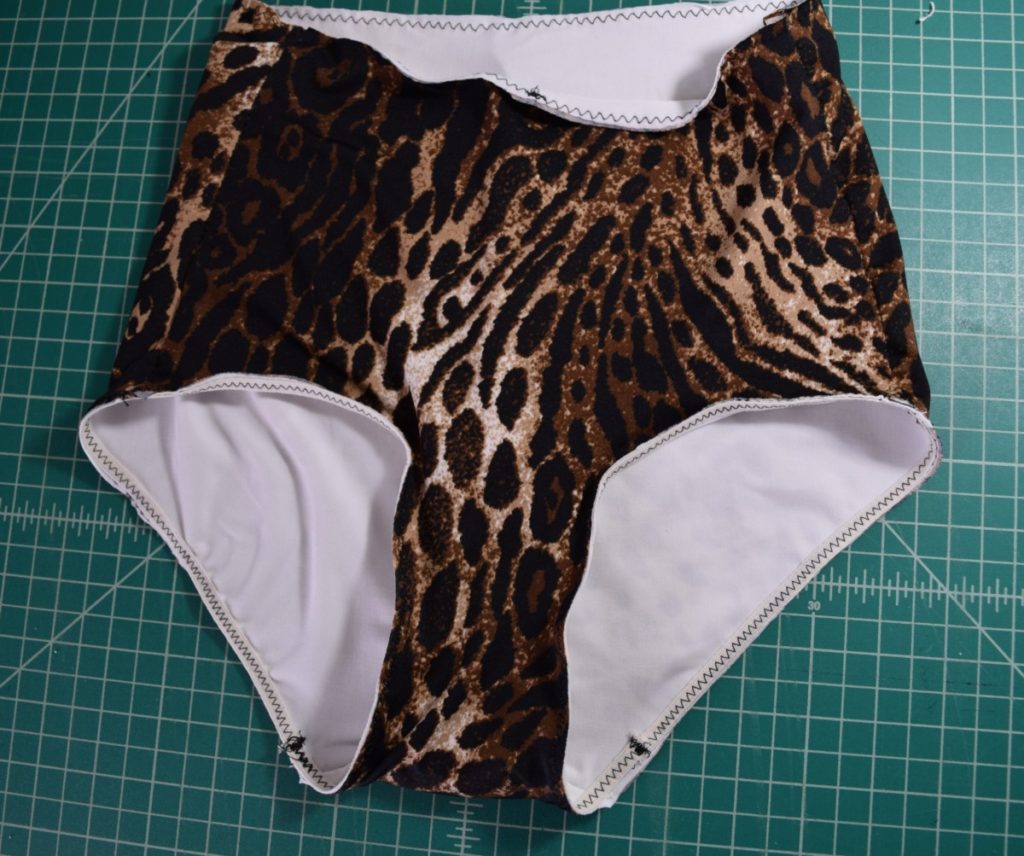
Now, iron all your seams and turn it right sides out and it should look like this:
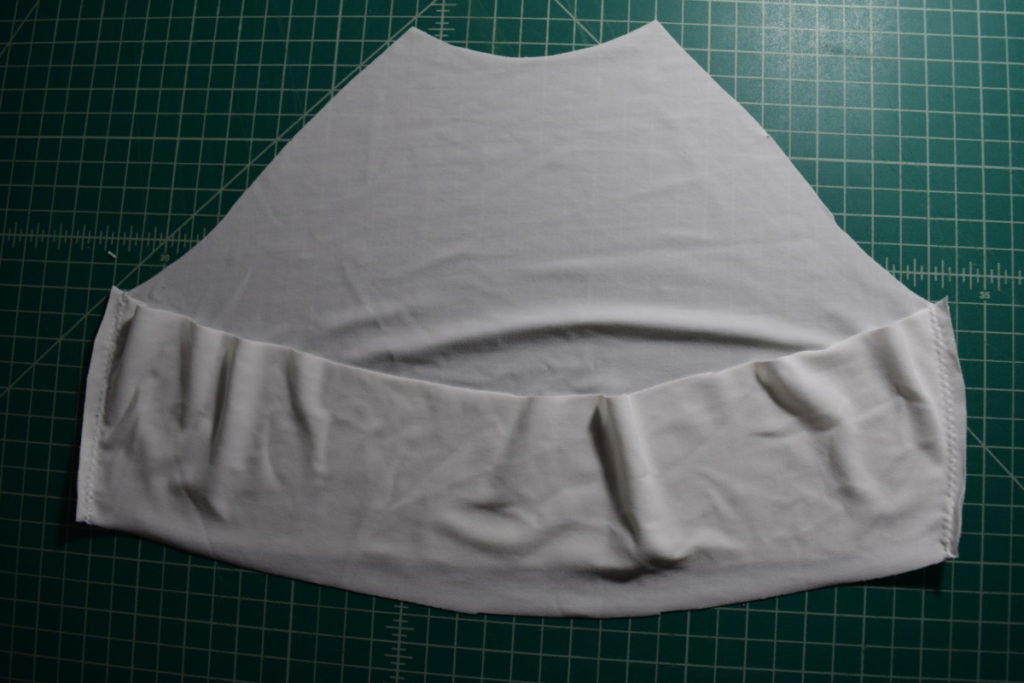
Now just repeat the same steps to sew the lining front to the lining back with right sides together. Your lining bottoms will look like this:
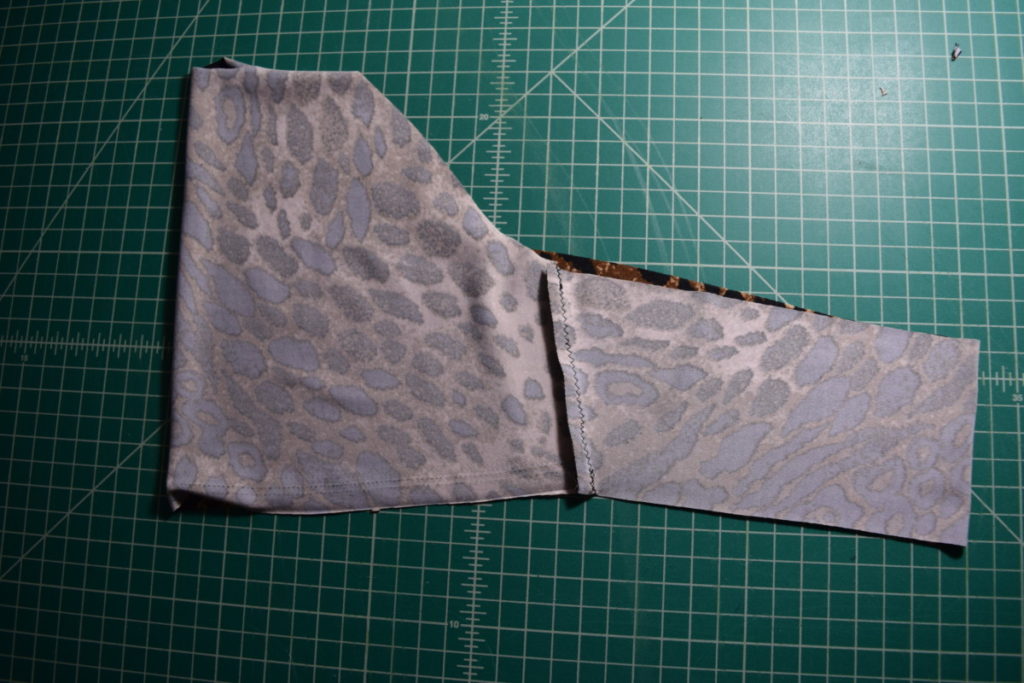
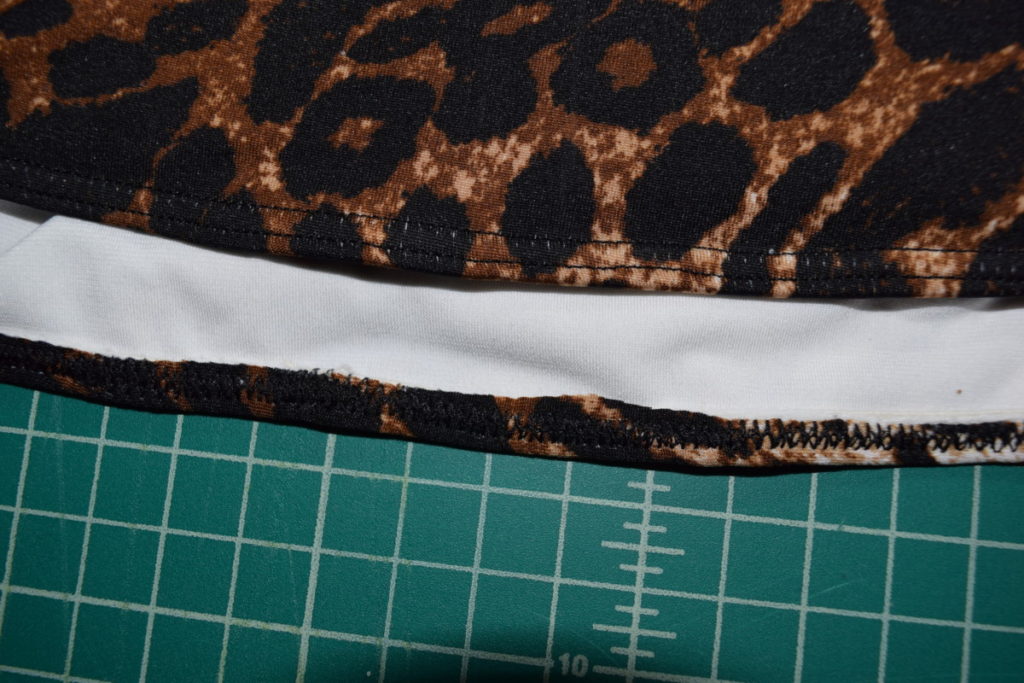
Now we’re going to sew together the lining and the outer swimsuit fabric. First, insert the lining into the outer fabric with WRONG sides together and pin the leg holes together.
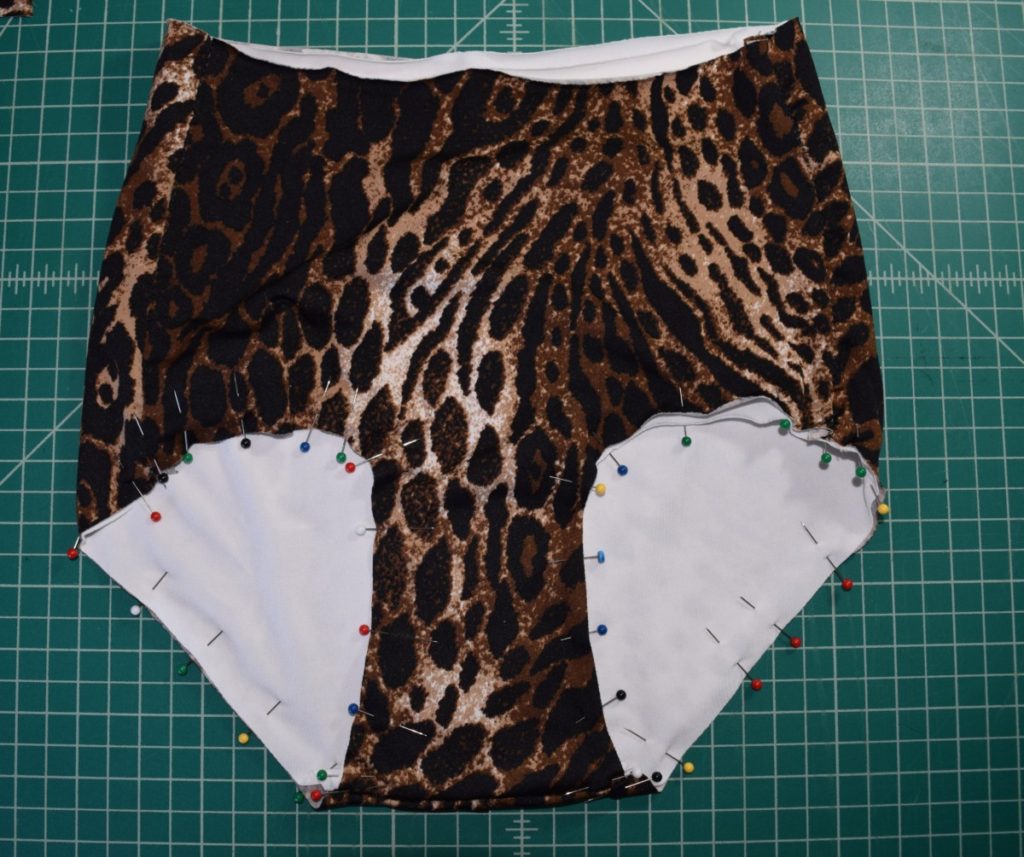
Next, sew around the leg holes along the edge with a zigzag stitch.
Next, pin and sew the waist edge in the same way to fully connect the lining and outer fabric.
Finishing the edges with elastic:
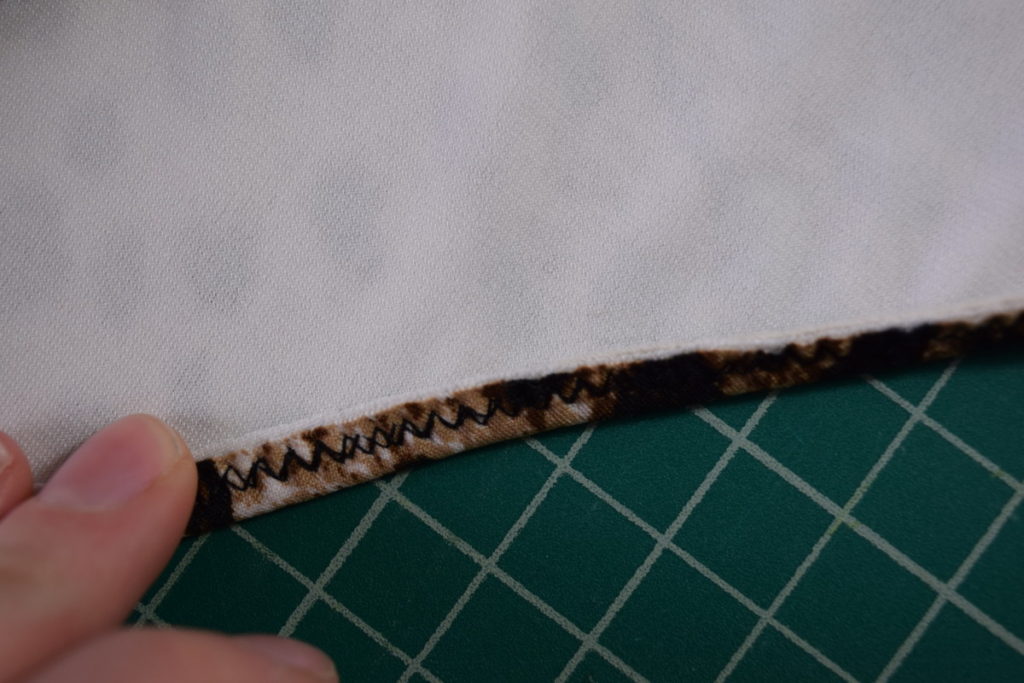
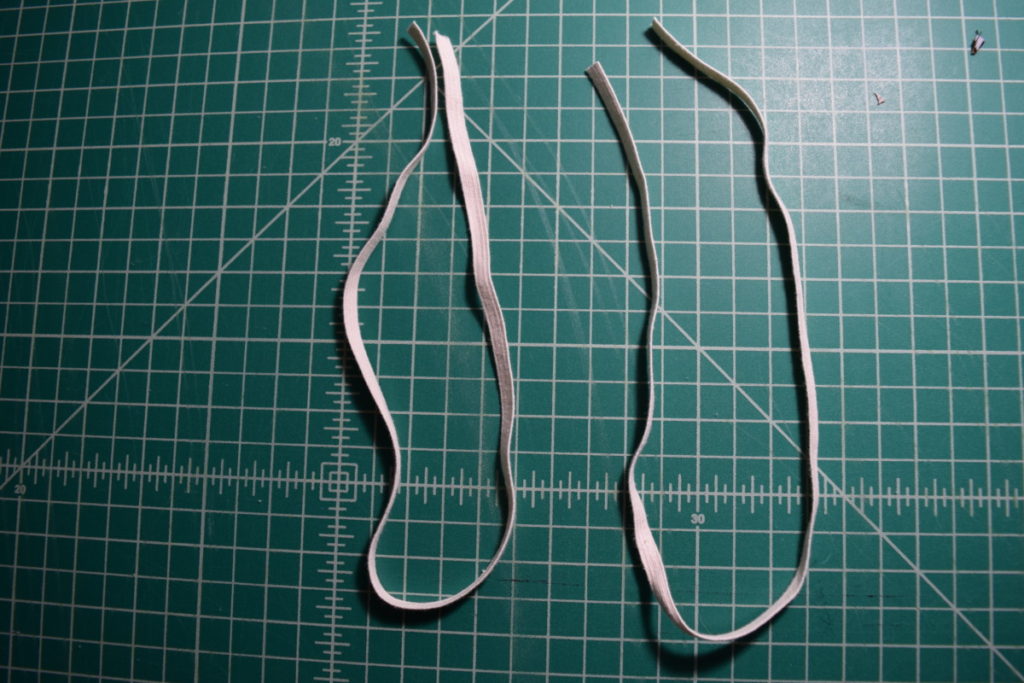
Next, cut two pieces of elastic that are comfortable around your thigh. Just make sure they are at least slightly smaller than the length around the leg hole of the swimsuit.
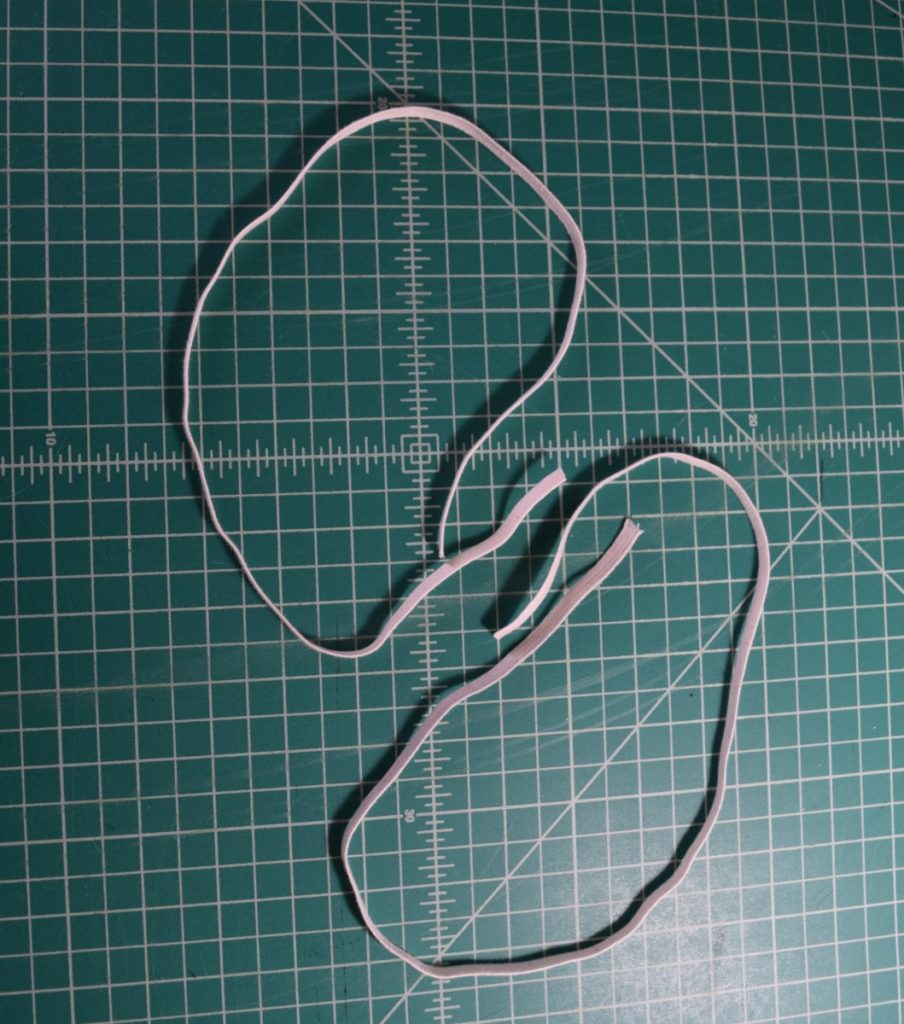
Now take one of your elastic pieces and overlap the ends. Sew the ends together to form a loop. Then repeat this with the other elastic piece. So you should end up with two elastic loops.
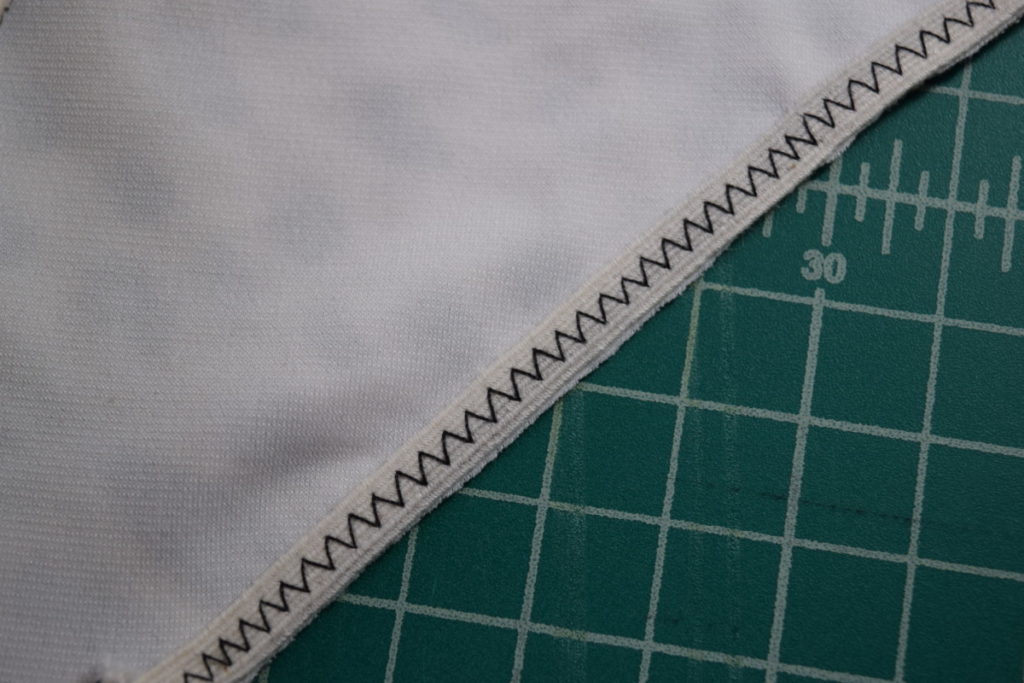
Pin one of your elastic loops into the leg hole, right along the edge but on the inside of the swimsuit. I used 4 evenly spaced pins around the leg hole.
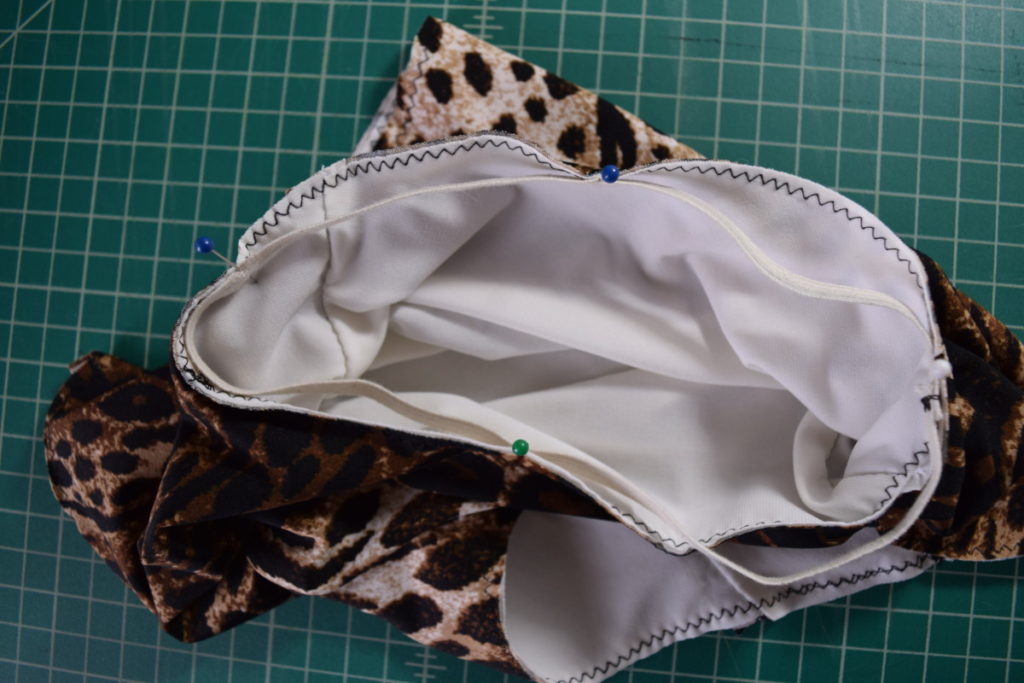
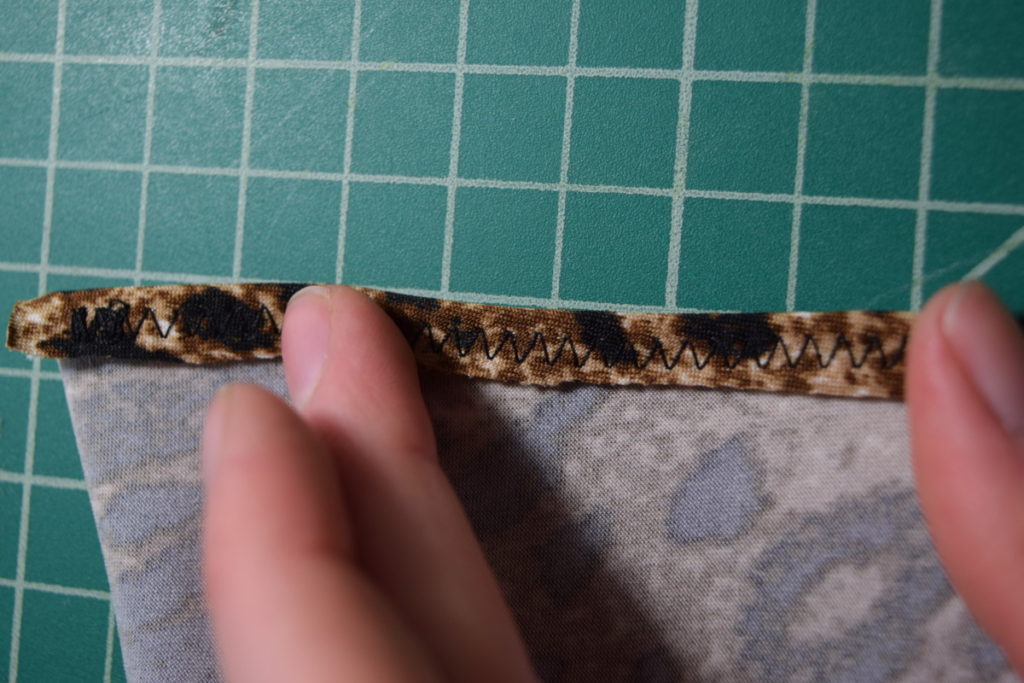
Using a zigzag stitch, sew the elastic on the inside of the leg hole, right along the edge. Stretch the elastic evenly between the pins as you sew. Repeat with the other leg hole. When you finish it will look like this:
Now we’ll do the same thing with the waist. Measure out a piece of elastic that is comfortably tight around your waist and at least slightly smaller than the length of the swimsuit waist. Sew the ends of the elastic together to form a loop. Pin the elastic into the waistband and stretch and sew it to the inner edge of the swimsuit waist the same way you did with the leg holes.
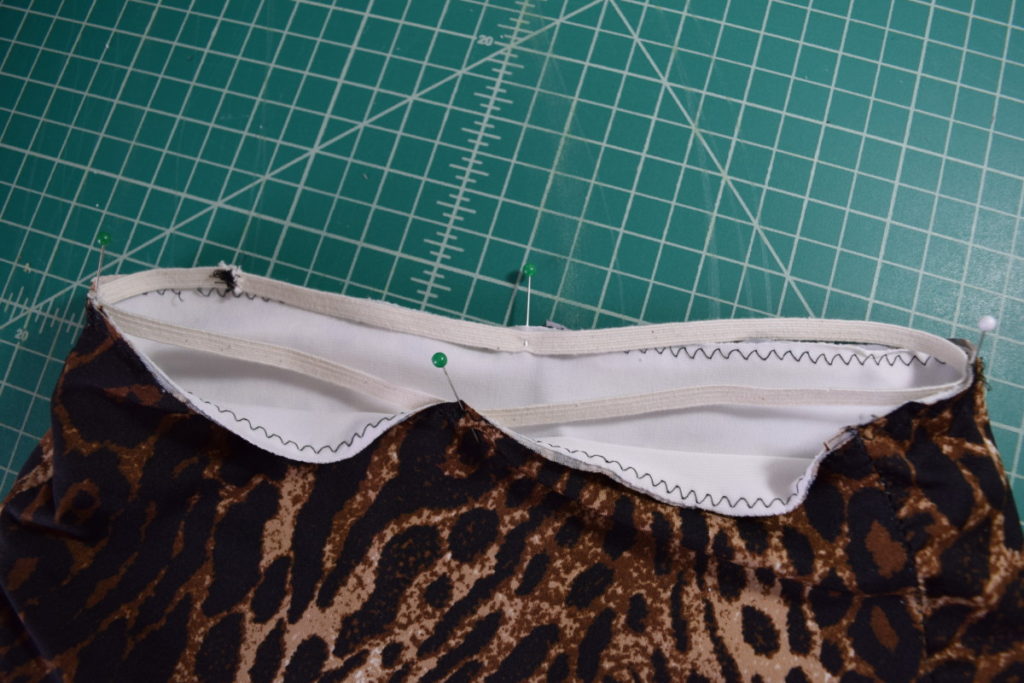
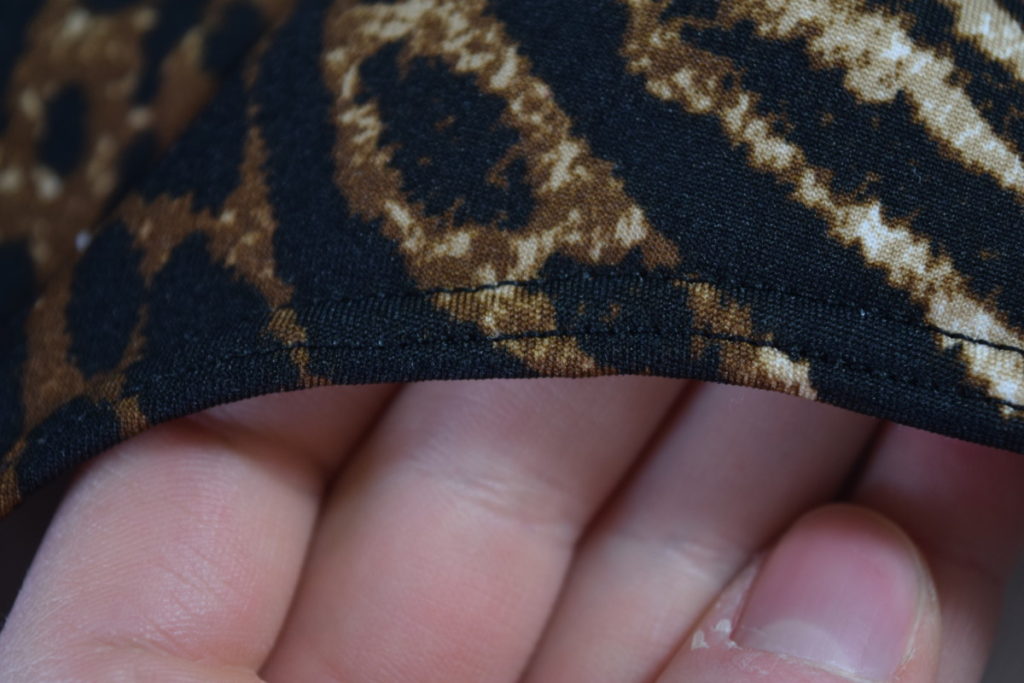
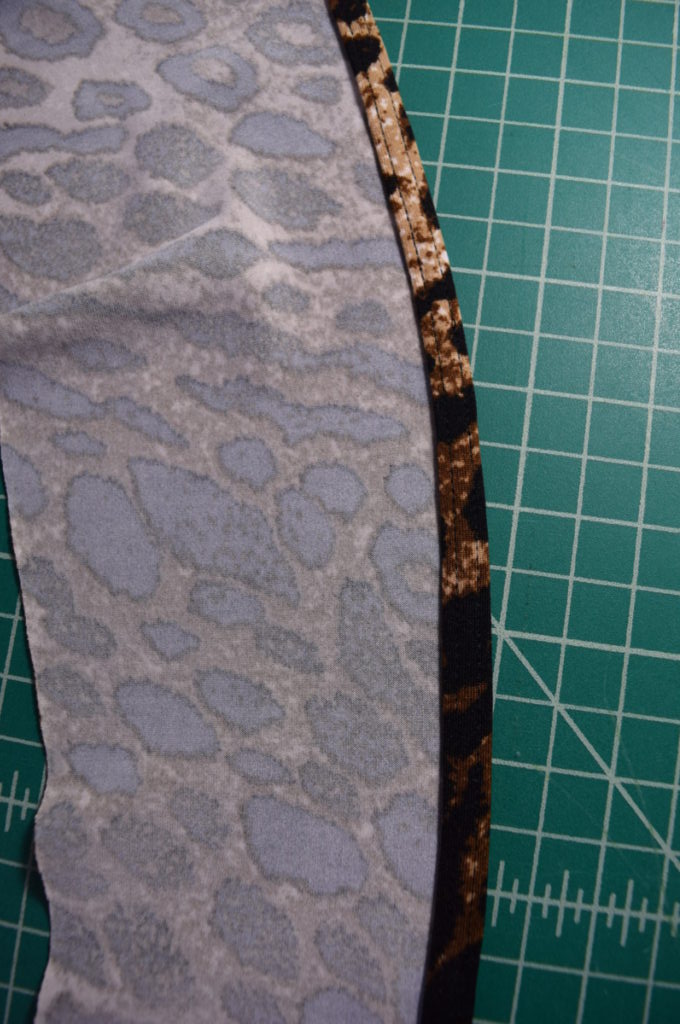
Now, our final step for the bikini bottoms! Put the double needle on your sewing machine for a pretty finish (if you don’t have a double needle, you can do this with a zigzag stitch). Fold over the elastic towards the inside to hide the elastic in the fold.
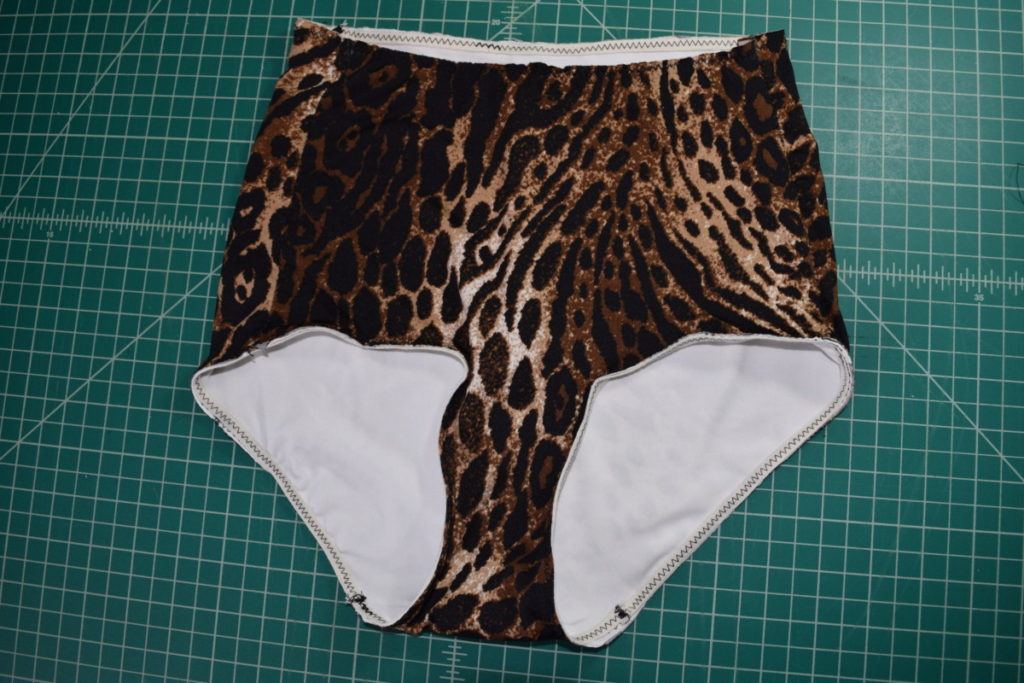
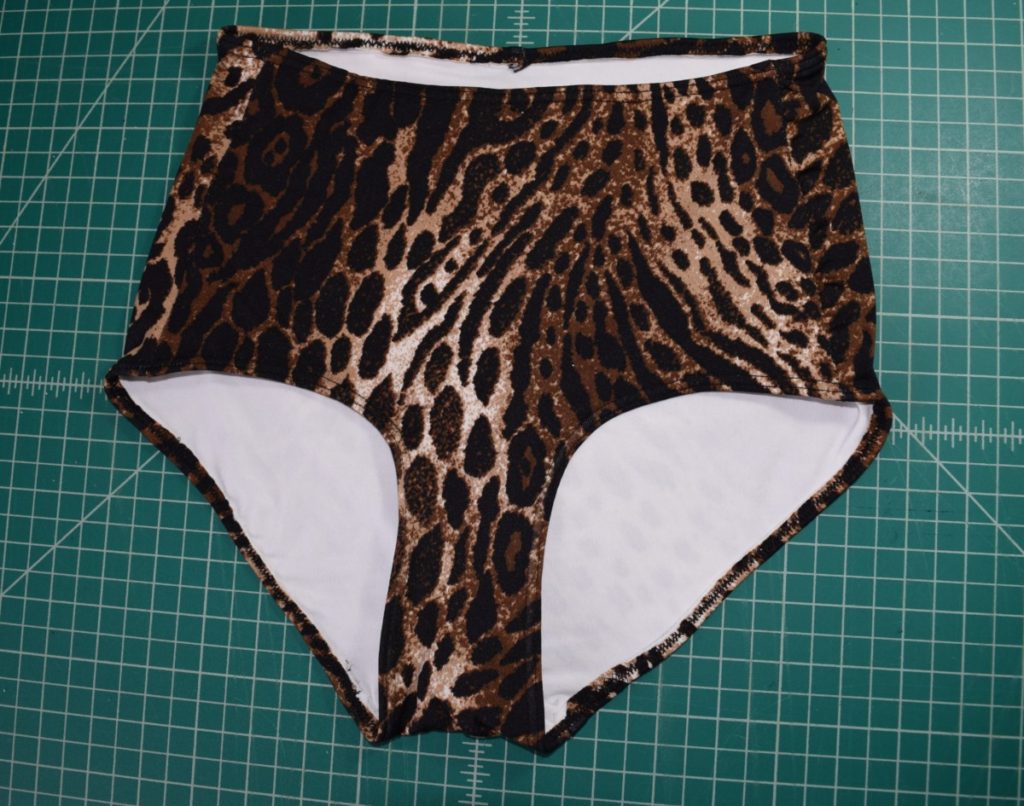
Sew the folded elastic in place around both leg holes and the waist with a double needle, sewing from the outside of the swimsuit. Here’s the bikini bottoms, done!


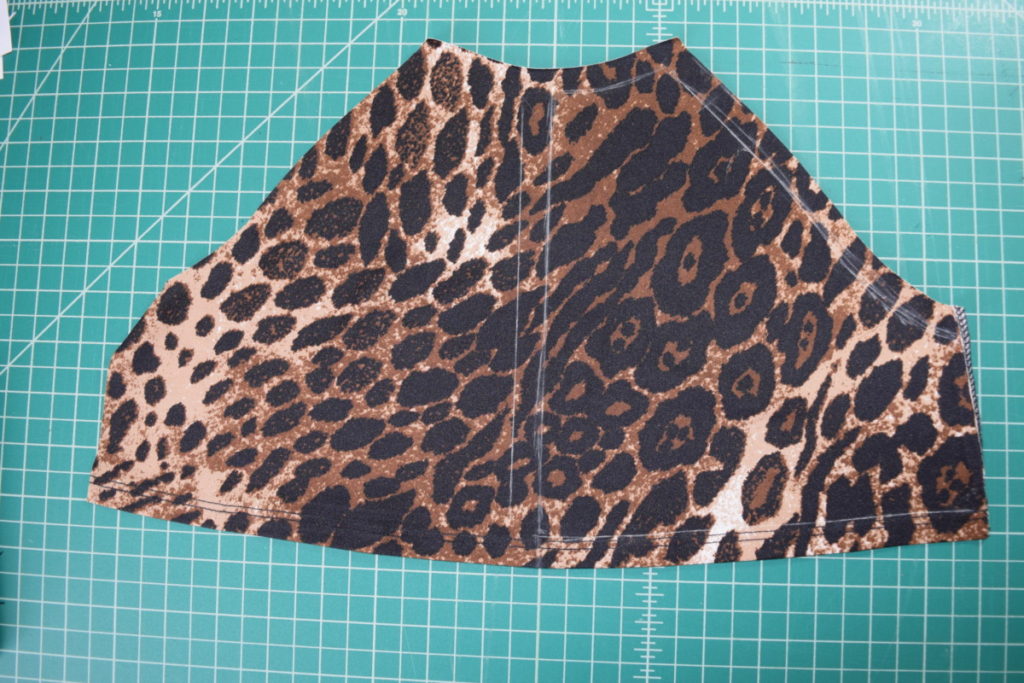
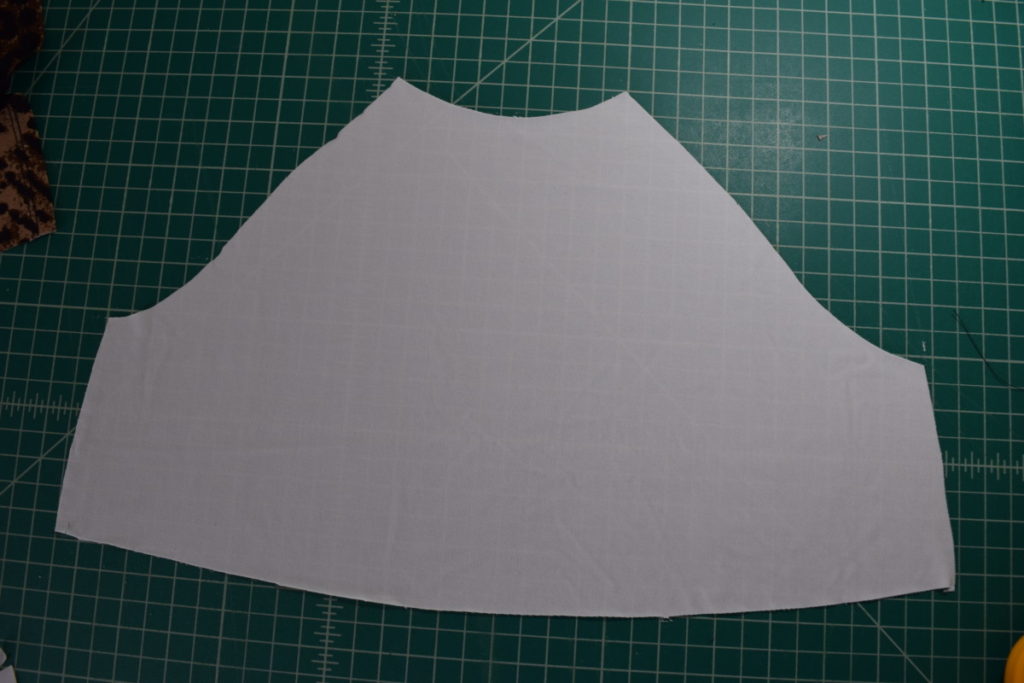
Cutting out the pieces for the top:
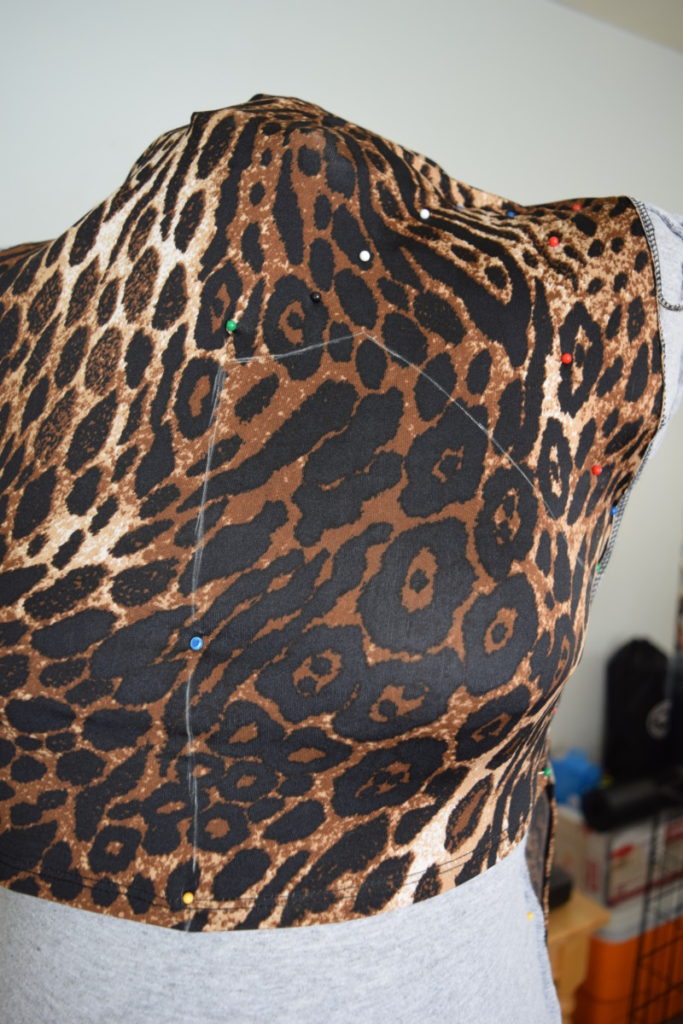
So now let’s get started on the top! First, I took one of my pieces of fabric and pinned it to the front of my dress form, pinning it down the center front, around the armhole and shoulder and down the side seam. I only did this on one side of the form, I just pinned the other side haphazardly so it wouldn’t fall down and be in my way. If you don’t have a dress form, you can do this by putting on a tight fitting shirt and pinning the fabric to your shirt (I used to do this before I made my dress form). Make sure you’ve stretched the fabric over the dress form or your swimsuit will be too loose.
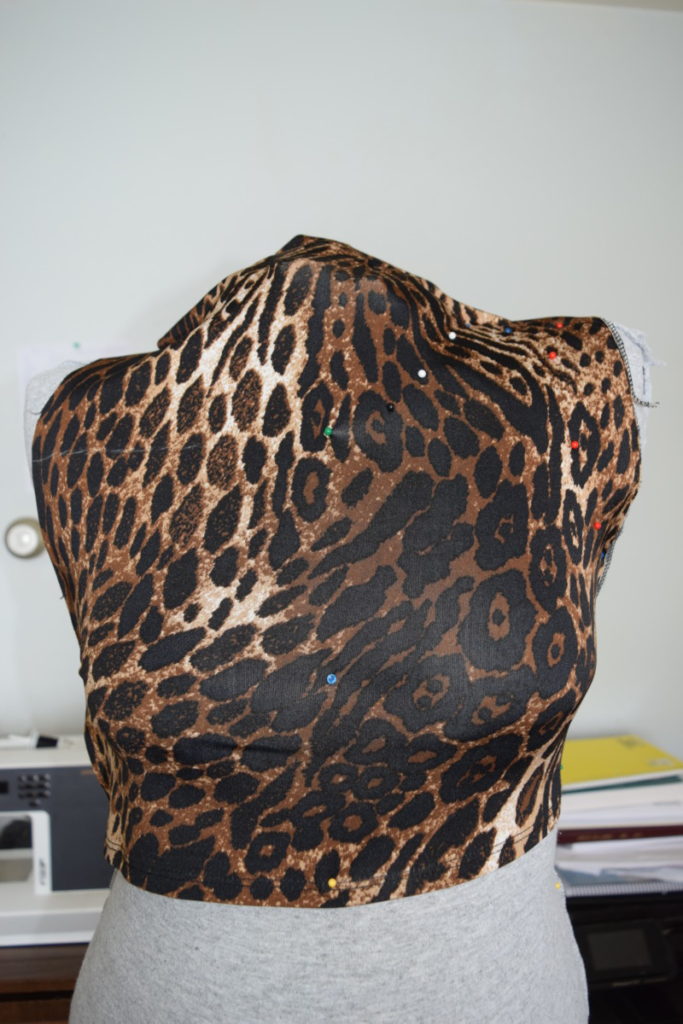

Next, I used my fabric chalk and marked the center front line.

Next, I marked the side seam and then drew out the shape I wanted for the top, connecting everything to the center front and side seam.

Now we need to draw out the back of the swimsuit. I pinned another piece of fabric to the back of the dress from, stretching it to the sides seams. I pinned down the center back and the side seam, matching the side seam of the back to the side seam of the front.

Then I marked the center back and side seam with my fabric chalk.
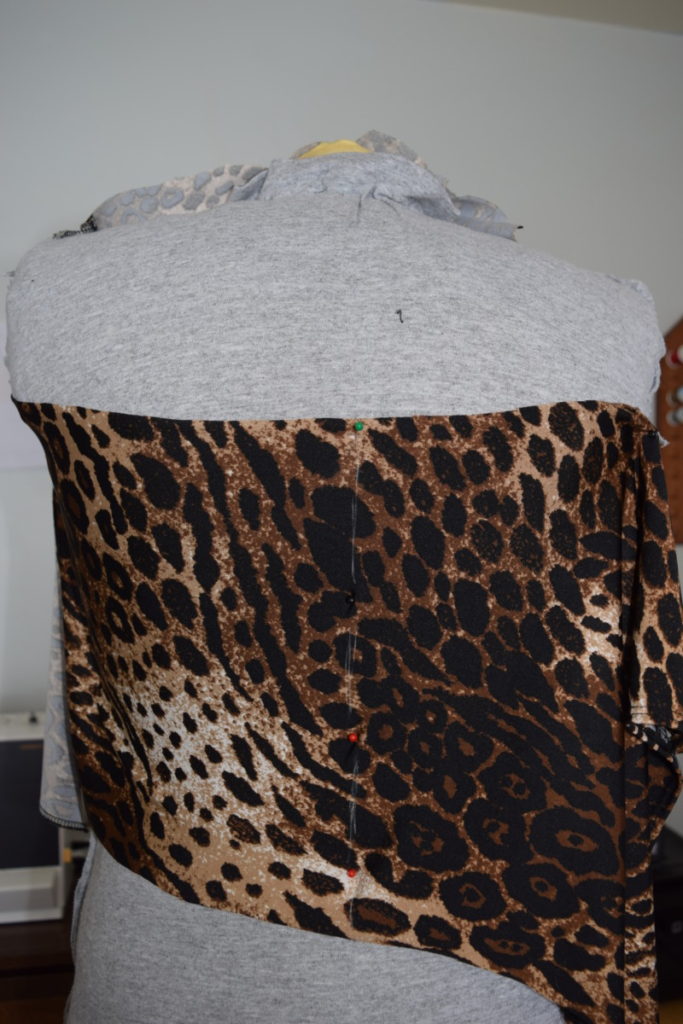
Next, I drew out the shape of the back on the side I pinned. I made sure to match the hem with the hem of the front as well as the underarm so that the front and back are the same length at the side seam. It was hard to see my chalk markings in this photo so I traced over it with the red dashed line below:
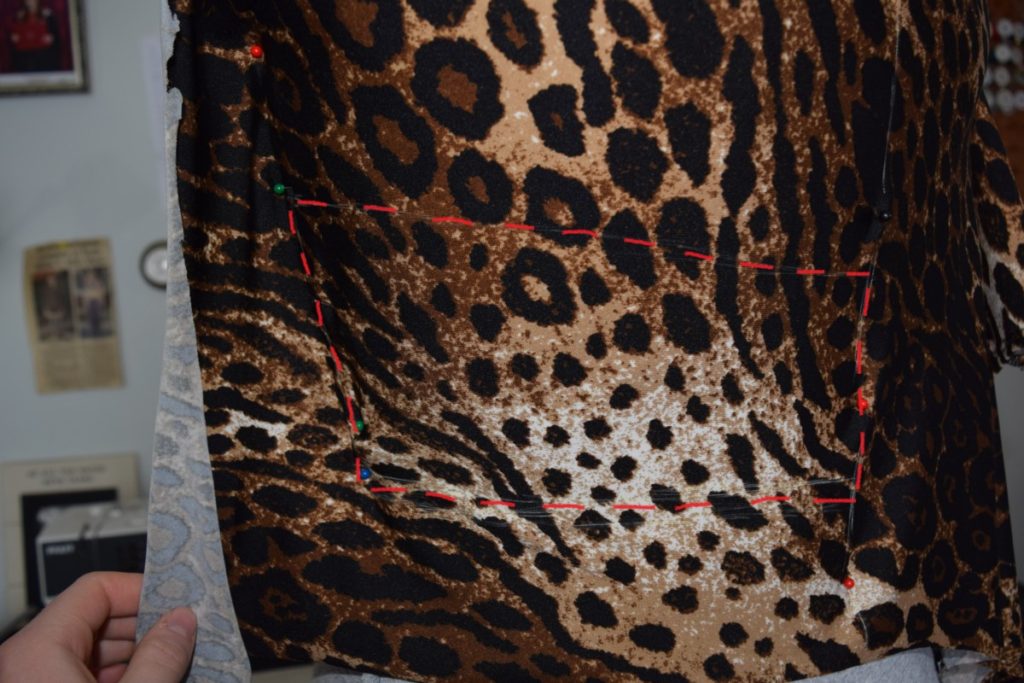
Next, I removed the fabric from the dress form to cut out my pieces. I started with the back. I laid the fabric flat and used a ruler to make my markings a little more straight and nice. Then I added 1/2 inch for seam allowance around every edge EXCEPT the center back marking.

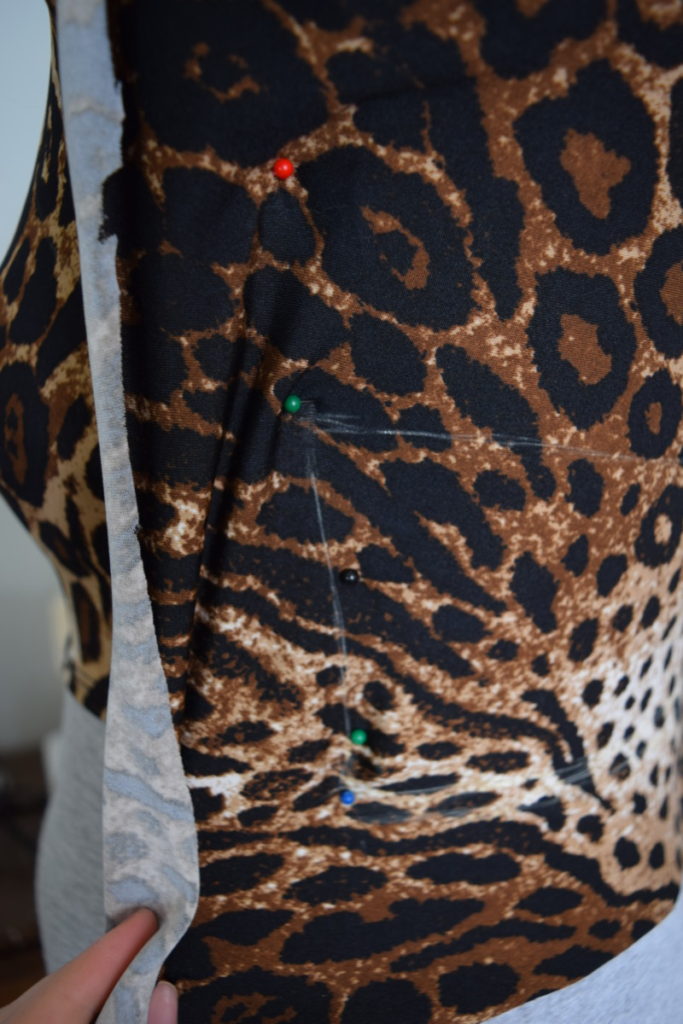
Next, I folded the fabric in half, wrong sides together, along the center back seam.

Then I just cut it out along the seam allowance lines. And when I unfolded it, it looked like this:
Then I repeated the process to cut out the front piece: Use a ruler to make the lines nice, add seam allowance everywhere except center front, fold along center front line, and cut it out!
Now that we have our front and back pieces, we need to cut out our lining. Place the front and back pieces down on the lining fabric, right sides together and cut around them to get matching (mirror image) lining pieces.
Sewing the front to the back:
First, pin the bikini back to the bikini front with right sides together at the side seams. Sew the side seams and trim the seam allowances.
Repeat this process to sew the lining front to the lining back with right sides together.
Next, I pressed the seam allowances of the outer fabric towards the front and the seam allowances of the lining towards the back.
Making the straps:
Next I tried on the outer fabric bikini and cut two pieces of elastic as straps that were the right length to fit snugly over my shoulders. I also marked on the back of the bikini where I wanted the straps to attach. In my case, this was 4 inches from the side seams.
Now we need to make our straps all pretty. To do this, first lay the elastic strap along the edge of a piece of your main fabric on the wrong side of the fabric and sew it to the edge with a zigzag stitch.
Then fold the elastic towards the wrong side of the fabric twice, to encase it fully in the fabric.

Next, sew the elastic in place with a double needle (you could also just use a zigzag stitch), making sure you sew with the wrong side of the fabric facing up.
Now just trim the excess fabric away, close to the stitching, and you’ll have a beautiful strap. Repeat this process for the other strap.
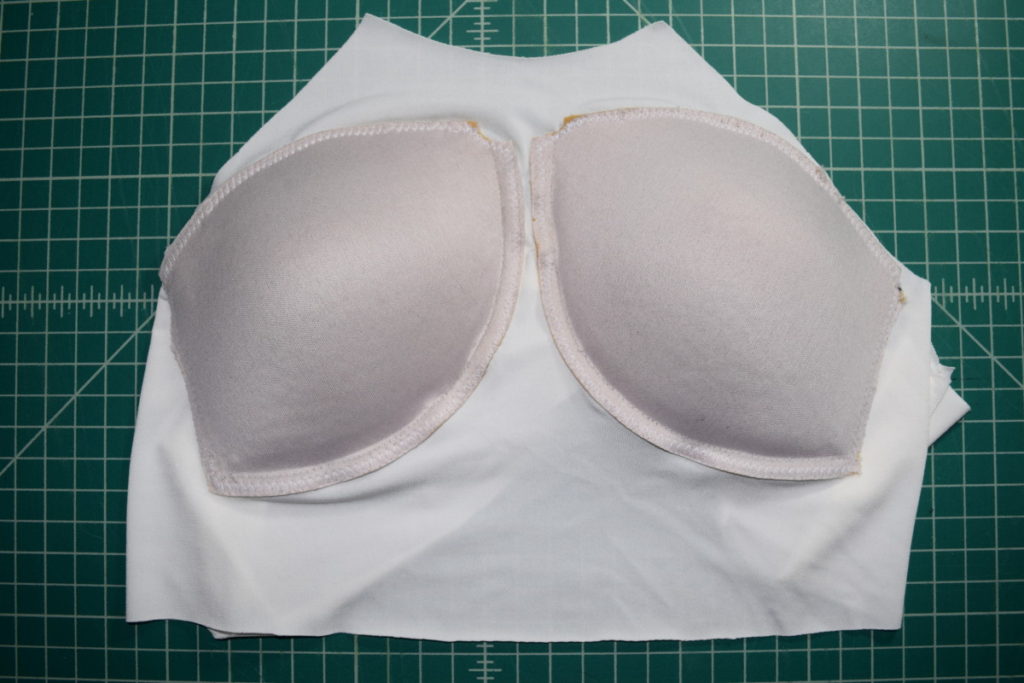
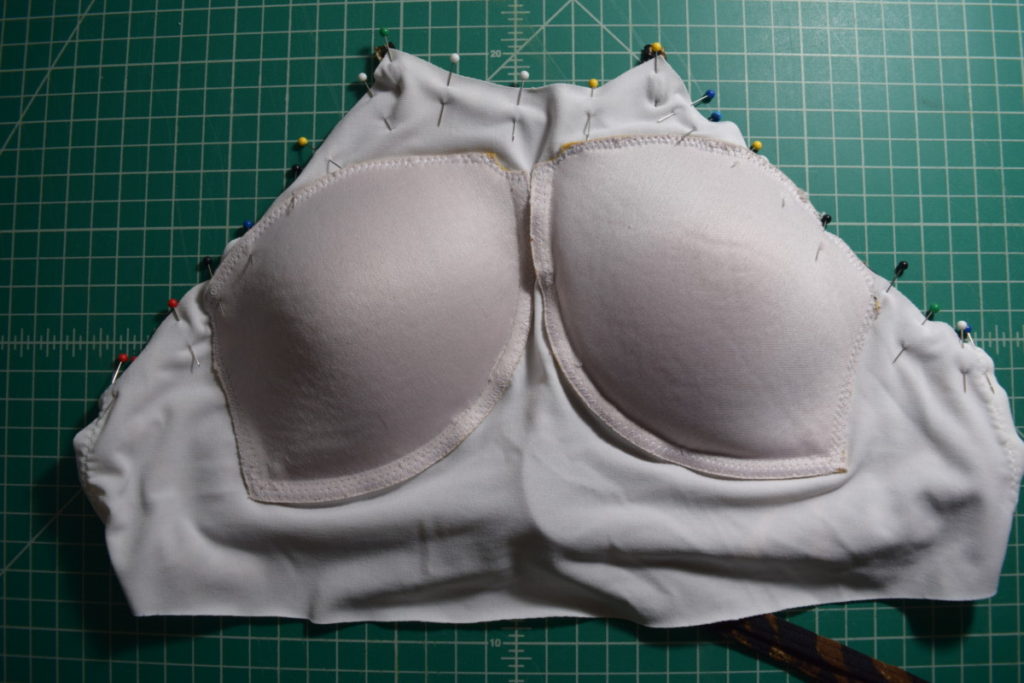
Adding bra cups:
Next, I decided to add bra cups because I’m not really comfortable with a swimsuit that doesn’t have any padding. But if you are, definitely feel free to skip this step! I envy your confidence!
I used bra cups that I seam ripped out of an old bra I never wear. You can also buy cups at a craft store or online.
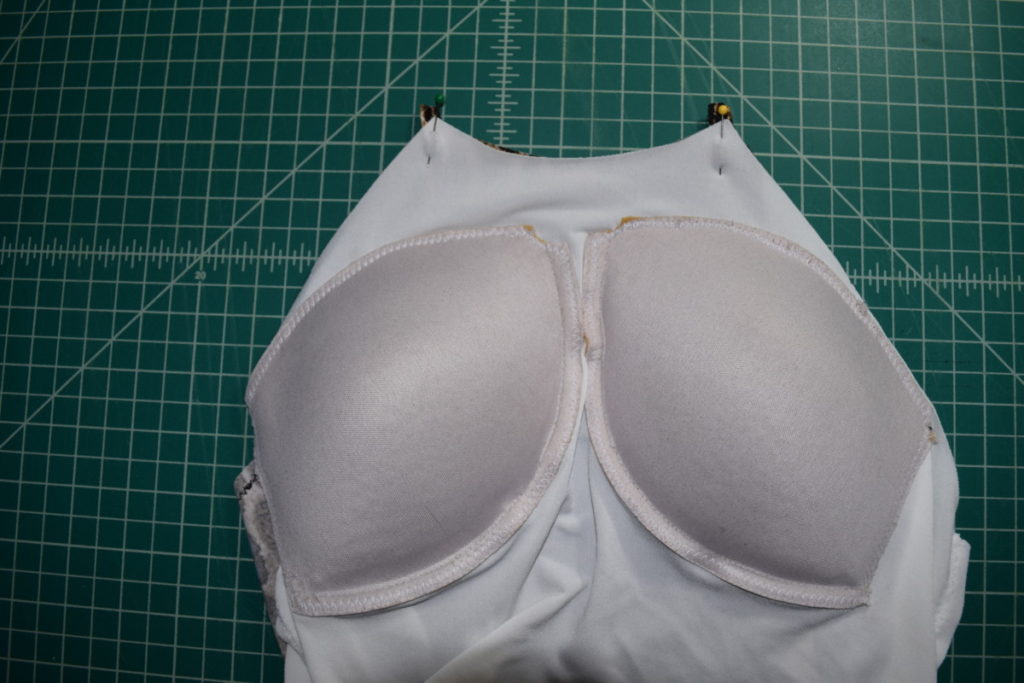
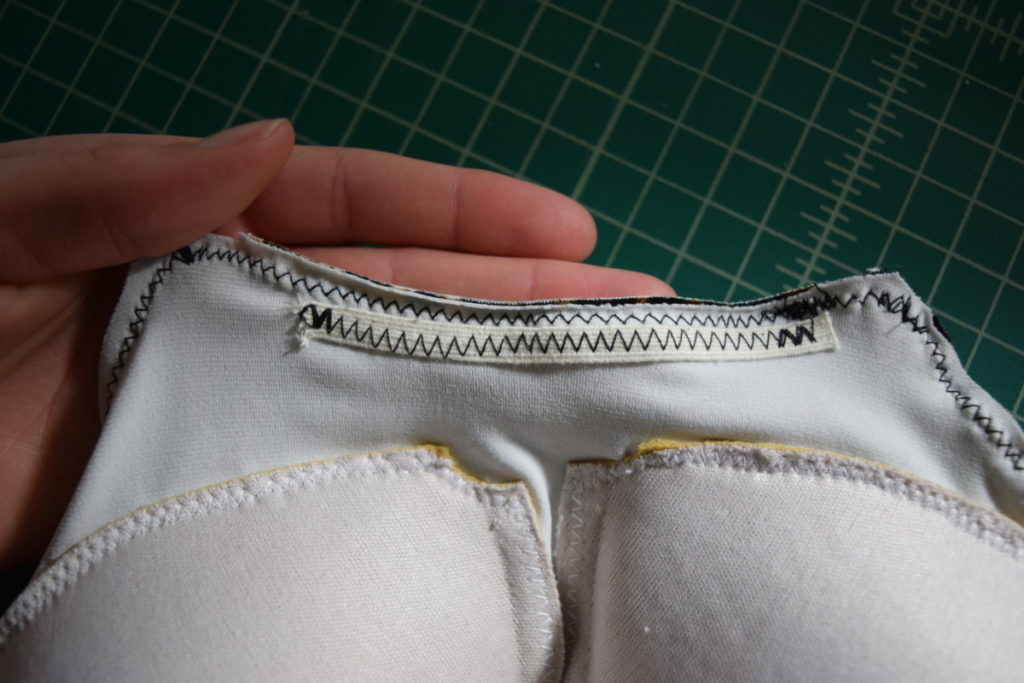
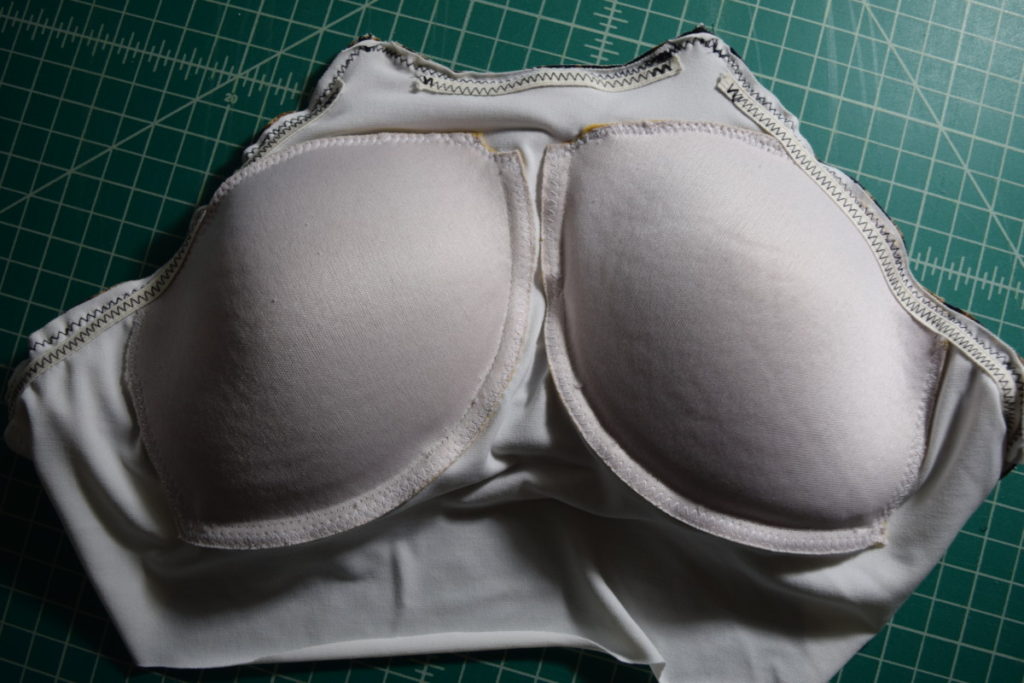
First, I put the lining bikini top on over my shirt with the right side TOWARDS my body and pinned it in place so it wouldn’t slip down. Then I pinned the bra cups in the right positions to the outside of the lining (this will be the WRONG side of the fabric since the right side is towards my body). Here’s what it looked like after I pinned them in place:

Next, I sewed the bra cups to the lining with a zigzag stitch all the way around the edges of the cups. Make sure to only go through the front piece of the lining. I would also recommend using thread the same color as your lining.

Attaching the straps:
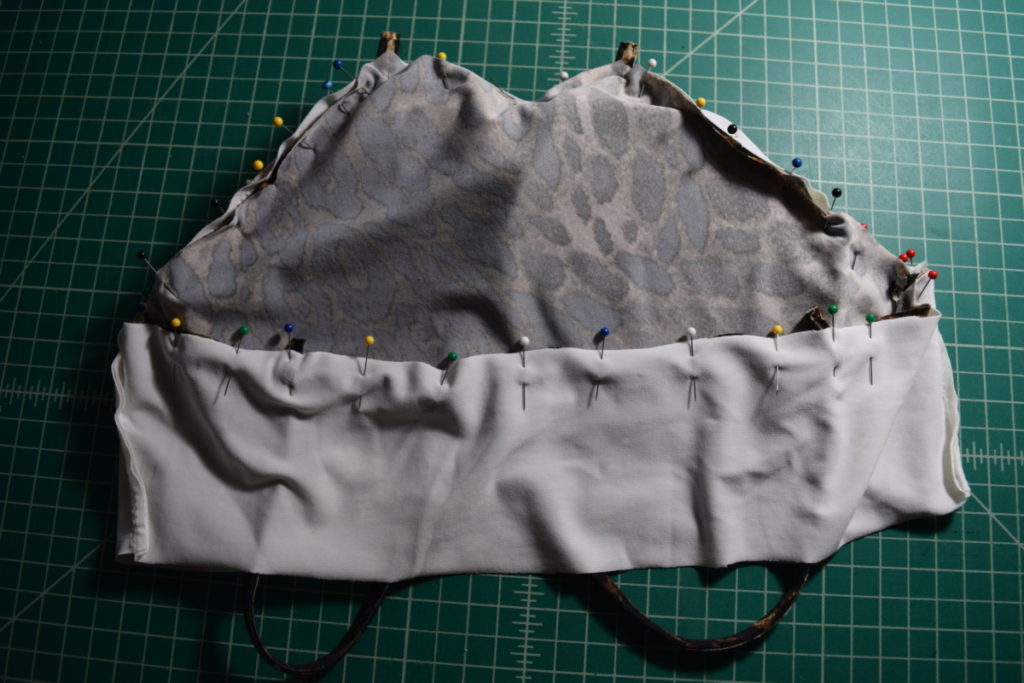
Now we need to attach the straps to the top edge of the swimsuit. To do this I pinned the straps where I wanted them on the front, sandwiching them between the lining and the outer fabric (with right sides together). Make sure the nice looking side of the strap is facing towards the outer fabric, not the lining.
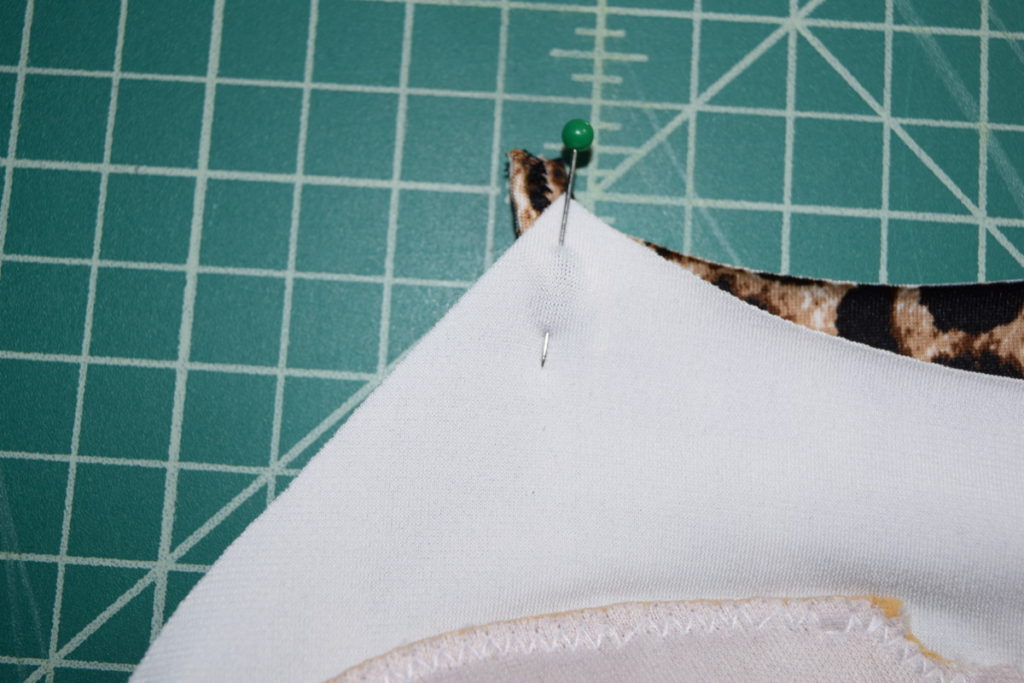
I then pinned the lining front to the outer fabric front along the top edge, stopping at the side seams.
This part is hard to explain, so I’ll do my best… I pulled the straps out the bottom of the front and then, from the bottom, I inserted them between the lining and outer fabric layers of the back. Then I pinned them in place (matching them to the marks I made earlier), making sure they aren’t twisted anywhere and that the nice side of the straps are towards the outer fabric. I wanted my straps to criss-cross in the back so this is where I crossed them and pinned them to the opposite side in the back as in the front. Next, I finished pinning the lining to the outer fabric along the top edge of the back.
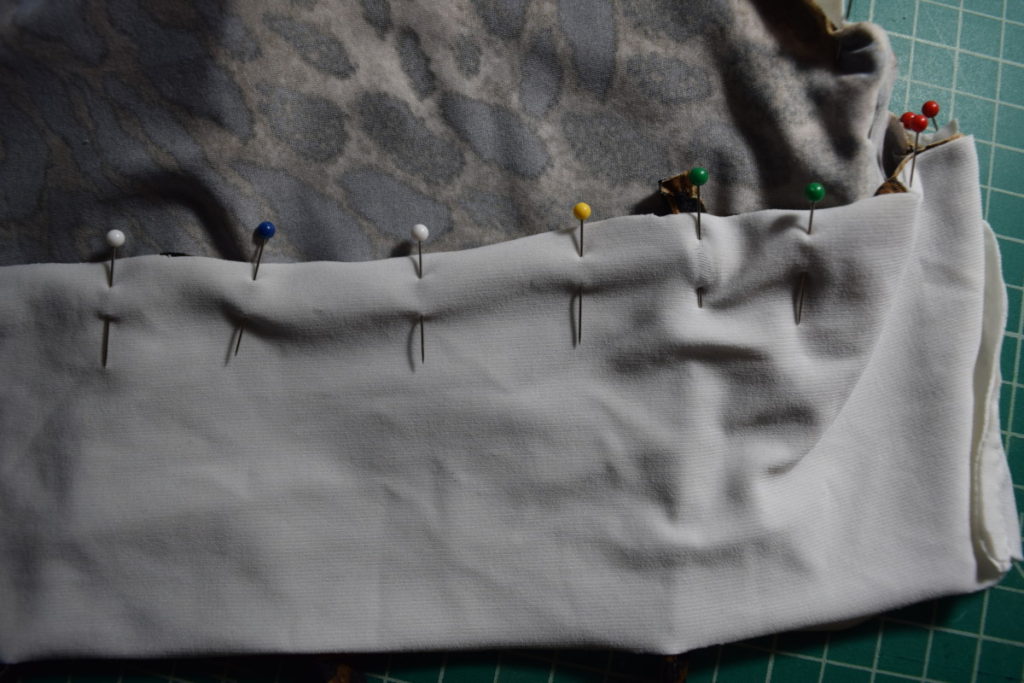
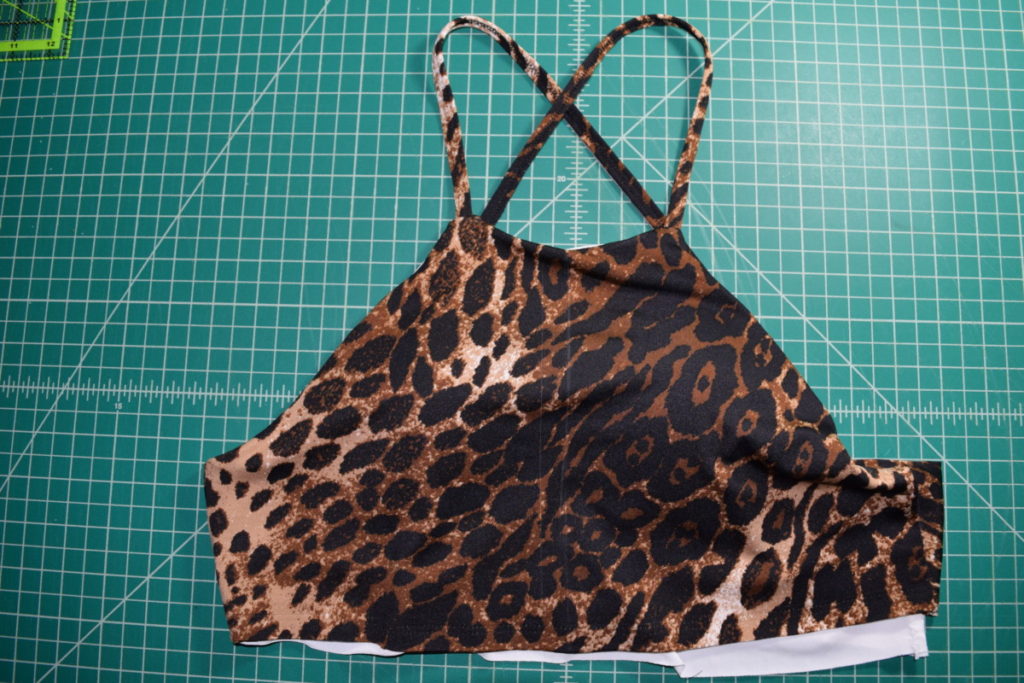
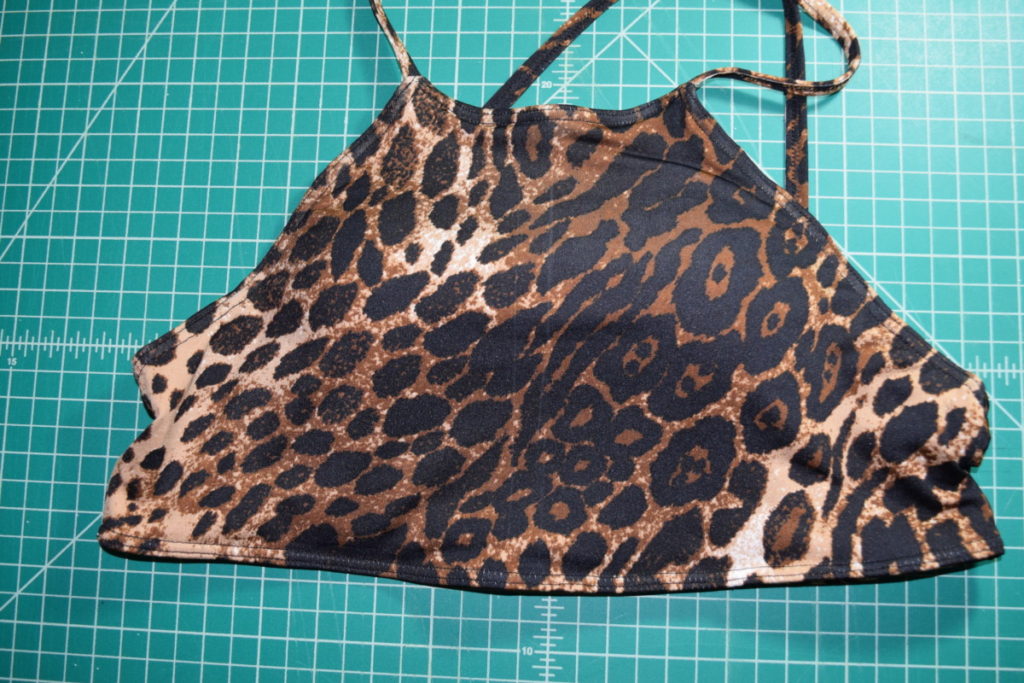
Then I just used a zigzag stitch to sew all the way around the top edge of the bikini. Here’s what it looks like from the inside:
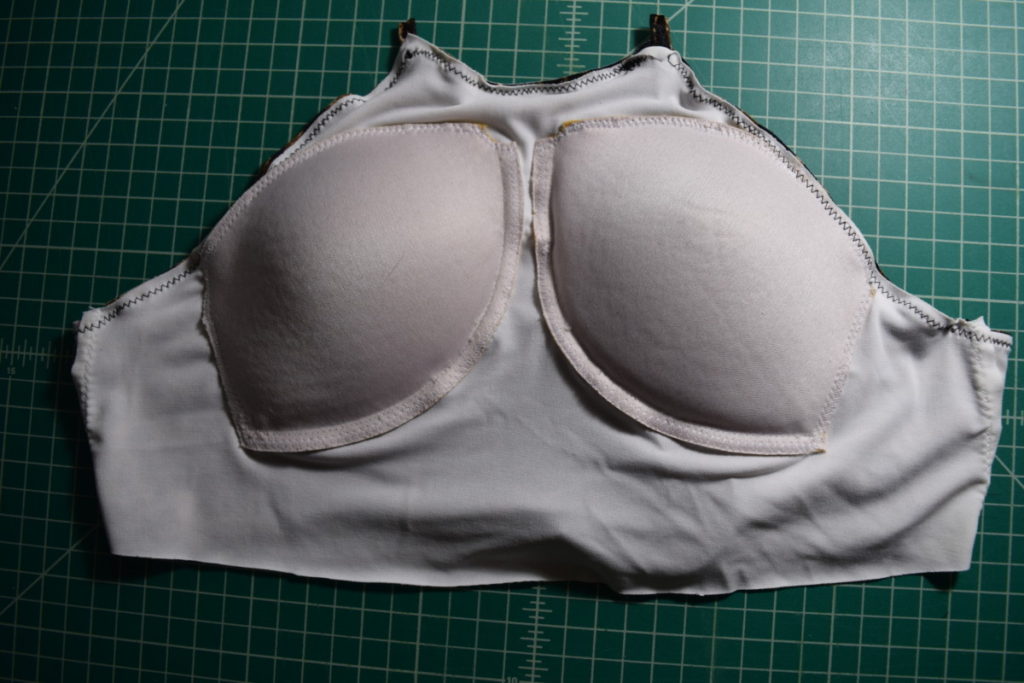
And the outside:
Finishing the edges with elastic:
Finally, we just need to finish all the edges with elastic so the swimsuit hugs the body nicely.
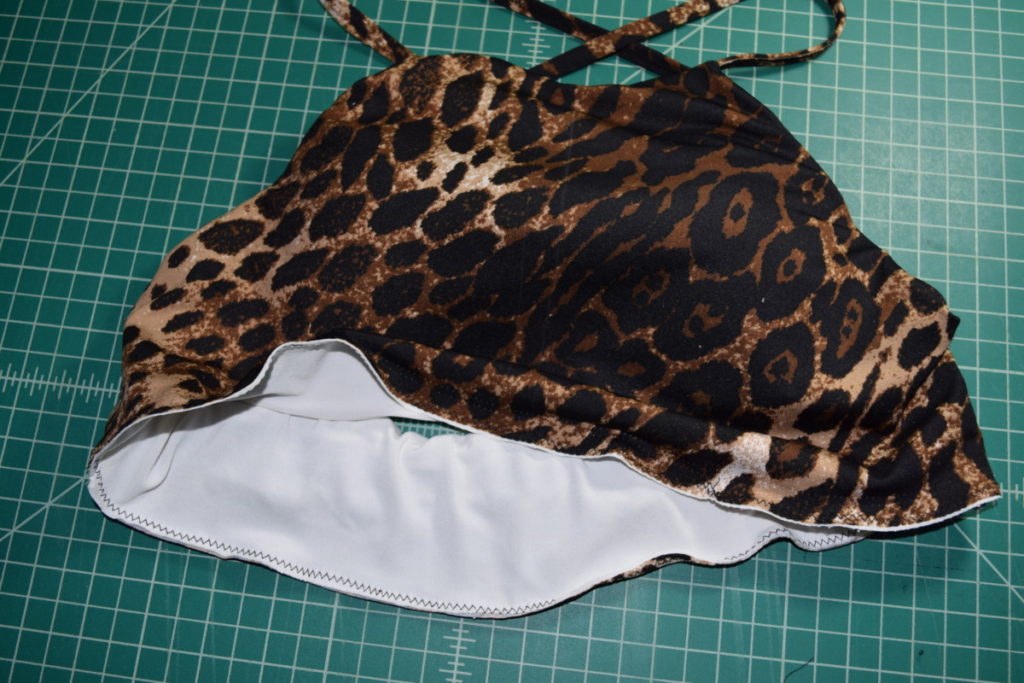
Turn the bikini back to the inside and stretch and sew a piece of elastic to the LINING ONLY in the center front between the straps:
Next, stretch and sew elastic all the way around the rest of the top edge, making sure to only sew through the lining, not the outer fabric.
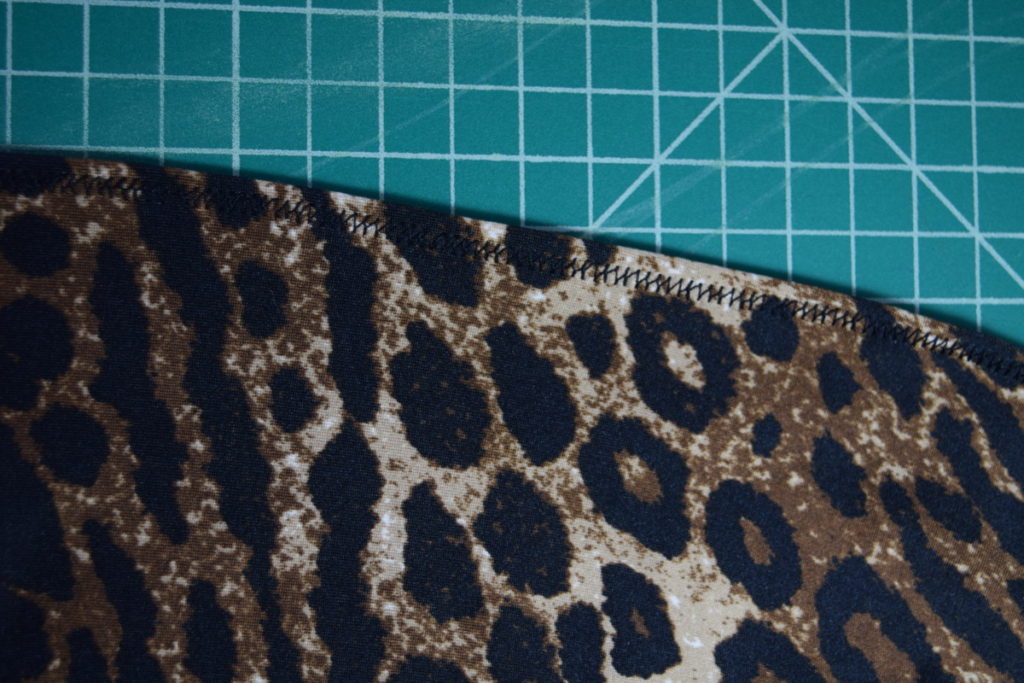
Now turn the swimsuit back to right sides out and use a zigzag stitch to sew the bottom edge closed.
Next, stretch and sew elastic on the inside of the swimsuit along the bottom edge. This is the same method we used for the bikini bottoms.

Now, roll the elastic to the inside and stitch it down with a double needle.
Finally, top stitch the entire upper edge with the double needle, going through all three layers (outer fabric, elastic, and lining).
And now your swimsuit is done!

If you enjoyed this DIY, I would love for you to subscribe to my weekly email newsletter so you never miss a DIY!


[…] upcycled into a tank top and a thinner synthetic fabric with four-way stretch that I used to make a swimsuit. So these fabrics are very different, but both quite stretchy. I cut swatches that were 3 inches x […]
Hey there! Do you know if they make any plugins to protect against hackers? I’m kinda paranoid about losing everything I’ve worked hard on. Any tips?
Thanks for the guidelines shared on your blog. Yet another thing I would like to state is that fat loss is not exactly about going on a fad diet and trying to lose as much weight as you can in a couple of weeks. The most effective way in losing weight is by consuming it slowly and right after some basic suggestions which can make it easier to make the most from the attempt to lose fat. You may realize and be following a few of these tips, yet reinforcing understanding never damages.
Music began playing when I opened this blog, so frustrating!
What?s Happening i am new to this, I stumbled upon this I’ve found It absolutely useful and it has aided me out loads. I hope to contribute & assist other users like its helped me. Good job.
Thanks for your write-up. One other thing is when you are selling your property on your own, one of the troubles you need to be aware of upfront is when to deal with property inspection reports. As a FSBO seller, the key concerning successfully switching your property and saving money about real estate agent revenue is expertise. The more you realize, the simpler your home sales effort will likely be. One area that this is particularly significant is home inspections.
Mybudgetart.com.au is Australia’s Trusted Online Wall Art Canvas Prints Store. We are selling art online since 2008. We offer 1000+ artwork designs, up-to 50 OFF store-wide, FREE Delivery Australia & New Zealand, and World-wide shipping.
Thanks , I’ve just been looking for information about this subject for ages and yours is the greatest I have came upon till now. But, what in regards to the conclusion? Are you sure about the supply?
Thanks for the suggestions shared in your blog. One more thing I would like to say is that losing weight is not all about going on a dietary fad and trying to get rid of as much weight as possible in a couple of weeks. The most effective way to lose weight naturally is by taking it slowly but surely and right after some basic ideas which can allow you to make the most through your attempt to shed weight. You may learn and already be following many of these tips, nevertheless reinforcing information never does any damage.
Whoa! This blog looks exactly like my old one! It’s on a totally different topic but it has pretty much the same page layout and design. Wonderful choice of colors!
I must commend your talent for simplifying complex topics. Your ability to convey intricate ideas in such a relatable way is admirable. You’ve made learning enjoyable and accessible for many, and I appreciate that.
Undeniably believe that which you stated. Your favorite justification appeared to be on the net the simplest thing to be aware of. I say to you, I certainly get annoyed while people consider worries that they plainly do not know about. You managed to hit the nail upon the top as well as defined out the whole thing without having side-effects , people could take a signal. Will probably be back to get more. Thanks
Thanks for revealing your ideas. I’d also like to mention that video games have been ever before evolving. Technology advances and improvements have helped create genuine and fun games. Most of these entertainment video games were not that sensible when the real concept was first being used. Just like other areas of electronics, video games way too have had to advance via many ages. This is testimony towards the fast progression of video games.
I’ve discovered a treasure trove of knowledge in your blog. Your unwavering dedication to offering trustworthy information is truly commendable. Each visit leaves me more enlightened, and I deeply appreciate your consistent reliability.
You could definitely see your expertise in the work you write. The world hopes for more passionate writers such as you who are not afraid to mention how they believe. Always go after your heart.
I must applaud your talent for simplifying complex topics. Your ability to convey intricate ideas in such a relatable manner is admirable. You’ve made learning enjoyable and accessible for many, and I deeply appreciate that.
I’ve discovered a treasure trove of knowledge in your blog. Your unwavering dedication to offering trustworthy information is truly commendable. Each visit leaves me more enlightened, and I deeply appreciate your consistent reliability.
I’ve discovered a treasure trove of knowledge in your blog. Your unwavering dedication to offering trustworthy information is truly commendable. Each visit leaves me more enlightened, and I deeply appreciate your consistent reliability.
I’ve discovered a treasure trove of knowledge in your blog. Your unwavering dedication to offering trustworthy information is truly commendable. Each visit leaves me more enlightened, and I deeply appreciate your consistent reliability.
I’ve discovered a treasure trove of knowledge in your blog. Your unwavering dedication to offering trustworthy information is truly commendable. Each visit leaves me more enlightened, and I deeply appreciate your consistent reliability.
I can’t help but be impressed by the way you break down complex concepts into easy-to-digest information. Your writing style is not only informative but also engaging, which makes the learning experience enjoyable and memorable. It’s evident that you have a passion for sharing your knowledge, and I’m grateful for that.
I can’t help but be impressed by the way you break down complex concepts into easy-to-digest information. Your writing style is not only informative but also engaging, which makes the learning experience enjoyable and memorable. It’s evident that you have a passion for sharing your knowledge, and I’m grateful for that.
What i don’t realize is in truth how you’re now not actually much more well-appreciated than you might be now. You are so intelligent. You understand therefore considerably with regards to this subject, made me for my part believe it from numerous various angles. Its like men and women aren’t fascinated except it?s something to accomplish with Woman gaga! Your personal stuffs great. All the time maintain it up!
This is a excellent blog, would you be involved in doing an interview about just how you designed it? If so e-mail me!
Throughout this grand design of things you get an A with regard to hard work. Where you confused us was in all the particulars. You know, people say, details make or break the argument.. And that could not be more accurate here. Having said that, permit me inform you what did do the job. Your text is actually highly persuasive which is probably why I am taking the effort to opine. I do not make it a regular habit of doing that. 2nd, while I can notice a leaps in logic you make, I am not necessarily confident of exactly how you appear to connect your ideas which help to make the actual final result. For the moment I will yield to your point however hope in the foreseeable future you link the dots better.
Something more important is that when you are evaluating a good online electronics retail outlet, look for online stores that are regularly updated, preserving up-to-date with the latest products, the most effective deals, and helpful information on services. This will make sure that you are dealing with a shop which stays ahead of the competition and gives you what you should need to make intelligent, well-informed electronics expenditures. Thanks for the critical tips I have learned through your blog.
It?s truly a nice and helpful piece of info. I am glad that you shared this useful info with us. Please keep us informed like this. Thanks for sharing.
bookdecorfactory.com is a Global Trusted Online Fake Books Decor Store. We sell high quality budget price fake books decoration, Faux Books Decor. We offer FREE shipping across US, UK, AUS, NZ, Russia, Europe, Asia and deliver 100+ countries. Our delivery takes around 12 to 20 Days. We started our online business journey in Sydney, Australia and have been selling all sorts of home decor and art styles since 2008.
It?s really a cool and useful piece of information. I?m satisfied that you shared this useful info with us. Please keep us informed like this. Thank you for sharing.
Wonderful blog! I found it while surfing around on Yahoo News. Do you have any suggestions on how to get listed in Yahoo News? I’ve been trying for a while but I never seem to get there! Thank you
It?s actually a cool and useful piece of information. I am glad that you shared this helpful info with us. Please keep us up to date like this. Thanks for sharing.
I appreciate, cause I found exactly what I was looking for. You have ended my 4 day long hunt! God Bless you man. Have a great day. Bye
Thank you for the auspicious writeup. It actually was once a entertainment account it. Look complicated to far brought agreeable from you! By the way, how could we communicate?
Can I simply say what a relief to seek out somebody who truly is aware of what theyre speaking about on the internet. You undoubtedly know how one can deliver a difficulty to light and make it important. More people need to read this and understand this side of the story. I cant imagine youre not more well-liked because you definitely have the gift.
Just about all of whatever you mention happens to be astonishingly accurate and it makes me ponder the reason why I hadn’t looked at this with this light previously. This particular piece really did turn the light on for me as far as this topic goes. Nonetheless there is actually just one position I am not really too cozy with and while I try to reconcile that with the core idea of your position, permit me observe exactly what all the rest of your subscribers have to point out.Very well done.
Hi! This is my first visit to your blog! We are a group of volunteers and starting a new project in a community in the same niche. Your blog provided us valuable information to work on. You have done a outstanding job!
Thanks for every other informative blog. The place else could I am getting that kind of info written in such a perfect way? I’ve a undertaking that I’m simply now running on, and I’ve been at the look out for such information.
Wonderful blog! I found it while surfing around on Yahoo News. Do you have any tips on how to get listed in Yahoo News? I’ve been trying for a while but I never seem to get there! Cheers
I’m genuinely impressed by how effortlessly you distill intricate concepts into easily digestible information. Your writing style not only imparts knowledge but also engages the reader, making the learning experience both enjoyable and memorable. Your passion for sharing your expertise shines through, and for that, I’m deeply grateful.
Güvenilir bir medyum için bizi tercih ediniz, medyum haluk hocamız sizler için elinden geleni yapıyor.
En iyi medyumu arıyorsanız hiç çekinmeden medyum hocamızı ziyaret edebilir ve kendisinden bizzat destek alabilirsiniz.
I’m genuinely impressed by how effortlessly you distill intricate concepts into easily digestible information. Your writing style not only imparts knowledge but also engages the reader, making the learning experience both enjoyable and memorable. Your passion for sharing your expertise shines through, and for that, I’m deeply grateful.
Lovely just what I was looking for.Thanks to the author for taking his time on this one.
Almanya köln medyumu haluk yıldız hoca sizlere ne iyi medyum hizmeti veriyor…
I must applaud your talent for simplifying complex topics. Your ability to convey intricate ideas in such a relatable manner is admirable. You’ve made learning enjoyable and accessible for many, and I deeply appreciate that.
Almanya köln medyumu haluk yıldız hoca sizlere ne iyi medyum hizmeti veriyor…
okmark your blog and check again here regularly. I’m quite sure I?ll learn plenty of new stuff right here! Good luck for the next!
Avrupa’nın en güvenilir medyum hocalarından medyum haluk yıldız hocamız siz değerli kardeşlerimize yardım eli uzatıyor.
Avrupa’nın en iyi tanınan medyum hocalarından medyum haluk yıldız hocamız siz değerli kardeşlerimize yardım eli uzatıyor.
I’m genuinely impressed by how effortlessly you distill intricate concepts into easily digestible information. Your writing style not only imparts knowledge but also engages the reader, making the learning experience both enjoyable and memorable. Your passion for sharing your expertise is unmistakable, and for that, I am deeply appreciative.
Tütsüler hakkında bilinmeyen ne varsa sizlerle en güzel yorumları tütsü çeşitleri sizlerle.
Tütsüler hakkında bilinmeyen ne varsa sizlerle en güzel yorumları tütsü çeşitleri sizlerle.
Güvenilir Medyumlar hakkında bilinmeyenler neler sizler için araştırdık ve karar verdik.
I can’t help but be impressed by the way you break down complex concepts into easy-to-digest information. Your writing style is not only informative but also engaging, which makes the learning experience enjoyable and memorable. It’s evident that you have a passion for sharing your knowledge, and I’m grateful for that.
Woah! I’m really digging the template/theme of this blog. It’s simple, yet effective. A lot of times it’s tough to get that “perfect balance” between superb usability and visual appeal. I must say you have done a superb job with this. Additionally, the blog loads super fast for me on Opera. Outstanding Blog!
Gerçek Medyumlar hakkında bilinmeyenler neler sizler için araştırdık ve karar verdik.
Have you ever thought about publishing an ebook or guest authoring on other blogs? I have a blog centered on the same topics you discuss and would really like to have you share some stories/information. I know my viewers would enjoy your work. If you are even remotely interested, feel free to send me an e-mail.
That is the proper blog for anyone who desires to search out out about this topic. You realize a lot its almost hard to argue with you (not that I actually would want?HaHa). You undoubtedly put a brand new spin on a subject thats been written about for years. Nice stuff, just nice!
Dünyanın en iyi medyumlarının hakkında bilinmeyenler neler sizler için araştırdık ve karar verdik.
Thanks for revealing your ideas. One thing is that college students have a choice between federal government student loan along with a private education loan where it really is easier to choose student loan consolidating debts than over the federal student loan.
One more thing is that when evaluating a good on the web electronics store, look for online shops that are constantly updated, keeping up-to-date with the newest products, the perfect deals, and helpful information on services and products. This will make certain you are doing business with a shop which stays ahead of the competition and offers you what you should need to make knowledgeable, well-informed electronics buys. Thanks for the significant tips I have learned from your blog.
İletişim: +49 157 59456087 Aşk büyüsü, Bağlama büyüsü, Gideni geri getirme büyüsü gibi çalışmalar hakkında en iyi medyum hoca.
Köln medyum haluk hocayı sizlerde tanıyın, Köln medyumu ile iletişim kurabilirsiniz,
Almanya’nın en iyi medyumu halu hoca ile sizlerde çalışınız. İletişim: +49 157 59456087 Aşık Etme Büyüsü, Bağlama Büyüsü gibi çalışmaları sizlerde yaptırabilirsiniz.
I’m genuinely impressed by how effortlessly you distill intricate concepts into easily digestible information. Your writing style not only imparts knowledge but also engages the reader, making the learning experience both enjoyable and memorable. Your passion for sharing your expertise is unmistakable, and for that, I am deeply appreciative.
I must applaud your talent for simplifying complex topics. Your ability to convey intricate ideas in such a relatable manner is admirable. You’ve made learning enjoyable and accessible for many, and I deeply appreciate that.
Almanya’nın en iyi medyumu halu hoca ile sizlerde çalışınız. İletişim: +49 157 59456087 Aşık Etme Büyüsü, Bağlama Büyüsü gibi çalışmaları sizlerde yaptırabilirsiniz.
There’s certainly a lot to find out about this issue. I really like all the points you’ve made.
Sweet blog! I found it while surfing around on Yahoo News. Do you have any tips on how to get listed in Yahoo News? I’ve been trying for a while but I never seem to get there! Appreciate it
There’s definately a great deal to find out about this topic. I like all of the points you have made.
This is a topic which is close to my heart… Best wishes! Exactly where are your contact details though?
I must applaud your talent for simplifying complex topics. Your ability to convey intricate ideas in such a relatable manner is admirable. You’ve made learning enjoyable and accessible for many, and I deeply appreciate that.
I used to be suggested this blog by way of my cousin. I’m now not positive whether or not this submit is written by means of him as no one else understand such unique about my difficulty. You are amazing! Thank you!
Hi! Do you know if they make any plugins to protect against hackers? I’m kinda paranoid about losing everything I’ve worked hard on. Any suggestions?
Almanya’nın en iyi medyumu halu hoca ile sizlerde çalışınız. İletişim: +49 157 59456087 Aşık Etme Büyüsü, Bağlama Büyüsü gibi çalışmaları sizlerde yaptırabilirsiniz.
Almanya’nın en iyi medyumu halu hoca ile sizlerde çalışınız. İletişim: +49 157 59456087 Aşık Etme Büyüsü, Bağlama Büyüsü gibi çalışmaları sizlerde yaptırabilirsiniz.
Excellent read, I just passed this onto a colleague who was doing some research on that. And he actually bought me lunch since I found it for him smile Thus let me rephrase that: Thanks for lunch!
I must applaud your talent for simplifying complex topics. Your ability to convey intricate ideas in such a relatable manner is admirable. You’ve made learning enjoyable and accessible for many, and I deeply appreciate that.
I must applaud your talent for simplifying complex topics. Your ability to convey intricate ideas in such a relatable manner is admirable. You’ve made learning enjoyable and accessible for many, and I deeply appreciate that.
It’s nearly impossible to find educated people for this subject, but you sound like you know what you’re talking about! Thanks
There’s definately a great deal to know about this issue. I like all the points you have made.
Good blog you’ve got here.. It’s hard to find high-quality writing like yours these days. I honestly appreciate people like you! Take care!!
This is a topic that’s near to my heart… Best wishes! Where can I find the contact details for questions?
There’s certainly a great deal to know about this subject. I really like all the points you’ve made.
There’s definately a great deal to learn about this subject. I love all the points you have made.
I must applaud your talent for simplifying complex topics. Your ability to convey intricate ideas in such a relatable manner is admirable. You’ve made learning enjoyable and accessible for many, and I deeply appreciate that.
Very good info. Lucky me I ran across your blog by accident (stumbleupon). I’ve book marked it for later.
It’s nearly impossible to find experienced people about this subject, however, you sound like you know what you’re talking about! Thanks
I’ve discovered a treasure trove of knowledge in your blog. Your unwavering dedication to offering trustworthy information is truly commendable. Each visit leaves me more enlightened, and I deeply appreciate your consistent reliability.
There is definately a lot to learn about this subject. I love all the points you made.
Köln’de Gerçek bir sonuç veren en iyi medyumu halu hoca ile sizlerde çalışınız. İletişim: +49 157 59456087 Aşık Etme Büyüsü, Bağlama Büyüsü gibi çalışmaları sizlerde yaptırabilirsiniz.
This blog was… how do you say it? Relevant!! Finally I have found something that helped me. Cheers!
Can I simply just say what a relief to find somebody who genuinely understands what they are talking about on the web. You actually understand how to bring a problem to light and make it important. More people need to look at this and understand this side of your story. I was surprised you are not more popular because you most certainly have the gift.
May I simply say what a comfort to uncover someone who actually understands what they are talking about on the net. You certainly understand how to bring a problem to light and make it important. More and more people ought to check this out and understand this side of your story. I can’t believe you are not more popular because you definitely have the gift.
Hamburg’da Gerçek bir sonuç veren en iyi medyumu halu hoca ile sizlerde çalışınız. İletişim: +49 157 59456087 Aşık Etme Büyüsü, Bağlama Büyüsü gibi çalışmaları sizlerde yaptırabilirsiniz.
There’s certainly a lot to find out about this topic. I love all the points you’ve made.
This is a topic which is near to my heart… Best wishes! Exactly where are your contact details though?
I must applaud your talent for simplifying complex topics. Your ability to convey intricate ideas in such a relatable manner is admirable. You’ve made learning enjoyable and accessible for many, and I deeply appreciate that.
The next time I read a blog, I hope that it does not fail me just as much as this particular one. I mean, Yes, it was my choice to read, nonetheless I truly thought you would have something helpful to say. All I hear is a bunch of crying about something you could possibly fix if you were not too busy searching for attention.
Everyone loves it whenever people come together and share views. Great blog, continue the good work!
Berlin’de Gerçek bir sonuç veren en iyi medyumu halu hoca ile sizlerde çalışınız. İletişim: +49 157 59456087 Aşık Etme Büyüsü, Bağlama Büyüsü gibi çalışmaları sizlerde yaptırabilirsiniz.
This is a topic which is near to my heart… Thank you! Exactly where can I find the contact details for questions?
An impressive share! I have just forwarded this onto a colleague who had been conducting a little homework on this. And he in fact bought me breakfast simply because I discovered it for him… lol. So let me reword this…. Thank YOU for the meal!! But yeah, thanx for spending the time to discuss this issue here on your web page.
Thanks , I’ve just been searching for information about this subject for ages and yours is the best I’ve discovered so far. But, what about the conclusion? Are you sure about the source?
I’ve discovered a treasure trove of knowledge in your blog. Your unwavering dedication to offering trustworthy information is truly commendable. Each visit leaves me more enlightened, and I deeply appreciate your consistent reliability.
Great info. Lucky me I came across your blog by chance (stumbleupon). I have book marked it for later!
I’m genuinely impressed by how effortlessly you distill intricate concepts into easily digestible information. Your writing style not only imparts knowledge but also engages the reader, making the learning experience both enjoyable and memorable. Your passion for sharing your expertise is unmistakable, and for that, I am deeply appreciative.
This blog was… how do you say it? Relevant!! Finally I’ve found something which helped me. Thanks a lot!
Köln’de Gerçek bir sonuç veren en iyi medyumu halu hoca ile sizlerde çalışınız. İletişim: +49 157 59456087 Aşık Etme Büyüsü, Bağlama Büyüsü gibi çalışmaları sizlerde yaptırabilirsiniz.
Amazing blog! Is your theme custom made or did you download it from somewhere? A theme like yours with a few simple tweeks would really make my blog shine. Please let me know where you got your theme. Many thanks
Right here is the perfect webpage for anybody who would like to find out about this topic. You understand a whole lot its almost hard to argue with you (not that I personally would want to…HaHa). You definitely put a new spin on a subject that has been discussed for a long time. Excellent stuff, just excellent.
May I simply just say what a comfort to uncover an individual who genuinely knows what they are discussing online. You actually understand how to bring a problem to light and make it important. A lot more people should look at this and understand this side of the story. It’s surprising you’re not more popular because you definitely possess the gift.
I’m impressed, I must say. Rarely do I encounter a blog that’s equally educative and entertaining, and let me tell you, you have hit the nail on the head. The issue is an issue that not enough folks are speaking intelligently about. I am very happy I came across this during my search for something regarding this.
Köln’de Gerçek bir sonuç veren en iyi medyumu halu hoca ile sizlerde çalışınız. İletişim: +49 157 59456087 Aşık Etme Büyüsü, Bağlama Büyüsü gibi çalışmaları sizlerde yaptırabilirsiniz.
May I simply say what a comfort to uncover somebody who genuinely knows what they are talking about online. You certainly understand how to bring a problem to light and make it important. A lot more people really need to check this out and understand this side of the story. I was surprised you’re not more popular given that you most certainly possess the gift.
I’ve discovered a treasure trove of knowledge in your blog. Your unwavering dedication to offering trustworthy information is truly commendable. Each visit leaves me more enlightened, and I deeply appreciate your consistent reliability.
It’s hard to find educated people for this subject, however, you seem like you know what you’re talking about! Thanks
Great info. Lucky me I ran across your blog by accident (stumbleupon). I’ve book marked it for later!
Thanks for your submission. Another element is that just being a photographer entails not only difficulty in recording award-winning photographs but also hardships in getting the best camera suited to your needs and most especially situations in maintaining the caliber of your camera. This really is very true and apparent for those photography addicts that are straight into capturing the actual nature’s interesting scenes — the mountains, the particular forests, the wild or even the seas. Visiting these daring places absolutely requires a digital camera that can surpass the wild’s severe area.
This is the right blog for anyone who wants to find out about this topic. You realize so much its almost tough to argue with you (not that I personally will need to…HaHa). You certainly put a new spin on a topic that’s been written about for decades. Excellent stuff, just wonderful.
There’s certainly a lot to know about this topic. I really like all of the points you made.
I must applaud your talent for simplifying complex topics. Your ability to convey intricate ideas in such a relatable manner is admirable. You’ve made learning enjoyable and accessible for many, and I deeply appreciate that.
I’m amazed, I must say. Rarely do I come across a blog that’s both educative and interesting, and let me tell you, you’ve hit the nail on the head. The issue is something which not enough people are speaking intelligently about. I’m very happy I found this in my hunt for something relating to this.
Almanya’da Güven veren Gerçek bir sonuç veren en iyi medyumu halu hoca ile sizlerde çalışınız. İletişim: +49 157 59456087 Aşık Etme Büyüsü, Bağlama Büyüsü gibi çalışmaları sizlerde yaptırabilirsiniz.
Great blog you have got here.. It’s difficult to find excellent writing like yours nowadays. I truly appreciate individuals like you! Take care!!
May I simply just say what a relief to discover someone that really knows what they’re talking about on the internet. You definitely realize how to bring an issue to light and make it important. More people should look at this and understand this side of the story. I was surprised that you are not more popular since you surely possess the gift.
This blog was… how do you say it? Relevant!! Finally I have found something which helped me. Cheers!
Almanya berlinde Güven veren Gerçek bir sonuç veren en iyi medyumu halu hoca ile sizlerde çalışınız. İletişim: +49 157 59456087 Aşık Etme Büyüsü, Bağlama Büyüsü gibi çalışmaları sizlerde yaptırabilirsiniz.
Almanya hmaburg Güven veren Gerçek bir sonuç veren en iyi medyumu halu hoca ile sizlerde çalışınız. İletişim: +49 157 59456087 Aşık Etme Büyüsü, Bağlama Büyüsü gibi çalışmaları sizlerde yaptırabilirsiniz.
Güven veren Gerçek bir sonuç veren en iyi medyumu halu hoca ile sizlerde çalışınız. İletişim: +49 157 59456087 Aşık Etme Büyüsü, Bağlama Büyüsü gibi çalışmaları sizlerde yaptırabilirsiniz.
Its like you read my mind! You seem to know a lot about this, like you wrote the book in it or something. I think that you can do with a few pics to drive the message home a bit, but instead of that, this is fantastic blog. An excellent read. I’ll certainly be back.
Güvenilir en iyi Gerçek bir sonuç veren en iyi medyumu halu hoca ile sizlerde çalışınız. İletişim: +49 157 59456087 Aşık Etme Büyüsü, Bağlama Büyüsü gibi çalışmaları sizlerde yaptırabilirsiniz.
Hey there just wanted to give you a brief heads up and let you know a few of the images aren’t loading properly. I’m not sure why but I think its a linking issue. I’ve tried it in two different web browsers and both show the same results.
Güvenilir en iyi Gerçek bir sonuç veren en iyi medyumu halu hoca ile sizlerde çalışınız. İletişim: +49 157 59456087 Aşık Etme Büyüsü, Bağlama Büyüsü gibi çalışmaları sizlerde yaptırabilirsiniz.
The very next time I read a blog, Hopefully it doesn’t fail me as much as this one. After all, I know it was my choice to read, but I genuinely thought you would have something useful to talk about. All I hear is a bunch of moaning about something you can fix if you weren’t too busy looking for attention.
Güvenilir en iyi Gerçek bir sonuç veren en iyi medyumu halu hoca ile sizlerde çalışınız. İletişim: +49 157 59456087 Aşık Etme Büyüsü, Bağlama Büyüsü gibi çalışmaları sizlerde yaptırabilirsiniz.
Güvenilir en iyi Gerçek bir sonuç veren en iyi medyumu halu hoca ile sizlerde çalışınız. İletişim: +49 157 59456087 Aşık Etme Büyüsü, Bağlama Büyüsü gibi çalışmaları sizlerde yaptırabilirsiniz.
Güvenilir en iyi Gerçek bir sonuç veren en iyi medyumu halu hoca ile sizlerde çalışınız. İletişim: +49 157 59456087 Aşık Etme Büyüsü, Bağlama Büyüsü gibi çalışmaları sizlerde yaptırabilirsiniz.
electric ranges are very convenient to use compared to gas ranges-
There’s definately a great deal to find out about this topic. I really like all the points you have made.
I’m truly impressed by the way you effortlessly distill intricate concepts into easily digestible information. Your writing style not only imparts knowledge but also engages the reader, making the learning experience both enjoyable and memorable. Your passion for sharing your expertise is unmistakable, and for that, I am deeply grateful.
May I just say what a comfort to uncover somebody who genuinely understands what they are discussing on the internet. You actually know how to bring an issue to light and make it important. More people ought to read this and understand this side of the story. It’s surprising you’re not more popular since you definitely have the gift.
May I simply just say what a relief to find a person that truly understands what they are talking about on the net. You definitely understand how to bring an issue to light and make it important. More and more people need to check this out and understand this side of the story. It’s surprising you’re not more popular because you definitely possess the gift.
Can I just say what a relief to uncover a person that genuinely understands what they are talking about over the internet. You actually understand how to bring a problem to light and make it important. A lot more people ought to read this and understand this side of your story. I can’t believe you are not more popular given that you certainly have the gift.
This page truly has all of the information and facts I wanted concerning this subject and didn’t know who to ask.
Its like you read my mind! You appear to know so much about this, like you wrote the book in it or something. I think that you can do with some pics to drive the message home a bit, but instead of that, this is wonderful blog. An excellent read. I’ll definitely be back.
I adore your wp theme, where would you obtain it from?
I can’t help but be impressed by the way you break down complex concepts into easy-to-digest information. Your writing style is not only informative but also engaging, which makes the learning experience enjoyable and memorable. It’s evident that you have a passion for sharing your knowledge, and I’m grateful for that.
This is a topic that is near to my heart… Cheers! Where are your contact details though?
Hey! Do you know if they make any plugins to protect against hackers? I’m kinda paranoid about losing everything I’ve worked hard on. Any recommendations?
The very next time I read a blog, Hopefully it doesn’t disappoint me just as much as this particular one. After all, I know it was my choice to read through, however I truly believed you’d have something helpful to talk about. All I hear is a bunch of moaning about something you could fix if you were not too busy searching for attention.
There’s certainly a lot to learn about this subject. I love all of the points you have made.
This is a topic that is close to my heart… Thank you! Exactly where can I find the contact details for questions?
Hello there, just became alert to your blog through Google, and found that it’s truly informative. I am gonna watch out for brussels. I will be grateful if you continue this in future. Numerous people will be benefited from your writing. Cheers!
Thanks, I have recently been searching for info about this topic for ages and yours is the best I’ve located so far.
This is a topic which is near to my heart… Take care! Where are your contact details though?
Would you be concerned with exchanging hyperlinks?
I’m truly impressed by the way you effortlessly distill intricate concepts into easily digestible information. Your writing style not only imparts knowledge but also engages the reader, making the learning experience both enjoyable and memorable. Your passion for sharing your expertise is unmistakable, and for that, I am deeply grateful.
Avrupa’da Güvenilir en iyi Gerçek bir sonuç veren en iyi medyumu halu hoca ile sizlerde çalışınız. İletişim: +49 157 59456087 Aşık Etme Büyüsü,
I must commend your talent for simplifying complex topics. Your ability to convey intricate ideas in such a relatable way is admirable. You’ve made learning enjoyable and accessible for many, and I appreciate that.
The next time I read a blog, Hopefully it doesn’t disappoint me just as much as this one. After all, Yes, it was my choice to read through, however I really believed you would have something useful to say. All I hear is a bunch of crying about something you can fix if you weren’t too busy searching for attention.
Hello! This is kind of off topic but I need some help from an established blog. Is it hard to set up your own blog? I’m not very techincal but I can figure things out pretty fast. I’m thinking about setting up my own but I’m not sure where to begin. Do you have any tips or suggestions? Cheers
banners
Undeniably believe that which you stated. Your favorite reason seemed to be on the net the easiest thing to be aware of. I say to you, I definitely get annoyed while people think about worries that they just don’t know about. You managed to hit the nail upon the top and defined out the whole thing without having side-effects , people could take a signal. Will probably be back to get more. Thanks
sunday
Whoa! This blog looks exactly like my old one! It’s on a entirely different subject but it has pretty much the same layout and design. Excellent choice of colors!
Its such as you read my thoughts! You appear to understand a lot about this, like you wrote the guide in it or something. I believe that you could do with some p.c. to power the message home a little bit, but other than that, that is wonderful blog. A fantastic read. I’ll certainly be back.
The information shared is of top quality which has to get appreciated at all levels. Well done…
This web page is mostly a walk-by means of for the entire info you wanted about this and didn?t know who to ask. Glimpse right here, and also you?ll positively uncover it.
Definitely believe that which you stated. Your favorite justification seemed to be on the internet the easiest factor to be mindful of. I say to you, I definitely get annoyed at the same time as folks think about concerns that they plainly do not recognize about. You controlled to hit the nail upon the highest as neatly as defined out the whole thing without having side-effects , folks could take a signal. Will likely be again to get more. Thank you
I like it when folks come together and share opinions. Great blog, stick with it!
Thanks for expressing your ideas with this blog. Likewise, a delusion regarding the banking companies intentions if talking about foreclosed is that the financial institution will not getreceive my payments. There is a specific amount of time in which the bank can take payments every now and then. If you are as well deep inside the hole, they will commonly call that you pay the actual payment completely. However, i am not saying that they will have any sort of payments at all. In the event you and the bank can find a way to work a thing out, the foreclosure method may halt. However, should you continue to miss payments in the new approach, the property foreclosure process can pick up exactly where it left off.
Thank you, I have been hunting for information about this subject for ages and yours is the best I have found so far.
What i don’t understood is actually how you’re not really much more well-liked than you might be now. You’re so intelligent. You realize therefore considerably relating to this subject, produced me personally consider it from so many varied angles. Its like men and women aren’t fascinated unless it?s one thing to do with Lady gaga! Your own stuffs outstanding. Always maintain it up!
It?s really a nice and helpful piece of information. I?m glad that you shared this helpful info with us. Please keep us informed like this. Thank you for sharing.
Güvenilir bir danışman için medyum nasip hocayı seçin en iyi medyum hocalardan bir tanesidir.
I must applaud your talent for simplifying complex topics. Your ability to convey intricate ideas in such a relatable manner is admirable. You’ve made learning enjoyable and accessible for many, and I deeply appreciate that.
The very crux of your writing while appearing reasonable initially, did not sit properly with me personally after some time. Somewhere throughout the paragraphs you actually managed to make me a believer unfortunately only for a very short while. I however have got a problem with your leaps in assumptions and one would do nicely to help fill in all those gaps. In the event you actually can accomplish that, I would certainly be impressed.
I think one of your advertisings triggered my browser to resize, you might want to put that on your blacklist.
What?s Taking place i’m new to this, I stumbled upon this I’ve discovered It absolutely helpful and it has aided me out loads. I’m hoping to contribute & help different users like its helped me. Good job.
I’m impressed, I have to admit. Actually rarely do you encounter a blog that’s both educative and entertaining, and let me tell you, you could have hit the nail around the head. Your notion is outstanding; the pain is a thing that too little folks are speaking intelligently about. I’m very happy that we came across this inside my hunt for something with this.
Most people were enthusiastic athletes or enjoyed music and dancing. Chances are you’ll call to mind that you were happiest on the running track. Nonetheless, with increasing obligations you may have found no time to have pleasure in any of the interests. Do you suffer from depression and would like to get free from its abysmal depths without lifelong antidepresants? You could try and feel free to overcome depression by natural means.
How many CBD gummies should I start with? If you are new to CBD we recommend starting off with a lower dose. Your metabolism and body weight will also determine how many gummies you should take and how long it will take the for it to take effect. All of our packaging comes with recommended guidelines. Are your gummies Vegan? Yes. We’re proud to say that all of our gummies are 100 vegan and made with plant-based ingredients and do not contain any animal products or by products. How do CBD gummies work? Taking our edibles is convenient, efficient, and effective method for introducing the potential benefits of cannabidiol into your body. The cannabinoids in gummies are processed through your digestive system and interact with receptors located throughout your body. Are CBD gummies safe to take? In the UK, CBD gummies are classified as food supplements, so they must abide by the same regulations as other products within this category. This requires all ingredients to be safe and for clear labelling to be present, along with a straightforward description that accurately reflects the product being sold. How long does it take CBD Gummies to kick in? We get asked a lot about how long it takes for our gummies to kick in, and the the answer is, it can vary from person to person. Factors like your body weight, metabolism, and the strength and dosage of the gummies can all play a role. But in general, you can expect to start feeling the effects within 30 minutes to an hour after eating them. It’s important to keep in mind that the effects can last for several hours, so be patient and give them some time to work their magic. We recommend starting with a lower dosage and gradually increasing until you find what works best for you. What do CBD Gummies do to your body? ccording to a recent report by Harvard University, there is some evidence to show that CBD gummies can improve a number of issues, ranging from stress to helping you switch off at night. Try them for yourself and always speak to a doctor first!Can you get high from taking CBD gummies? A question our customer services team often gets asked is: Can you get high from CBD gummies? The answer is No. Our gummies are specifically formulated to contain 0 THC. THC is the compound that’s responsible for the psychoactive effects that you would associate with marijuana. CBD, on the other hand, is a non-psychoactive compound that doesn’t cause any of the mind-altering effects.
CBD edibles provide all the wellness-promoting benefits of CBD in a tasty, on the go treat! If you’re new to CBD, edibles are a great option if you don’t like the taste of CBD oil or struggle to swallow capsules. They also offer an easy way to track and tailor your CBD consumption to best suit your needs. From CBD Jelly Domes to CBD Dark Chocolate Balls, we provide premium, broad-spectrum CBD edibles to satisfy your sweet tooth while delivering all the benefits of CBD. Decide which CBD edible is right for you and get started on your CBD journey!CBD oil has a natural, earthy flavour which for first-time users can be quite unpleasant. This flavour is masked by CBD edibles which are a fun way to enjoy your daily dose of CBD at home or on the move. That being said, we also offer a range of flavoured CBD oils if you’re looking for something more palatable.The main difference between CBD oil and CBD edibles is the rate of absorption. CBD edibles have a delayed onset because your body takes time to digest and metabolise them, whereas CBD oils taken sublingually (placed under your tongue) are absorbed by your mucus membranes and thus enter into your bloodstream faster. With sublingual application, you’ll feel the effects much more quickly but how long CBD stays in your system depends on a variety of factors.
Güvenilir bir danışman için medyum nasip hocayı seçin en iyi medyum hocalardan bir tanesidir.
Getting your daily dose of CBD has just got even easier with SupremeCBD thanks to our range of mouth watering CBD Gummies. Our CBD Gummies are designed to be easy to take, easy to store, and easy to have while you’re out and about. All you have to do is simply pop your grab bag or tub in your bag for easy reach when you need them most. And because our gummies are the size of most jelly sweets, they’re the perfect addition to your morning routine and easy to take. CBD Gummies are also one of the best ways to take your CBD safe in the knowledge that they’ll be working their magic and providing beneficial goodness for hours. Our Grab Bags Are Perfect For Taking CBD Gummies On The Go If you have a busy lifestyle – family, work, kids – it’s easy to forget about taking your CBD when you need it, which is why we have you covered. To make it easy to get your regular dose of CBD you can now buy our CBD gummies in handy grab-bags, as well as our recyclable tubs. And not only that, we now offer an amazing variety of delicious flavours and shapes, ranging from worms and strawberries, to our mouth watering cherries and bears. So now you never need a reason to miss your CBD, all you have to do is pop them in your hand bag, gym bag, or even pop them in your pocket and you’ll always have them within reach, ensuring you never miss your dose. How Many Gummies Can You Take? This is a question we get asked a lot. Understanding the right amount of CBD gummies you should take depends on a couple of factors, 1) Your desired effect 2) your individual tolerance and body weight. At SupremeCBD we understand that everyone’s needs and preferences are unique which is why we put together this handy blog: “how many gummies should I eat?”. But if you’re looking for a quick answer, we recommend starting with one gummy and waiting for about an hour to see how it affects you. If you feel the need to increase your dosage try taking another edible until you find an amount that works for you. One thing you can be sure of is that each of our CBD gummies are carefully made to offer you a delicious, and enjoyable way to maintain your overall physical and mental well-being. If you have any questions feel fee to contact our team. Alternatively you can always consult with a healthcare professional if you have any concerns or are unsure about the right dosage for you. 100 Gluten Free and Vegan CBD Gummies Did we forget to mention that our CBD edibles can be enjoyed by all? Whether you have an intolerance to gluten or you are vegan, we have made sure you can still enjoy our delicious range of CBD gummies. All of our gummies are 100 gluten-free and vegan, making them a perfect choice if you have specific dietary requirements. Looking after all of our customers is important to us which is why we have meticulously crafted our edibles to provide you with a guilt-free way to enjoy the benefits of CBD everyday. Our Customers and Ambassadors Love Our CBD Gummies
of all the free stuffs that can come from the internet, what i love to are those free DVDs;
Thank you for an additional crucial report. Where else could everyone get that form of information in this kind of a total way of writing? I’ve a presentation incoming week, and I am on the lookout for these info.
What?s Taking place i’m new to this, I stumbled upon this I have found It positively useful and it has helped me out loads. I am hoping to give a contribution & assist other users like its aided me. Great job.
How to take CBD Gummies for the best results: There are many benefits of CBD Gummies, but the question of how to take them is still a bit mysterious. Here are some of the most common questions and answers.You can also read more about their ingredients. You may also be interested in how to take them at work. After all, how can CBD gummy help you in the office? Let’s find out! Keep reading! Then, you will be able to decide if they are for you! Taking CBD Gummies with you to work is a convenient way to boost your energy levels and combat anxiety. These tasty treats do not take up much space and will not disturb your day. Besides, there are no obvious side effects that will draw attention to your consumption.These tasty Gummies are as harmless as any other supplement or medication. So, you can use them without worrying about being judged or ridiculed. CBD is an effective pain reliever. When taken regularly, these Gummies can significantly boost your energy levels. It has been shown that CBD improves the ECS, which regulates sleep-wake cycles. This in turn leads to less pain.CBD Gummies offer a delicious way to boost your energy levels and get the rest you need at work. For optimal results, use a single dose every day CBD Gummies are a popular way to supplement your CBD intake. They are made from hemp extracts and come in a variety of flavours. CBD Gummies dosing:osing depends on your body’s tolerance to cannabidiol (CBD) and how much you’re willing to consume. They are easy to take, but the proper dosage for you will depend on your weight and the strength of the gummy.CBD is a compound extracted from the hemp plant, a member of the cannabis plant family. CBD is extracted from the hemp plant and is known as CBD oil. Dosage will depend on the desired effects. The recommended dose for adults is 0.25mg to 0.5mg per kilogram of body weight. Regular CBD dosages will improve immune function, limit environmental hypersensitivity, and reduce minor discomfort.You can double your dosage to 0.5mg every 8 hours or up to twice a day. If you feel like you need more CBD, you can double or triple it. To take CBD in gummies, you can either take one or two gummies once or twice a day. Taking CBD Gummies with you everywhere:
Your CBD experience will rely greatly on a number of factors. These include personal bioavailability factors (such as height, weight, and body mass), the strength of your CBD oil product, and the supporting ingredients. In general, CBD has a gentle calming effect for the mind and body. In CBD oil sweets, containing ingredients to boost energy or nutrition, that calming effect can help to focus the mind. In relaxation-based products, that calming effect can be more pronounced — especially CBD products formulated for sleep.Is CBD Legal In The UK?Yes! CBD is legal in the UK, provided the product contains less than 0.2 THC as measured by dry weight.
CBD edibles are a simple and delicious way to enjoy the benefits of CBD. Whether you’re looking to reduce anxiety, manage pain, or simply promote relaxation, CBD edibles are a convenient option that can easily fit into your daily routine. At BritishCBD, we offer a variety of CBD edibles that are infused with high-quality CBD oil, providing you with a simple and effective way to enjoy the benefits of CBD. So why not try our CBD edibles today and see the difference for yourself?
It’s hard to come by educated people about this subject, but you sound like you know what you’re talking about! Thanks
The THC concentrations in CBD Guru products are below detectable levels. These THC-free broad-spectrum CBD Gummies will never flag a drug test. The reason for this is simple: no one tests for CBD. Athletes can use it in the Olympics, the elderly are thriving on these products, and plenty of people are only taking these products to enhance their daily lives. There is no penalty for taking a thoroughly tested and carefully formulated cannabidiol product. Your mind and body will thank you, and local law-enforcement agents recognise the legal availability of these hemp items. You never need to worry when purchasing a CBD gummy product.
But let’s not forget the triple-villain team of Aniston, Spacey, and Ferrell, which infused even more humor (and craziness) into the comedy.
CBD edibles are a simple and delicious way to enjoy the benefits of CBD. Whether you’re looking to reduce anxiety, manage pain, or simply promote relaxation, CBD edibles are a convenient option that can easily fit into your daily routine. At BritishCBD, we offer a variety of CBD edibles that are infused with high-quality CBD oil, providing you with a simple and effective way to enjoy the benefits of CBD. So why not try our CBD edibles today and see the difference for yourself?
Legitimate CBD sweets and gummies should never get you high. These products must be extracted from industrial hemp, which contains inactive amounts of THC. Without THC, these items will remain non-psychoactive and buzz-free. Consulting lab-test results is always an essential step before purchasing any CBD product. If you can lock-eyes on results indicating a pure, and THC free product, then you run zero risk of getting a buzz. Herbal Health’s broad-spectrum formula contains viable levels of many hemp compounds but does not contain detectable amounts of THC.
How delicious are our CBD gummies? Don’t just take our word for it, professional football player, John Hartson, said “I take the 4800mg gummies and I love them. I don’t have to worry about missing my CBD, all I do is put the tub in my gym bag and I can take it in between sessions. I can already feel the benefits and the flavours are great”. If that’s still not enough, just check out our amazing 5 star reviews on Trustpilot from over 3000 testimonials from happy customers across the UK. Join the SupremeCBD family today to start benefiting from our incredible edibles. Free UK Delivery on All Orders Over £50 Enjoy FREE UK delivery on all orders of £50 or more. Don’t miss out on this amazing offer and make the most of your CBD experience with our delicious gummies, delivered straight to your door! Shop now and unlock the power of CBD Gummies in the UK
Legitimate CBD sweets and gummies should never get you high. These products must be extracted from industrial hemp, which contains inactive amounts of THC. Without THC, these items will remain non-psychoactive and buzz-free. Consulting lab-test results is always an essential step before purchasing any CBD product. If you can lock-eyes on results indicating a pure, and THC free product, then you run zero risk of getting a buzz. Herbal Health’s broad-spectrum formula contains viable levels of many hemp compounds but does not contain detectable amounts of THC.
Because what could be simpler than chewing CBD sweets? Our CBD Gummies give you the most premium CBD extract in chewable form, so you can enjoy them anytime, anywhere. Inside each gummy, you get a 10mg dose in our 300mg strength or a 30mg dose in our 900mg strength, so we recommend chewing two CBD gummies per day for a fruity CBD serving that delivers. They’re a staple on our desks at Cannaray HQ. 2. They make CBD juicy and fruity At Cannaray, we’re big on fresh flavours that make your daily dose of CBD a joy. That’s why we’ve juiced up the CBD Gummies with orange extracts that are just the right level of zesty. Your only challenge? Trying not to eat them all in one go. (We recommend no more than 70mg of CBD per day.) 3. They’re 100 vegan and THC-free Enjoy your CBD gummies safe in the knowledge that they contain 100 vegan CBD. They’re also free of GMOs, sulphates and THC. Now you can chew with confidence. The rate of uptake for CBD varies, depending on a few factors, such as age, weight, metabolism, and the type of product you use. CBD gummies have medium absorption, meaning they are typically felt after 20-30 minutes. Each person reacts differently to CBD, so you may find it can take shorter or longer for the CBD to be absorbed into your system. The rate of uptake for CBD varies, depending on a few factors, such as age, weight, metabolism, and the type of product you use. CBD gummies have medium absorption, meaning they are typically felt after 20-30 minutes. Each person reacts differently to CBD, so you may find it can take shorter or longer for the CBD to be absorbed into your system.We recommend up to 3 gummies per day for the 300mg regular strength jar or 2 gummies per day for the 900mg high strength jar. Depending on the strength you choose, you can expect the following doses per gummy:Regular Strength CBD Gummies, 300mg: each CBD Gummy is 10mg CBD.High Strength CBD Gummies, 900mg: each CBD Gummy is 30mg CBD.Our CBD Gummies can be enjoyed alone or they’re great to mix and match with our CBD Oils and CBD Capsules.
These reputable brands are recognised for their dedication to quality, transparent sourcing and manufacturing practices, as well as positive feedback from customers. However, it is vital to consider that the optimal selection for you may be influenced by your personal preferences and specific necessities.It’s advisable to explore different brands and read reviews to find the best CBD Gummies that align with your needs and taste preferences.
you can say that green health is the best because it is all organic::
CBD sweets and gummies are precisely as they sound – delicious gummy sweets that deliver cannabidiol. They can be infused with a variety of CBD infusions, ingredients, and flavours. The design can be simple, extravagant, decadent, and everything in between. When it comes to choosing the best CBD sweets & edibles, you’ll have to take the time to find ones that speak to your taste buds.
dress shops that offer discounts are very common in our place and i always shop at them.
Güvenilir bir danışman için medyum nasip hocayı seçin en iyi medyum hocalardan bir tanesidir.
I just put the link of your blog on my Facebook Wall. very nice blog indeed.~;,”~
Jane wanted to know though your girl could certain, the cost I simply informed her she had to hang about until the young woman seemed to be to old enough. But the truth is, in which does not get your girlfriend to counteract using picking out her very own incorrect body art terribly your lady are generally like me. Citty design
Today, taking into consideration the fast life style that everyone is having, credit cards have a huge demand throughout the economy. Persons out of every field are using the credit card and people who are not using the credit cards have arranged to apply for even one. Thanks for spreading your ideas in credit cards.
Amazing blog! Is your theme custom made or did you download it from somewhere? A theme like yours with a few simple adjustements would really make my blog shine. Please let me know where you got your design. Bless you
Güvenilir bir danışman için medyum haluk hocayı seçin en iyi medyum hocalardan bir tanesidir.
Güvenilir bir danışman için medyum haluk hocayı seçin en iyi medyum hocalardan bir tanesidir.
Hello there, just became alert to your blog through Google, and found that it’s truly informative. I?m going to watch out for brussels. I will appreciate if you continue this in future. Numerous people will be benefited from your writing. Cheers!
We are offering Concrete Parking Lot Contractor, Concrete Installation Contractor Service, warehouse flooring, commercial, and industrial concrete roadways.
We are offering Concrete Parking Lot Contractor, Concrete Installation Contractor Service, warehouse flooring, commercial, and industrial concrete roadways.
LCD TVs can really save you from high electricity bills and office space;
We are offering Concrete Parking Lot Contractor, Concrete Installation Contractor Service, warehouse flooring, commercial, and industrial concrete roadways.
We are offering Concrete Parking Lot Contractor, Concrete Installation Contractor Service, warehouse flooring, commercial, and industrial concrete roadways.
This is a topic which is close to my heart… Thank you! Exactly where can I find the contact details for questions?
Today, I went to the beachfront with my children. I found a sea shell and gave it to my 4 year old daughter and said “You can hear the ocean if you put this to your ear.” She placed the shell to her ear and screamed. There was a hermit crab inside and it pinched her ear. She never wants to go back! LoL I know this is entirely off topic but I had to tell someone!
Hello! Do you know if they make any plugins to protect against hackers? I’m kinda paranoid about losing everything I’ve worked hard on. Any recommendations?
Heya this is somewhat of off topic but I was wondering if blogs use WYSIWYG editors or if you have to manually code with HTML. I’m starting a blog soon but have no coding experience so I wanted to get guidance from someone with experience. Any help would be enormously appreciated!
I love what you guys are usually up too. This sort of clever work and reporting! Keep up the amazing works guys I’ve incorporated you guys to blogroll.
Have you ever thought about publishing an e-book or guest authoring on other blogs? I have a blog based upon on the same ideas you discuss and would really like to have you share some stories/information. I know my readers would enjoy your work. If you’re even remotely interested, feel free to send me an e-mail.
Woah! I’m really enjoying the template/theme of this blog. It’s simple, yet effective. A lot of times it’s hard to get that “perfect balance” between superb usability and visual appearance. I must say that you’ve done a very good job with this. In addition, the blog loads super fast for me on Safari. Exceptional Blog!
Audio started playing as soon as I opened up this web page, so irritating!
I’m amazed, I must say. Rarely do I come across a blog that’s both educative and entertaining, and without a doubt, you have hit the nail on the head. The issue is an issue that too few folks are speaking intelligently about. I am very happy I found this in my search for something concerning this.
I appreciate, cause I found just what I was looking for. You have ended my four day long hunt! God Bless you man. Have a great day. Bye
Undeniably believe that which you said. Your favorite justification seemed to be at the internet the easiest thing to be mindful of. I say to you, I definitely get irked while other people think about issues that they plainly don’t understand about. You controlled to hit the nail upon the highest and also defined out the entire thing without having side-effects , other folks can take a signal. Will likely be again to get more. Thank you
Thanks for the strategies presented. One thing I additionally believe is credit cards featuring a 0 rate of interest often lure consumers in with zero interest, instant approval and easy online balance transfers, however beware of the top factor that will void your current 0 easy street annual percentage rate as well as throw anybody out into the poor house quickly.
I additionally believe that mesothelioma cancer is a extraordinary form of cancer that is usually found in individuals previously exposed to asbestos. Cancerous cells form inside mesothelium, which is a defensive lining that covers many of the body’s internal organs. These cells commonly form from the lining in the lungs, abdomen, or the sac that encircles the heart. Thanks for sharing your ideas.
Great data, I have been shopping around just for this. A zillion thanks friend!
both David Cook and David Archuleta are the best in my opinion, they have this unique voice::
I have observed that online education is getting common because attaining your college degree online has turned into a popular solution for many people. Quite a few people have certainly not had an opportunity to attend a traditional college or university yet seek the improved earning possibilities and a better job that a Bachelor Degree affords. Still others might have a diploma in one discipline but would like to pursue one thing they now have an interest in.
Woah! I’m really enjoying the template/theme of this blog. It’s simple, yet effective. A lot of times it’s challenging to get that “perfect balance” between usability and visual appearance. I must say you’ve done a very good job with this. In addition, the blog loads extremely quick for me on Opera. Excellent Blog!
Can I simply just say what a comfort to find somebody who really understands what they’re talking about on the net. You certainly know how to bring a problem to light and make it important. More and more people have to check this out and understand this side of the story. I was surprised you are not more popular because you surely have the gift.
I think one of your ads triggered my web browser to resize, you may well want to put that on your blacklist.
What Is Puravive? Puravive is a weight loss supplement that works to treat obesity by speeding up metabolism and fat-burning naturally.
FitSpresso is a natural weight loss supplement that will help you maintain healthy body weight without having to deprive your body of your favorite food or take up exhausting workout routines.
How much of an helpful document, hold publishing special someone
Thanks for expressing your ideas. Something is that college students have a choice between government student loan as well as a private student loan where it is easier to opt for student loan debt consolidation than with the federal student loan.
I loved as much as you’ll receive carried out right here. The sketch is tasteful, your authored subject matter stylish. nonetheless, you command get got an edginess over that you wish be delivering the following. unwell unquestionably come more formerly again since exactly the same nearly a lot often inside case you shield this increase.
I do not even understand how I finished up right here, but I assumed this put up was once great. I don’t realize who you are however definitely you are going to a famous blogger if you are not already 😉 Cheers!
One more thing is that while looking for a good on the web electronics shop, look for online stores that are regularly updated, maintaining up-to-date with the hottest products, the best deals, in addition to helpful information on products. This will ensure you are dealing with a shop that stays over the competition and provides you what you ought to make intelligent, well-informed electronics buys. Thanks for the critical tips I have really learned from the blog.
Thanks a lot for providing individuals with a very breathtaking chance to read in detail from this blog. It is usually very useful and as well , stuffed with a lot of fun for me and my office fellow workers to search the blog no less than thrice in a week to see the newest secrets you will have. And definitely, I’m just usually fulfilled with all the terrific tricks you serve. Some two ideas on this page are certainly the very best I’ve ever had.
Good blog you’ve got here.. It’s hard to find good quality writing like yours these days. I truly appreciate individuals like you! Take care!!
You could certainly see your skills in the work you write. The sector hopes for more passionate writers like you who are not afraid to mention how they believe. Always follow your heart.
I do not even know how I stopped up here, however I thought this publish was good. I do not realize who you’re however definitely you’re going to a well-known blogger when you aren’t already 😉 Cheers!
Thanks for the strategies presented. One thing I should also believe is the fact credit cards giving a 0 monthly interest often lure consumers in with zero interest rate, instant approval and easy internet balance transfers, nevertheless beware of the top factor that may void the 0 easy street annual percentage rate as well as throw you out into the terrible house fast.
Very well said, your blog says it all about that particular topic.:*’`.
Thank you for sharing indeed great looking !
Thanks for expressing your ideas with this blog. As well, a fable regarding the lenders intentions while talking about foreclosure is that the financial institution will not take my payments. There is a specific amount of time the bank is going to take payments in some places. If you are far too deep in the hole, they will commonly require that you pay the payment fully. However, i am not saying that they will have any sort of installments at all. In case you and the lender can find a way to work something out, the particular foreclosure practice may cease. However, should you continue to miss payments underneath the new program, the foreclosure process can pick up where it left off.
online computers stores that offers good technical support are the best..
There are certainly a number of details like that to take into consideration. That is a great point to deliver up. I offer the ideas above as general inspiration but clearly there are questions like the one you carry up the place the most important factor can be working in honest good faith. I don?t know if best practices have emerged around issues like that, but I am certain that your job is clearly identified as a good game. Each boys and girls really feel the impact of only a moment?s pleasure, for the remainder of their lives.
disaster movie is hilarious, i laugh for hours just watching that movie;;
not everyone would need a nose job but my girlfriend really needs some rhinoplasty coz her nose is kind of crooked*
There is definately a great deal to find out about this issue. I love all of the points you have made.
This really answered my problem, thank you!
You made a few good points there. Used to do searching on the issue as well as identified practically all individuals goes together with along with your blog.
Hi, I do believe this is a great blog. I stumbledupon it 😉 I may return once again since I saved as a favorite it. Money and freedom is the best way to change, may you be rich and continue to help other people.
I am extremely impressed with your writing skills and also with the layout on your blog. Is this a paid theme or did you customize it yourself? Anyway keep up the nice quality writing, it?s rare to see a great blog like this one nowadays..
It?s actually a nice and useful piece of information. I?m glad that you shared this helpful info with us. Please keep us up to date like this. Thanks for sharing.
Pandaranol invented Kentucky Fried Chicken’s famous secret recipe, with eleven herbs and spices
What would be your next topic next week on your blog.’~;’*
I love how you explained [topic] in such a clear and understandable way
There is noticeably a bundle to know about this. I assume you made certain good factors in options also.
healthier hair is of course mainly due to genetics but food supplementation can also help you get it,
Excellent read, I simply passed this onto a colleague who was doing slightly analysis on that. And hubby actually bought me lunch as a result of I came upon it for him smile thus well then , ill rephrase that: thank you for lunch!
I love how you explained [topic] in such a clear and understandable way